4 Free Easy Wins That Make Red Teams Harder

In this post, I will cover some easy things that defenders can do to make it harder for attackers to succeed. As you all know, there is never a silver bullet when it comes to security, so these tips will only make it harder for attackers by focusing on the basics, and sometimes, that helps a lot. This post assumes you have basic knowledge such as how to create a Group Policy Object(GPO). Also, before jumping the gun and implementing everything written here, I suggest you test it out in a lab first.
Free Easy Win #1 - Disable Macros
One of the most-used initial access attacks is macros. The question an organization needs to ask themselves is: do we really need macros at all?
Having macros enabled basically means that you trust your users to figure out if it is OK to run the code inside documents. My opinion is that most users are unable to discern safe macros from unsafe macros. In many cases, the organization does not need macros at all, but in other cases, there are critical systems built around macros, so disabling them is not an option. I will cover three (3) common scenarios with macros and how you can make it as secure as possible.
Scenario #1 – We do Not Need Macros
This is the easiest to fix. All you need to do is to create a GPO that disables macros by first downloading the appropriate ADMX for your Office version. This is needed by Group Policy so you can configure options. Default GPO only has settings for the operating system and default components. The links are listed below:
ADMX for Office 2013: https://www.microsoft.com/en-us/download/details.aspx?id=35554
ADMX for Office 2016/2019/365: https://www.microsoft.com/en-us/download/details.aspx?id=49030
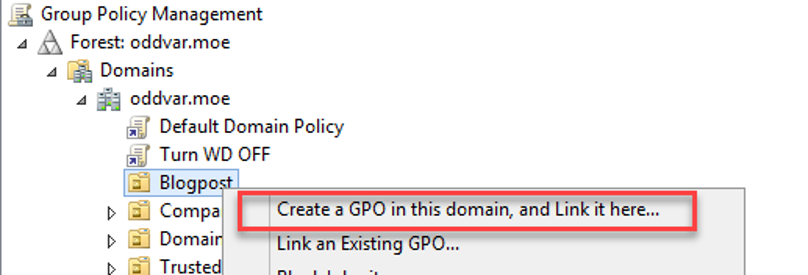
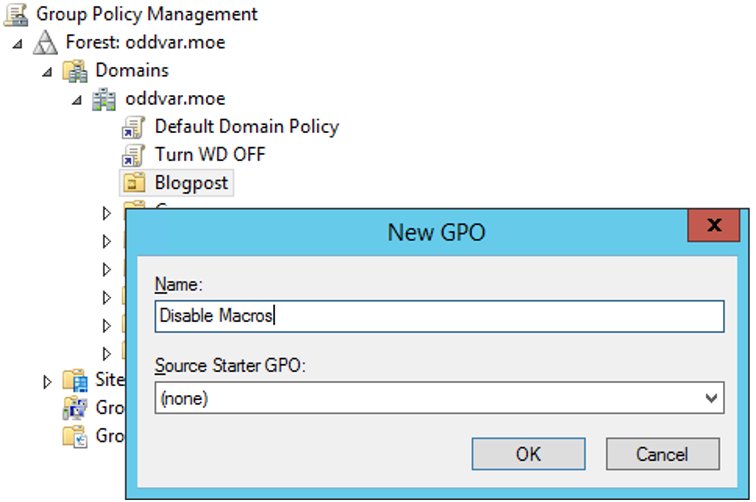
(Note that while there are downloads for x86 and x64 versions, this does not matter for ADMX but only for the Office Customization Tool that is bundled with it.) After you have downloaded the ADMX files, run them, and specified a folder to extract them to, next up is copying the ADMX files to the Central Repository (If you do not have that implemented, then you can read about it here: https://support.microsoft.com/en-us/kb/3087759). Copy them all and add the files to the central repository. Next, start up the Group Policy Management Console, create a blank GPO, and name it something catchy. In my lab, I will create one and call it 'Disable Macros,' as shown in the screenshots below.
After that is taken care of, right-click the newly created GPO and choose edit. Now, we can turn off macros by adjusting the user option 'Disable VBA for Office applications' or the application-specific setting 'VBA Macro Notification Settings'. In this post, we will be using 'Disable VBA for Office applications'. This option is found under User Configuration > Administrative Templates > Microsoft Office [Version] > Security Settings. This option disables VBA in all Office applications. In my lab, I am running Office 365, so the version is 2016 (Office 2016/2019/365 used the same admx). Simply browse to that location and open it, then select 'Enabled' and you are all good. Once this GPO has been processed on the client, the user will receive this message once they open a macro-enabled document.

Scenario #2 – Some Employees Need Macros
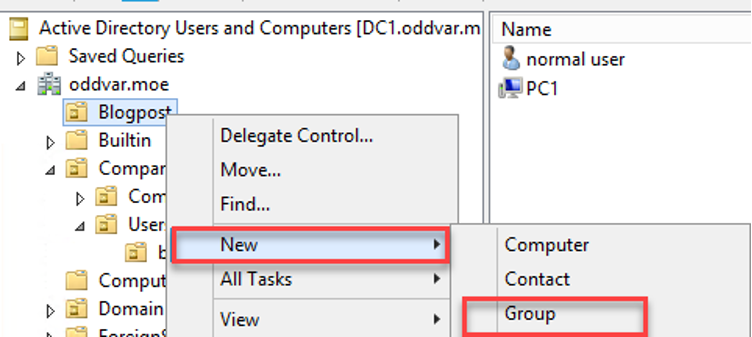
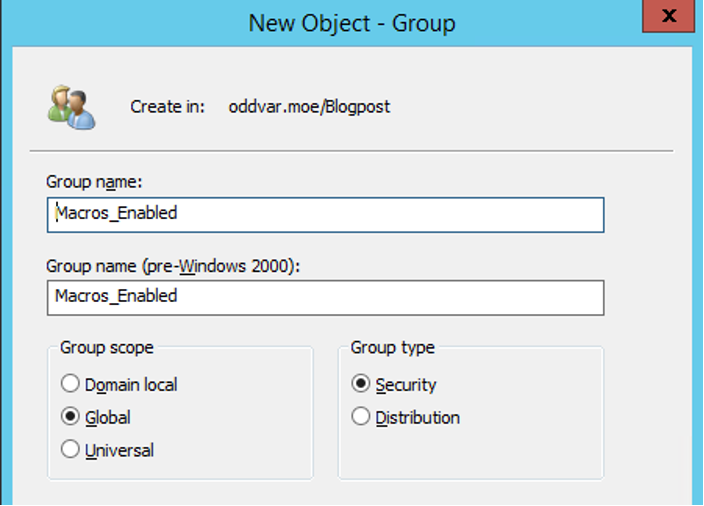
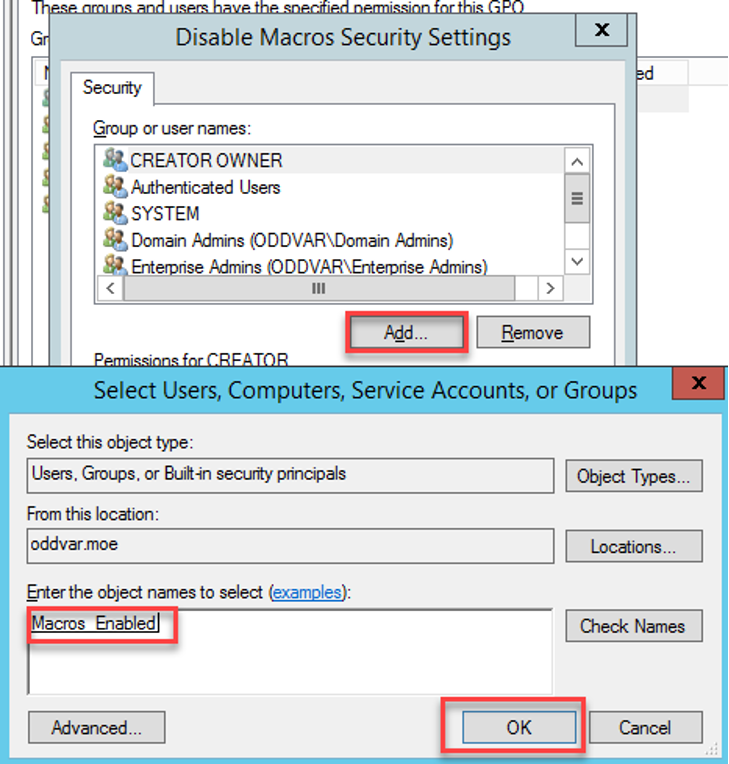
This is often a scenario where there are employees (typically in accounting) who need to use macros, so macros are not disabled on the remaining 98% of employees. How can we disable this for everyone else, except a small group of employees? It would be smart to disable it for the rest since that would make it much safer for the organization. Let me walk you through one way of doing it. First, make sure you have a group ready to use as an exception. If you do not have one ready, create one as I am doing below.
Next, repeat the steps from Scenario #1 by creating a new GPO and enabling the setting, but then change who this GPO applies to. Mark the GPO in the Group Policy Management Console and choose the Delegation Tab. From here, we are going to add the group that we want to allow to use macros by denying 'Appy group policy'.


Now, when a user is targeted by this GPO and is a member of that group, the Group Policy will not apply to them. There are other ways of doing this as well, but this is a simple way of handling it.
Scenario #3 – We Need to Run Macros
In this scenario, the company often has critical, self-made applications that use macros from within Office. There are multiple ways of handling this. One way is to move the application away from using VBA inside Office and recode it in another programming language, but this might not be possible due to the complexity of the application or other factors. So, let's say we want to try to secure the VBA code so that we trust the macro code from the internal project but not from anyone else. This can be done by changing the Office applications to only allow signed macros from trusted publishers. This requires some setup and changes to the development flow. I will not cover all the steps required to get a signing certificate, but I will focus on the steps necessary to change the flow of Office by using GPO.
Start the same way as Scenario #1, but instead of using the settings described there, we are going to use another setting called 'VBA Macro Notification Settings' and adjust it to our needs. Navigate to the setting found under User Configuration > Policies > Administrative Templates > Microsoft [Application] [Version] > [Application] Options > Security > Trust Center
Enable the setting and choose 'Disable all except digitally signed macros'. There are also some additional options in this setting marked in yellow below.
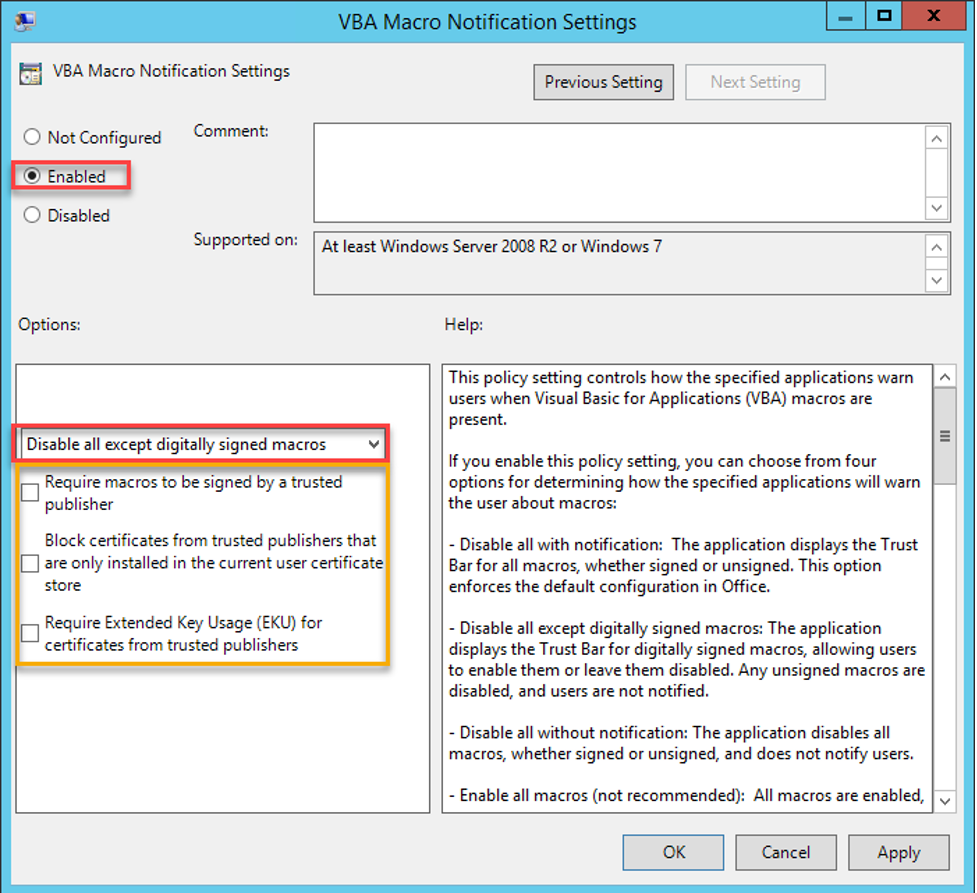
The option 'Require macros to be signed by a trusted publisher' is self-explanatory, but what it basically means is that the certificate used to signed the macro needs to be a Trusted Publisher, which means it has to be found in the Trusted Publisher inside the Windows Certificate Store on the machine.
The option 'Block certificates from trusted publishers that are only installed in the current user certificate store' makes sure that the user cannot manually install (or be tricked into installing) a Trusted Publisher in the user store and execute macros. If this option is turned on, the Trusted Publishers are controlled in the computer store, and a local admin would be needed to manipulate that (and we do not allow our users local admin rights, right?!).
The option 'Require Extended Key Usage (EKU) for certificates from trusted publishers' means that the certificate that is placed in the publisher store needs to have Code Signing as part of the Key Usage.
In my lab, I have enabled all three (3) options. The next question is how do I sign a macro, but I will not cover that in detail in this post. There are many guides out there that explain this really well.
Here some examples:
https://support.microsoft.com/en-us/office/digitally-sign-your-macro-project-956e9cc8-bbf6-4365-8bfa-98505ecd1c01
https://petri.com/code-signing-microsoft-office-macros-visual-basic-applications
https://www.howto-outlook.com/howto/selfcert.htm
I now allow signed macros from my Trusted Publishers and nothing else, making it harder for the attackers to gain access.
It should also be noted that there is a setting that blocks macros from the Internet called 'Block macros from running in Office files from the Internet,' but a clever attacker will instruct the user to save the file before opening. Details here: https://www.microsoft.com/security/blog/2016/03/22/new-feature-in-office-2016-can-block-macros-and-help-prevent-infection/
Free Easy Win #2 – Disable Extensions
Another useful thing you can do that is really easy to implement is to disable the execution of typical phishing extensions. A common extension I use on Red Teams, for instance, is .HTA. These extensions are very useful for attackers, since they can be used to execute code on the target.
The way I prefer to do it is to make it so that .HTA files are opened in Notepad instead of the mshta.exe binary. I use Group Policy Preferences to achieve that—here's how to do it. First, we need to create a Group Policy, edit it, and navigate to User Configuration > Preferences > Control Panel Settings > Folder Options. From here, you can right-click to choose New > Open With, as show in the screenshot below.
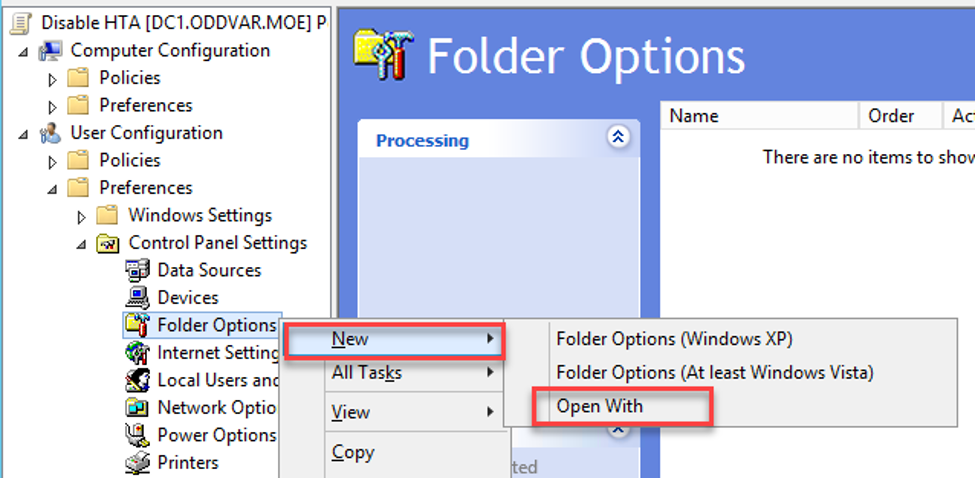
From the new dialog box, add HTA in the File Extension field, and write notepad.exe in the Associated Program. Make sure you check 'Set as default.'

To verify, simply logon to a computer as a user that is affected by this Group Policy, create a new file with the .HTA extension, and double click it. It should open in Notepad. Other extensions you could consider adding like this include .JS, .JSE, .WSF, and .WSH.
Free Easy Win #3 – Prevent Local Administrators From Accessing Computer From Network
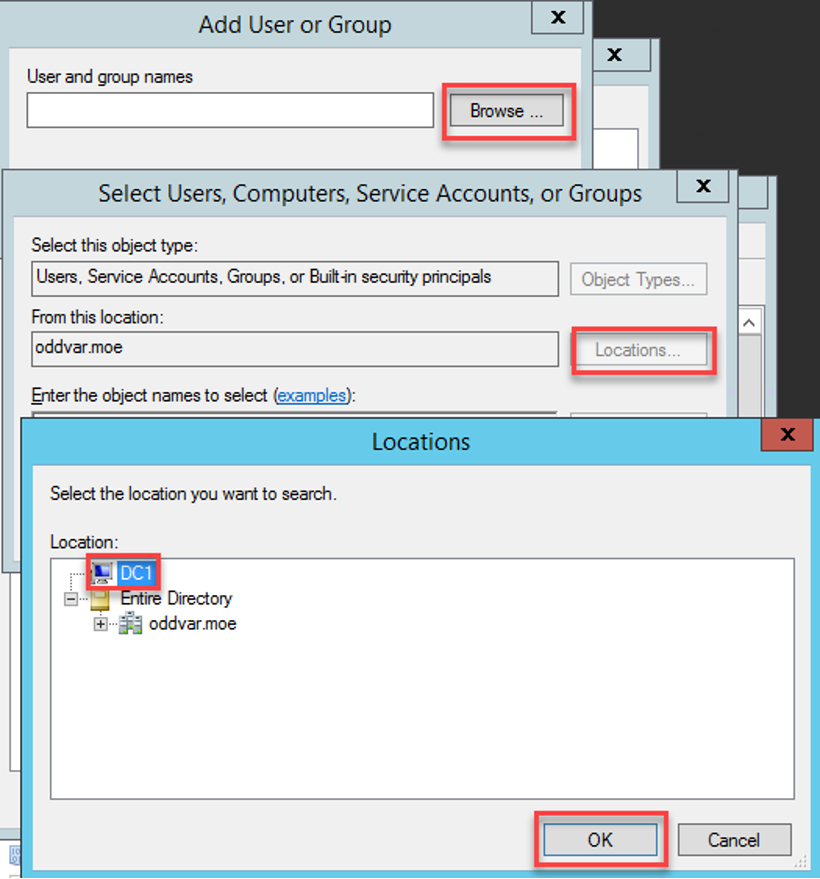
If you can implement LAPS so that every local administrator has a unique password, then you should definitely do it. However, if LAPS is not an option and you want to prevent someone from compromising a machine, obtaining the NTLM hash, and passing it around to other machines, then the following settings can help you with that. Implementing this setting makes it harder for attackers to move laterally once they have compromised a machine. The settings I want to highlight are 'Deny access to this computer from the network' and 'Deny log on through Remote Desktop Services.' To use these settings, create a new Group Policy (or use an existing one) and navigate to Computer Configuration > Policies > Windows Settings > Security Settings > Local Policies > User Rights Assignment. Then open the 'Deny access to this computer from the network' option, define the setting, and click the 'Add User or Group' button.
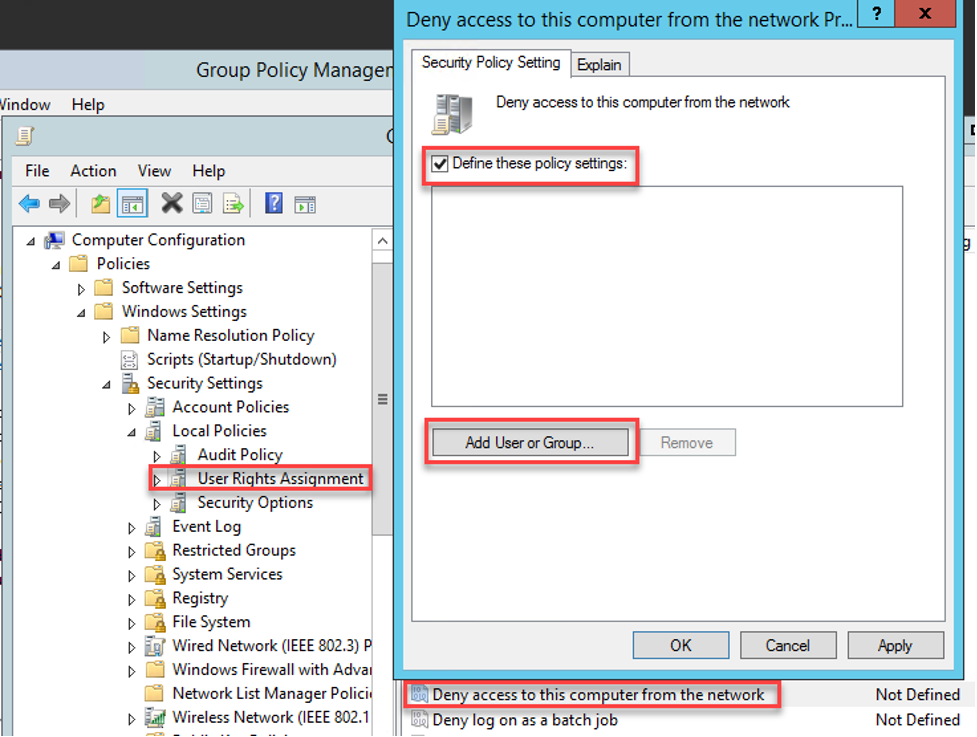
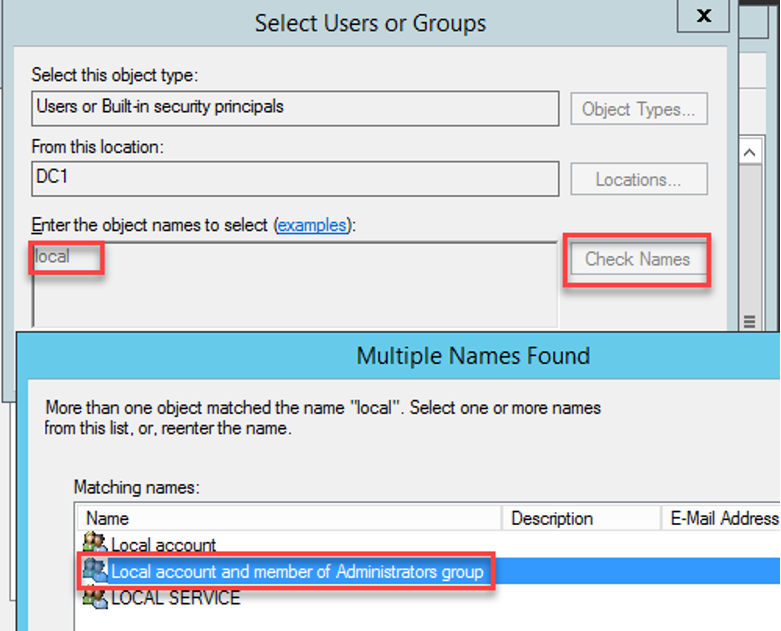
From within the 'Add User or Group' dialog, first click the 'Browse' button, then the 'Locations' button, and choose the local computer name. After you have done that, type 'local' and click 'Check names.' A list with a few options should populate; choose 'Local account and member of the Administratorsgroup.'
The end result should look like the screenshot below.

Next, do the same for 'Deny log on through Remote Desktop Services.'
Free Easy Win #4 – Protect LSASS
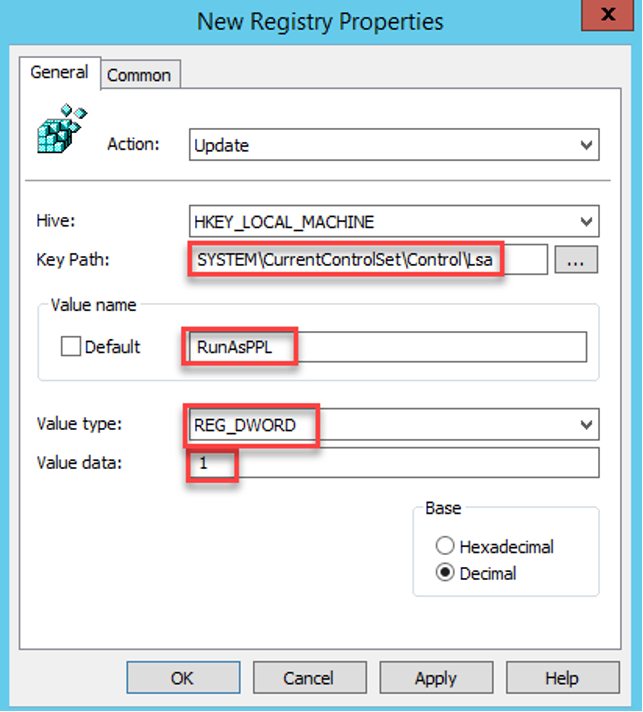
I do not see this setting very often, but I really hate when it is turned on. The setting I am thinking about is the RunAsPPL. This can be set by using Group Policy Preferences, so start by creating a new Group Policy, then navigate to Computer Configuration > Preferences > Windows Settings > Registry. From there, right-click and choose New > RegistryItem.

Next, fill out the key path to SYSTEM\CurrentControlSet\Control\Lsa and then the Value name to RunAsPPL. Set the Value type to REG_DWORD and decimal value 1.
Whenever someone tries to run mimikatz after this, they will receive the following error message.
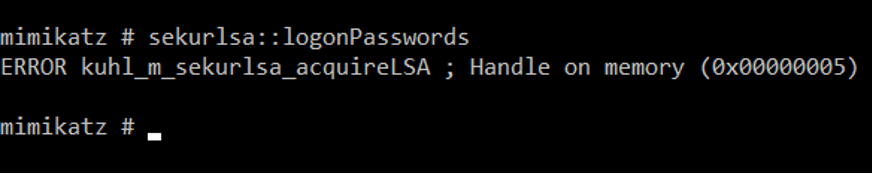
There are ways around this, but it ensures that the attacker needs to make some unnecessary noise and work a little harder. More info about this setting and additional LSA hardening tips can be found here: https://docs.microsoft.com/en-us/windows-server/security/credentials-protection-and-management/configuring-additional-lsa-protection
Outro
There are so many things you can do to make it harder for attackers. One of the recommended best practices is to implement some of the Microsoft Security Baselines, which really make the Operating System more secure. More info on that here: https://docs.microsoft.com/en-us/windows/security/threat-protection/windows-security-baselines
I also recommend that you take a look at this post from Sean Metcalf for further hardening: https://adsecurity.org/?p=3299
Lastly, I want to mention application whitelisting. Implementing that can really make the work for an attacker more difficult. TrustedSec did a webinar on AppLocker (one of many application whitelisting solutions) that goes over some of the basics and more advanced stuff. This can be found here: https://www.trustedsec.com/events/unleashing-the-power-of-applocker-how-to-get-started-and-go-beyond-the-basics/
I hope you enjoyed this post and that it gave you some ideas on ways to make Windows more secure.