
ADExplorer is a tool I have always had in my backpack. It can be useful for both offensive and defensive purposes, but in this post, I am going to focus more on its offensive use. The tool itself can be found here: https://docs.microsoft.com/en-us/sysinternals/downloads/adexplorer
A typical scenario I often face on engagements is that I have compromised a server or workstation, and I am able to get my hands on the local NTLM hashes as well as the computer account NTLM hash used to authenticate itself against the Active Directory domain. One way I typically end up in this scenario is to proxychain through a beacon on a user's workstation and use a known exploit to gain administrative access.
So, how do we use the Active Directory computer account over SOCKS to look at Active Directory? Well, of course there are many tools out there such as Impacket or LDAPPER, but today I'll be covering ADExplorer.
Let's go through the steps on getting ADExplorer to work from my local Windows machine through a SOCKS proxy on my Cobalt Strike command and control (C2) server.
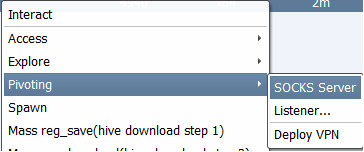
First you will need to tell Cobalt Strike to establish a SOCKS proxy on the beacon you have. You do that by right clicking and choosing PIVOTING > SOCKS Server
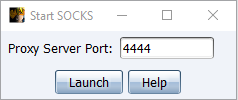
Choose a specific port you want to use for the SOCKS listener and click Launch. In my case, the port is set to TCP 4444.
The C2 server should now have port 4444 open and allow proxy traffic through into the network where you have the beacon. I recommend that you use iptables to only allow SSH into the C2 server (that topic is something I will not cover in this post, so I recommend Googling on how to do that). Do not allow access to port 50050 (Cobalt Strike Team Server Port) or 4444 directly from the Internet. Instead, use SSH and forward those ports. To set up a port that is forwarded to 4444 on the C2 server SSH, I simply run the following SSH command:
ssh user@<c2 ip> -L 4444:127.0.0.1:4444
This creates a local port on my Windows host that listens on port 4444. This port is then forwarded over SSH to the 4444 port on the C2 server.
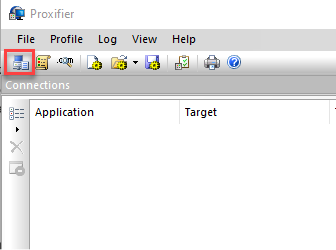
In my Windows environment, I use Proxifier (https://www.proxifier.com/) to adjust proxy settings per application. Start by opening up the proxy server's menu inside Proxifier.
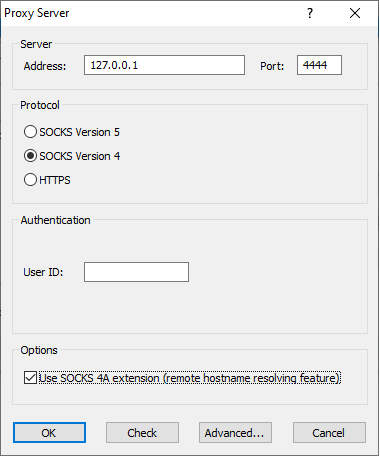
Click add and configure your proxy settings as shown below. It is important to note that Cobalt Strike Proxy is SOCKS4.
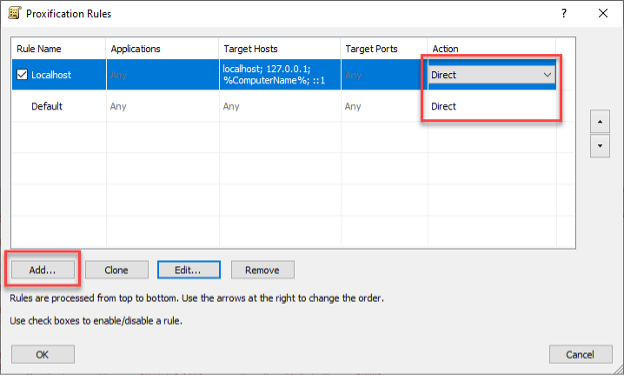
Once that is taken care, of you open up Proxification Rules and make sure that both Localhost and Default are set to Direct. Once that is verified, add a new proxification rule by clicking the Add button.
Next, add the details needed for the application you want to send through the proxy. In my case, it is the adexplorer.exe binary file.
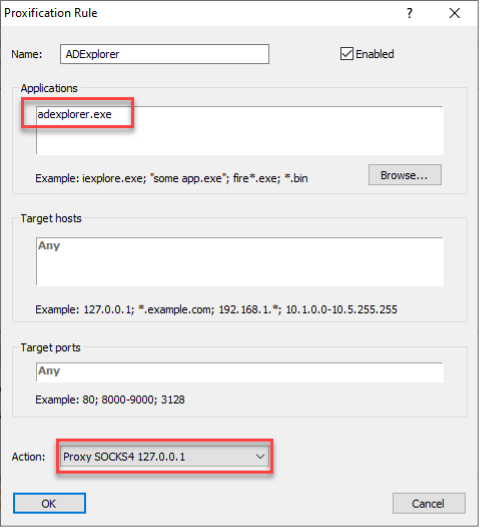
Hit okay and you should be all good.
Next, I am going to fire up ADExplorer.exe, but since I am using a machine account hash instead of a username and password, I will need to inject the hash. However, if you know a username and password, you could simply start ADExplorer and fill out the server IP address in the connect to, user, and password fields.

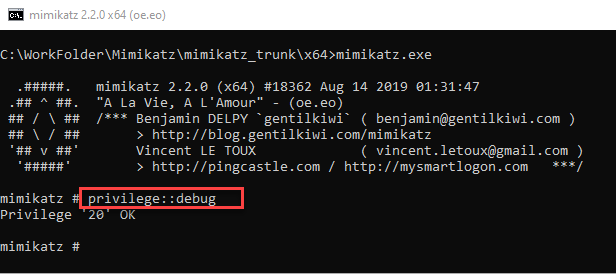
Since I am injecting the hash, I am going to use Mimikatz to help me out. Fire up Mimikatz (elevated) and ensure you have the debug privilege by running privilege::debug.
(If you get an error message, you might want to double check that you actually started cmd elevated.)
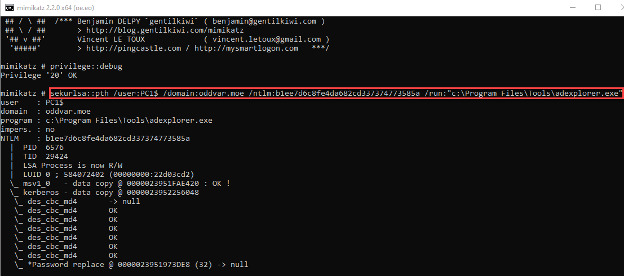
Once I have that privilege, I can now inject the machine account hash into a new modified ADExplorer.exe process. Still inside Mimikatz, type:
sekurlsa::pth /user:<name of machine account>$ /domain:<domainname.com> /ntlm:<machine account NTLM hash> /run:"c:\Program Files\Tools\adexplorer.exe"
In my case, I am doing this on a machine called PC1 and going towards the Oddvar.moe domain, so it looks like this:
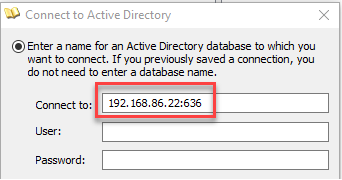
ADExplorer should now launch and all I need to fill in is the IP address for the domain controller in the connect to field. Since I have injected the hash into the process, ADExplorer will use the current authentication inside the process, so you should not need to fill in user or password.
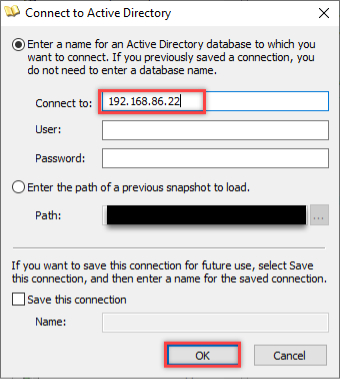
Hit OK, and if you did everything correctly, you should be able to browse Active Directory over SOCKS with ADExplorer using a machine account hash. You can verify that traffic is flowing by looking at Proxifier. If you want to use a port other than the default 389, you can specify it by adding a colon at the end. It is preferred to use LDAPS whenever you can by using 636 as the port.
Since I already covered a lot of stuff with ADExplorer, lets continue with some recon tips while you are inside Active Directory.
Recon Tip 1 – Take a Snapshot
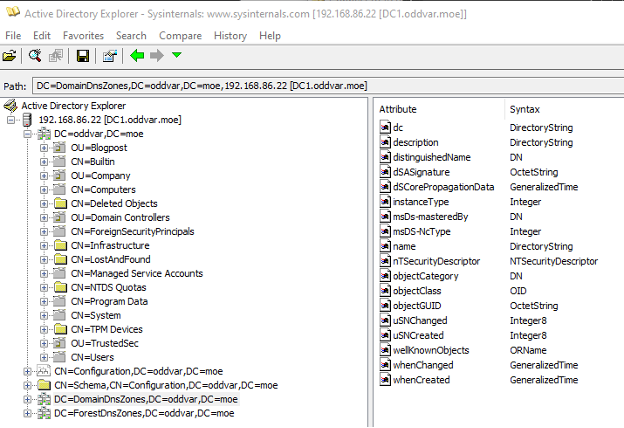
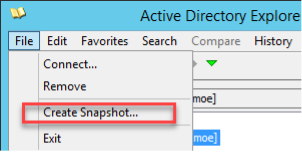
Looking at Active Directory over a SOCKS proxy can sometimes be very slow, so I often take a snapshot. The snapshot basically takes a copy of everything it can read from Active Directory and stores it to a file on disk over the proxy into the local machine from which you are running ADExplorer, so take bandwidth into consideration before doing it. To do this, highlight the connection (192.168.86.22 [DC1.oddvar.moe] in my case) then click File > Create Snapshot.
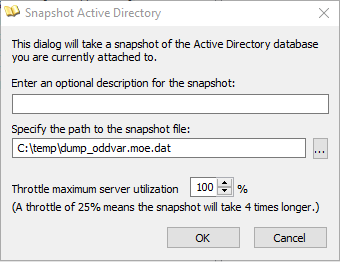
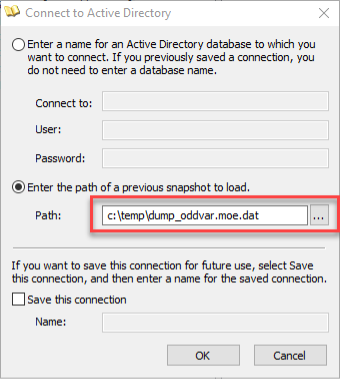
Fill in a path to store the dump and press OK. This could, of course, take a while if the Active Directory database is rather big. For a company with around 30,000 users, it is not uncommon for the dump to be over 800 MB in size. Once the dump is finished, I can open up the dump offline at any time using ADExplorer without the need to connect to the environment over the proxy. Instead of filling in connection details, I simply choose 'Enter the path of a previous snapshot to load' when starting ADExplorer.
Recon Tip 2 – Sites and Services
In the early stages of an engagement, I typically do not know all the subnets or geographical locations of the organization. One (1) place where this is stored (if sysadmins decided to implement it) is inside Active Directory. This is implemented so that Active Directory can set up the best possible replication topology as well as direct the authentication requests to domain controllers residing in the same site as the user or computer authenticating. To find the sites, I browse to the Configuration partition and look at the sites container as shown in the following screenshot.

If I highlight a subnet, I can see more details about what geographic site it belongs to by looking at the siteObject property.
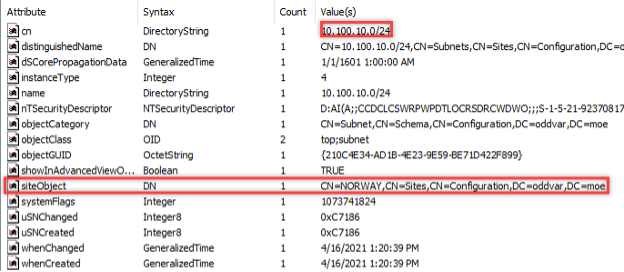
In this case, the 10.100.10.0/24 subnet is linked to the site named Norway.
Recon Tip 3 – Domain settings
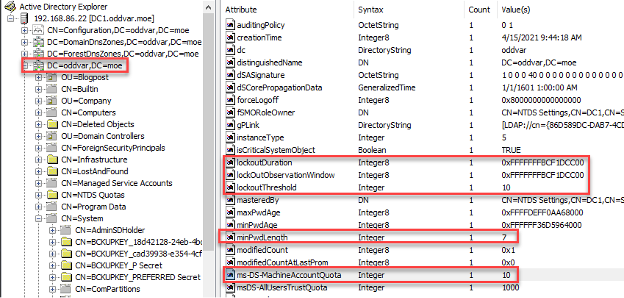
By highlighting the domain, I can see interesting details about the domain such as the status of the password policy or even the ms-DS-MachineAccountQuota. This password policy can be overwritten if the customer is using fine-grained password policy, so you need to be sure of that if you are planning to start a password spray based on this policy.
By default, all authenticated accounts in Active Directory can add computers to the domain, and the ms-DS-MachineAccountQuota is the attribute that determines how many computers can be added by a given account (10 by default). This can be restricted in other places, such as a Group Policy, but it is worth checking what the value is. If it is 0, it means that normal users cannot add computers to the domain.
Recon Tip 4 – Trusts
If you are curious about whether there are trusts in play, you can search for them by looking for objectClass attributes that are set to trustedDomain, like the screenshot below.

This should list out trusts, and if I double click on any of the results in the lower portion of the GUI, I can jump right to the location in ADExplorer. Once there, I can find additional details about the trust such as trusttype, trustdirection, and more.
Recon Tip 5 – Other Useful Searches
Here are some other typical searches I do once inside an environment.
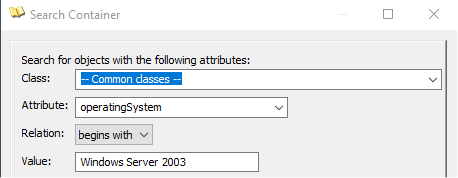
Old operating systems:
Local Administrator Password Solution (LAPS) passwords:
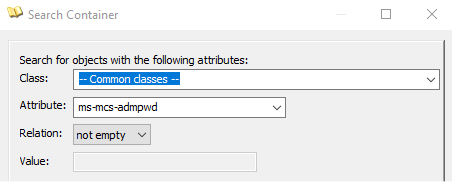
When the environment has LAPS implemented, there is a chance that these passwords appear in plaintext, meaning what you see in this field is the actual password. The LAPS password is stored in the ms-msc-admpwd attribute.
Other attributes with possible passwords:
- userPassword
- unicodePwd
- unixUserPassword
- msSFU30Password
- os400Password
If passwords are found in one of these attributes, they are often stored as ASCII code. Use a converter (e.g., https://onlinestringtools.com/convert-ascii-to-string) to get the plaintext password—just be careful when putting passwords into untrusted online tools.
admincount set to one (1):
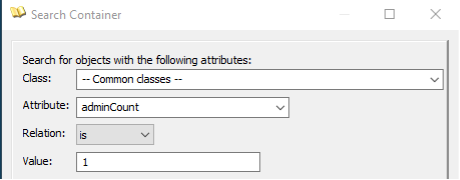
This attribute is set to one (1) if the account is a member of any protected groups (e.g., important Active Directory Groups).
Description field search:
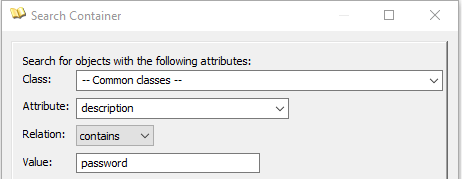
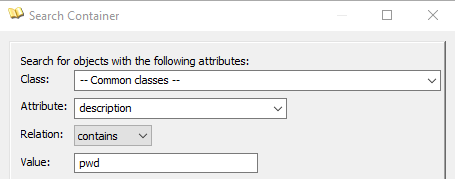
Sometimes I just search for 'description not empty' and manually look at the results. There is also a bug that I encounter sometimes using offline ADExplorer snapshots when using the 'contains' search that crashes ADExplorer, but it works when using ADExplorer online, so the problem is not too big.
I also want to mention others who have done some great writeups on ADExplorer before this post. A great post written by Sally Vandeven over at Black Hills shows us how to edit objects using ADExplorer among other things: https://www.blackhillsinfosec.com/domain-goodness-learned-love-ad-explorer/
Another awesome addition is ADEGrab https://github.com/stufus/ADEGrab, created by Stuart Morgan at MWR Infosecurity. This is super useful if you ever want to grab the search results from ADExplorer since there are no native ways of doing that.
That’s what I have for you this time, and I hope you see that ADExplorer can be a really useful tool in some cases. I know that many other tools exist that do the job in a more automated way, but I sometimes prefer to use the GUI to see the structure of things and maybe even spot things I would normally miss. One thing I wish would be possible would be to export ADExplorer results into BloodHound data—that would be amazing! Or to even have the possibility to edit the offline snapshot however you would like.
Good luck on your AD Exploring!