Automating a RedELK Deployment Using Ansible

As the red team infrastructure needs continue to expand (and grow more complicated), so does the need for infrastructure automation. Red teams are adopting DevOps to improve the speed at which their infrastructure is deployed, hence the rise in usage of tools such as Terraform and Ansible for red teams. In this post, we will use Ansible to deploy the RedELK infrastructure visibility tool across a red team infrastructure.
If you are new to RedELK, the high-level view is that it is an ELK stack specifically designed for red team usage. It shows things like Cobalt Strike beacon logs and Apache/HAProxy logs, all in a friendly Kibana user interface. I strongly encourage you to read the three-part series from the Outflank team on the development, configuration, and usage of their tool (Part 1, Part 2, Part 3), then check out their GitHub Wiki. Henceforth, this post assumes you are familiar with RedELK installation and basic usage. Ideally, you would have at least stood up RedELK in a lab environment before proceeding.
A few important prerequisites before I turn you loose on the code:
- The Ansible playbooks here are meant to instrument an existing red team infrastructure with RedELK. It assumes your Cobalt Strike team servers and redirectors are already up and running.
- You will need a dedicated RedELK server to run the ELK stack. If you are using Amazons AWS EC2, you’ll need, at minimum, a t2.medium instance.
- These playbooks will work with either an on-premises or cloud-based infrastructure (or a combination).
- You will, of course, need sudo rights to all your servers.
- You will need basic familiarity with Ansible and have it installed on a machine. I did all my testing with Ansible v2.8.5. You will need at least Ansible v2.8.
For the rest of this post, Amazon EC2 instances are used as a lab environment with Apache as the redirector. This post will act as a guide to get you on your way with an automated deployment of RedELK.
Download the code here.
Pre-Configuration
There are 2 required tasks and 1 optional task to be completed before running the playbook:
- Modify the hosts file with your environment information (required).
- Modify the vars/redelk.yml file with your environment information (required).
- Put a custom htpasswd.users file in the templates/directory (optional).
The Hosts File
First, have a look at the hosts file. You will need to fill this out with your infrastructure information.
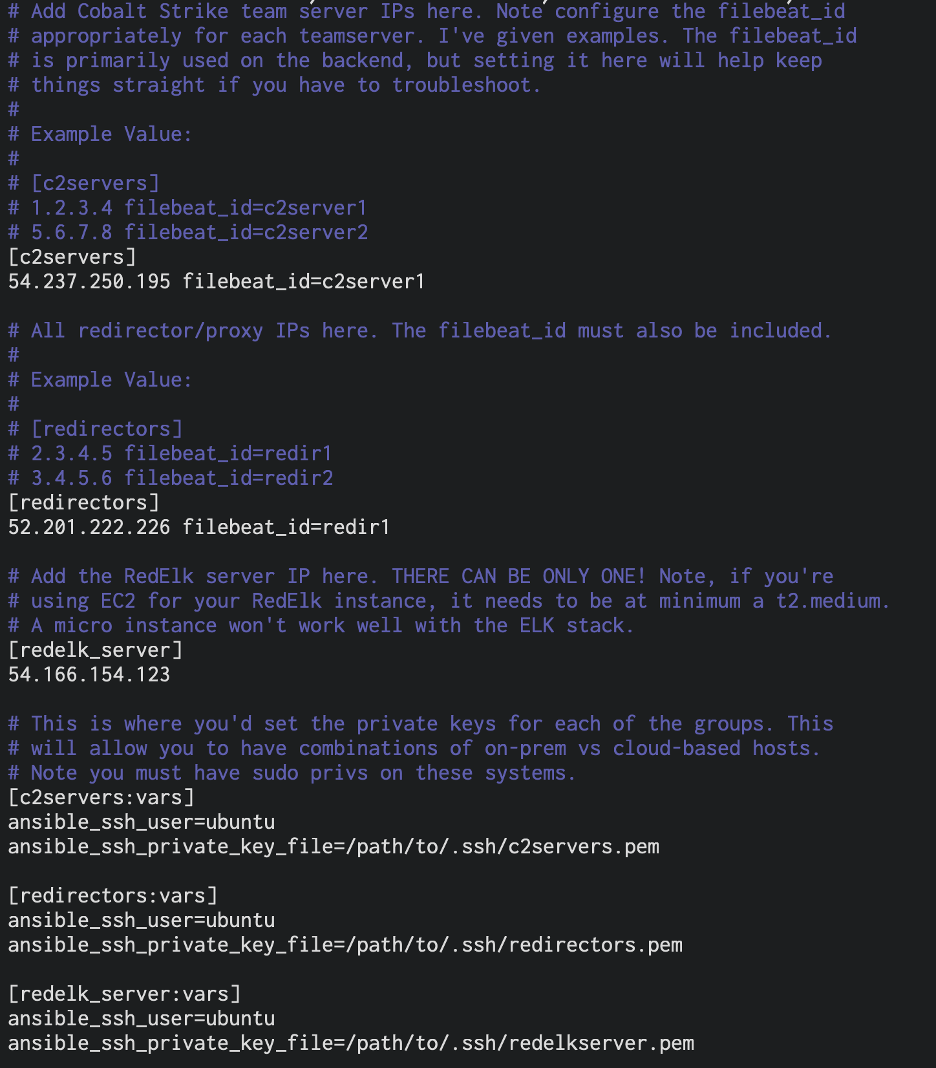
Modifying this file is how you would designate between on-premises vs cloud-based infrastructure; however, it is done by server 'role.' For example, you can have all your redirectors in the cloud and all your C2 servers on-prem, but not one redirector in the cloud and one redirector on-prem. Also, you can only have one RedELK server.
A host variable that must be specified is the filebeat_id. This should be unique per host and should describe the host’s purpose. The filebeat_id is used on the backend for host communication with the RedELK server as well as in the Kibana UI for identifying redirectors. The comments in the host file give the proper format for specifying the filebeat_id for redirectors and teamservers.
Taking a step back, I am making a general assumption that your infrastructure is essentially all being used for the same engagement—different phases, sure (e.g., short-term C2, long-term C2, etc.), but the same engagement. You could, in theory, instrument every single C2 server across your organization with RedELK and have them all report back to a RedELK server, but in my conversations with the RedELK team, mixing engagements is generally not recommended and could lead to the mishandling of data.
vars/redelk.yml
Once you have the parameters of that file set, you simply need to modify vars/redelk.yml. There are several primary variables that are important to set properly. Things are pretty well-documented in the file itself, but I will list the main variables here:
- cobaltstrike_install_dir: This is the directory on your C2 servers where Cobalt Strike is installed. Leave off the trailing slash.
- scenario_name: This is the name of the attack scenario. RedELK supports multiple attack scenarios. This Ansible playbook will use only a single scenario. If you want to split out your infrastructure into multiple attack scenarios, rerun the playbook and set your hosts file and this value accordingly.
- redelk_server_host: The IP address or DNS name of the RedELK server.
- redelk_server_port: The port that RedELK receives information on from the redirectors and teamservers. If using a cloud instance, this port must be open to your redirectors and teamservers. Default 5044.
There are additional options in the vars/redelk.yml file. The Alarm.json.conf values should also be set up, as they provide significant functionality in terms of alerting your team to potential burning of payloads, shells, etc.
Last is the certificate information for the RedELK instance. This isn’t for browsing, but for communication channel security between the RedELK server and the teamservers/redirectors. It can be self-signed, of course.
For more information regarding alarm.json.conf and the certificate values, refer to Part 2 of the RedELK blog post series and Outflank’s GitHub wiki pages, both linked above.
htpasswd.users
The default credentials to connect to RedELK are redelk:redelk. This is fine for demos, but we obviously want a strong password for production usage. Behind the scenes, RedELK uses nginx as a web server. We can modify the password that RedELK uses by creating a new htpasswd.users file.
$ sudo apt install apache2-utils
$ htpasswd ./htpasswd.users redelk
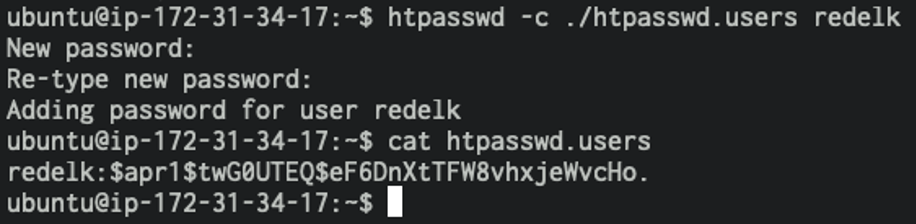
This will create an htpasswd.users file for user 'redelk' with the password you specify. Put the htpasswd.users file into the ansible-redelk/templates folder and it will be automatically applied to the redelk server.
Running the Playbook
Once you have filled out the hosts and vars/redelk.yml files per your environmental needs (and optionally created an htpasswd.users file), you can run the playbook with the following command:
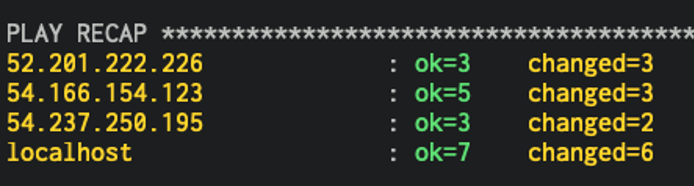
$ ansible-playbook ./build_redelk_environment.yml -i hosts
If everything goes well, you’ll see output indicating the environment has been successfully modified. If you’re new to Ansible, green means task completed but nothing was changed, yellow means the task was completed and something was changed, and red means the task failed. All yellow means you’re good to go.
Post-Install Redirector Configuration
Once the playbook is done running, there will be a few post-configuration items to handle on the redirector.
If you are using Apache on your redirectors:
1. Ansible should have moved over a configuration file for you to use. You will need to include it in any Apache configuration file that is part of your engagement. This file will specify a custom Apache LogFormat directive that is *required* for RedELK to work properly. If you have another LogFormat directive specified in your conf file, add the following Include statement after it:
Include /etc/apache2/redelk_include.conf
Read this file and follow the additional instructions.
2. Assuming you’re using mod_rewrite to get traffic back to your teamserver, you will need to add a couple of environment variables called backend_name on your RewriteRules. I have shown them in the below screenshot and have also given more information in the /etc/apache2/redelk_include.conf file.

3. Optional: The Apache access log file name is specified in /etc/apache2/redelk_include.conf as 'access-redelk.log.' If you change this, be sure to update /etc/filebeat/filebeat.yml with the correct name/path.
Once that’s done, reload the Apache rules and acquire yourself a Cobalt Strike beacon. If everything goes right, you should see that glorious data in your RedELK instance.

Troubleshooting tips: If you’re not seeing data, it’s likely due to one or more of the following reasons:
- DNS (ikr?). Be sure the DNS instance for your RedELK server is configured properly. If you change the A record after the environment is up and running, you will have to wait for upstream DNS to catch up.
- If your C2 server IP address changes, then you will need to update /etc/cron.d/redelk on the RedELK server. See the entry for getremotelogs.sh and change the C2 server parameter.
- Check /etc/filebeat/filebeat.yml on the redirectors and C2 servers to make sure everything looks correct.
- Reboot 3x?
Steps & Tags
The most immediate use of the playbook is to get RedELK running in a clean environment. But what if you add teamservers for a different attack scenario or new redirectors because some others were burned? Ansible tags give you the granularity you need to only run parts of the playbook instead of running the whole thing. This also works great if something fails and you just want to rerun that section.
I’ll list all the steps the playbook takes along with the tags associated to each step. Note that tags are represented in a hierarchy, so running the top-level tag will run all the tags underneath that step.
The playbook is broken up into 4 major parts: Local preparation, Instrumenting Teamsevers, Instrumenting Redirectors, and Building the RedELK server.
- Local Preparation [tag: prep]
- Download the latest RedELK package (.tgz) from GitHub to /tmp [tag: prep_download]
- Extract the package to /tmp/redelk_latest [tag: prep_extract]
- Modify certs/config.cnf [tag: prep_cert]
- Modify alarm.json.conf [tag: prep_alarm]
- Set the Cobalt Strike install path [tag: prep_cobaltstrike]
- Execute the RedELK init script and error check [tag: prep_init]
- Instrumenting Teamservers [tag: teamservers]
- Copy teamservers.tgz to target hosts [tag: teamserver_copy]
- Extract the .tgz to /tmp/teamserver [tag: teamserver_extract]
- Install the teamserver package and check for errors [tag: teamserver_install]
- Instrumenting Redirectors
- Copy redirs.tgz to target hosts [tag:redir_copy]
- Extract the .tgz to /tmp/redir [tag: redir_extract]
- Install the redir package and check for errors [tag: redir_install]
- Will copy over an Apache include file if Apache2 is found [tag: redir_post_config]
- Building the RedELK Server [elkserver]
- Copy elkserver.tgz to target host [tag: elkserver_copy]
- Extract the .tgz to /tmp/elkserver [tag: elkserver_extract]
- Install the RedELK package and check for errors [tag: elkserver_install]
- Tag: elkserver_post_config
- Copy the getremotelogs.sh template to /etc/cron.d/redelk
- Copy templates/htpasswd.users if found
- Restart nginx if htpasswd file was updated
To run the playbook with one or more tags, use the - -tags parameter. Back to our scenario where new redirector servers were added, you would update the hosts file accordingly with the new IP addresses, and then run the following command (assuming you still have the RedELK package downloaded to /tmp/redelk_latest):
$ ansible-playbook ./build_redelk_environment.yml -i ./hosts --tags redirectors
If you need to download and configure the package again, it would be:
$ ansible-playbook ./build_redelk_environment.yml -i ./hosts --tags prep,redirectors
Let's say you got part way through the installation but get an error. Do you have to run the entire playbook again (even just tagged)? No, you can use the --step parameter to choose what to do.
$ ansible-playbook ./build_redelk_environment.yml -i ./hosts --tags prep,redirectors --step
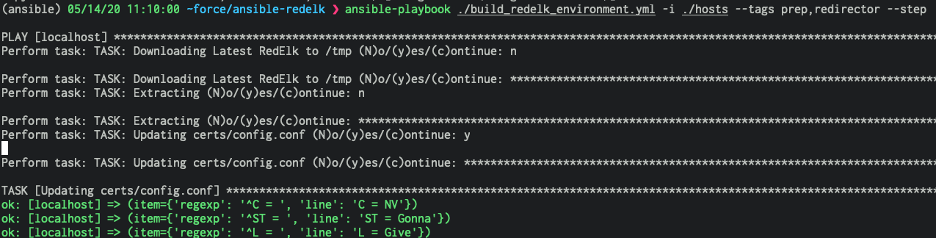
'y' will perform the step, 'n' will skip the step, and 'c' will perform the step, then continue unprompted.
That’s it for this post. I’ll keep the playbook updated as RedELK continues to grow.
Happy Hacking!
Jason