July 03, 2018
Building a "Quick" Lab Environment with Linux Containers
Written by
Geoff Walton

 As a penetration tester, I often need to stand up small environments (and sometimes not so small) for a few different reasons—to try things out before making a mess of a client’s production system, to avoid being detected, or to use it simply for our own practice. A lot of us at TrustedSec are remote, so it’s not always handy to use the test lab. VMware has made it easy to install a full virtual machine (VM) on my laptop, but if you are like me, you’ll run out of disk or memory space before you have everything in place, or you can’t keep stuff around that you might want to use again for lack of storage. I suppose I could get some big external drives, but those are hard to walk around with.
Enter the world of lightweight containers and efficient copy-on-write filesystems like Btrfs! With these things, I can stand up any number of virtual Linux machines at minimal disk cost, and without the memory overhead of trying to run full VMs. There are a lot of choices now that leverage some of the underlying technology I’ll introduce. Tools like Docker are great for stuff that you need to be repeatable or distributable, but I like using Linux Containers (LXC) and kvm (qemu-kvm) directly for day-to-day testing. You can set up a simple environment on just about any hardware that can boot contemporary Linux kernel. You can even get started on VM running in VMware!
This blog won’t be a full how-to in terms of building out a specific environment, but I will point you in what have proven to be the right directions for me and leave you all to fill in the blanks and make changes. Hopefully, this will save everyone a little time and spare you trying to “choose the right virtual Ethernet transport,” etc. Additionally, I’ll focus on LXC, but the goal of this setup is to create an environment where you can integrate other types of containers like Docker or full VMs running in kvm on the same host easily.
Host Configuration
First, we need a host platform. Personally, I’d choose Slackware! Unlike a lot of the other choices, it does not have a lot of logic that will get in the way, such as systemd/udev rules that are going to react to new network interfaces showing up and the like. That said, save yourself grief and use whatever Linux platform you are most comfortable with. Remember this is only the host platform – you can still run CentOS or any other guest Linux operating system that will be representative of your experiments.
I won’t go into a whole lot of detail on the host platform setup, but here are a few major bullet points:
As a penetration tester, I often need to stand up small environments (and sometimes not so small) for a few different reasons—to try things out before making a mess of a client’s production system, to avoid being detected, or to use it simply for our own practice. A lot of us at TrustedSec are remote, so it’s not always handy to use the test lab. VMware has made it easy to install a full virtual machine (VM) on my laptop, but if you are like me, you’ll run out of disk or memory space before you have everything in place, or you can’t keep stuff around that you might want to use again for lack of storage. I suppose I could get some big external drives, but those are hard to walk around with.
Enter the world of lightweight containers and efficient copy-on-write filesystems like Btrfs! With these things, I can stand up any number of virtual Linux machines at minimal disk cost, and without the memory overhead of trying to run full VMs. There are a lot of choices now that leverage some of the underlying technology I’ll introduce. Tools like Docker are great for stuff that you need to be repeatable or distributable, but I like using Linux Containers (LXC) and kvm (qemu-kvm) directly for day-to-day testing. You can set up a simple environment on just about any hardware that can boot contemporary Linux kernel. You can even get started on VM running in VMware!
This blog won’t be a full how-to in terms of building out a specific environment, but I will point you in what have proven to be the right directions for me and leave you all to fill in the blanks and make changes. Hopefully, this will save everyone a little time and spare you trying to “choose the right virtual Ethernet transport,” etc. Additionally, I’ll focus on LXC, but the goal of this setup is to create an environment where you can integrate other types of containers like Docker or full VMs running in kvm on the same host easily.
Host Configuration
First, we need a host platform. Personally, I’d choose Slackware! Unlike a lot of the other choices, it does not have a lot of logic that will get in the way, such as systemd/udev rules that are going to react to new network interfaces showing up and the like. That said, save yourself grief and use whatever Linux platform you are most comfortable with. Remember this is only the host platform – you can still run CentOS or any other guest Linux operating system that will be representative of your experiments.
I won’t go into a whole lot of detail on the host platform setup, but here are a few major bullet points:
- If you are using a virtual machine as your “host” platform and plan to support any non-Linux guests enable nested virtualization.
- For kvm, you can do this by adding a conf file to /etc/modprobe.d/
- It should contain either options kvm_amd nested=1 or options kvm_intel nested=1
- For VMware, the vmx file should have enable = "TRUE"
- For kvm, you can do this by adding a conf file to /etc/modprobe.d/
- Consider a second physical network interface controller (NIC) if you want your VMs to talk to the outside world. This way, you don’t disrupt your SSH connection to the host machine if you are making network changes. There are plenty of other options, such using iptables to network address translation (NAT) on the host, or placing the physical primary adapter in the bridge that is acting as your virtual LAN segment and subsequently assigning an IP to bridge, but these options might complicate your life.
- Set up your host system to leave this interface unconfigured. It should be “UP,” but do not enable DHCP or set a network address.
- You can use whatever you like for your primary file systems. You will want a large volume with a Btrfs filesystem mounted to /var/lib/lxc or if you choose Btrfs as your main file system, your containers can share the same volume.
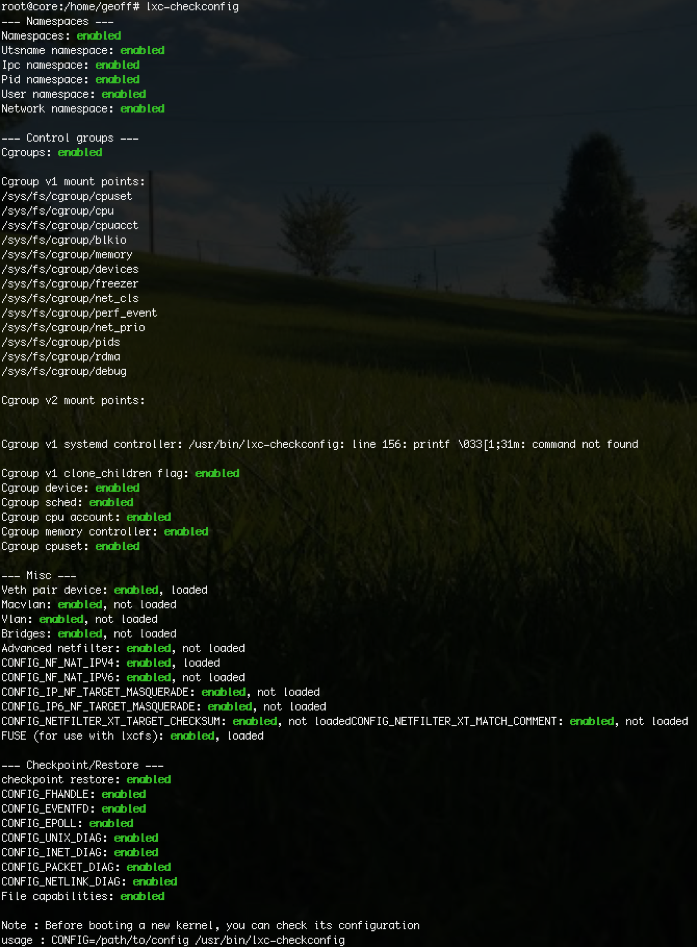 Figure 1 lxc-checkconfig on a correctly configured system[/caption]
It should look like the output above. If you are missing any features, enable the kernel options specified and re-compile your kernel! This should not be necessary as these features have been enabled in most common configurations for quite some time now.
Network Setup
Next, let us take care of the network. After playing with a number of routes, the best option is really using the virtual Ethernet interface, or “veth,” in LXC speak. I have come to this conclusion for a number of reasons. First, it’s as agnostic as possible regarding higher level protocols, so anything you need to play with should work even if it’s not IP. The second reason is that you can seamlessly add other Ethernet devices to a bridge with it; which includes physical adapters and kvm virtual interface, and even things like OpenVPN that use the tun/tap interface. Finally, because it presents inside the container as a normal Ethernet interface, guests works reliably without changes.
On the host machine, create Linux bridges. If you are unfamiliar with the concept of a bridge, think of it as virtual network layer-two switch. Depending on your platform, there may be rc scripts that allow you to define and configure bridge interfaces. I’ll give the basic commands you can use ad-hoc while setting up your topology. You can either migrate your settings to your platform’s boot scripts, or write yourself some shell scripts using these commands to create configure interfaces.
For each LAN segment you need we will create one bridge interface on the host.
brctl addbr lab
The command should create a bridge interface called “lab.” I suggest using names like “lab” rather than just “br0,” because it makes it clear what things are in the future, when you run a command like ifconfig -a. Otherwise, as the number of virtual networks and interfaces becomes large in your lab, things will get confusing fast.
If you only have the one interface (assumed to be eth0), you can create a second bridge to act as the uplink to the outside world, then add your physical adapter to that. You will want to make sure that the adapter is configured as “UP” without an address assigned. If you have daemons like Networkmanager, you will need to make sure these don’t try to change the properties of this interface.
brctl addbr uplnkbrctl addif uplnk eth0dhclient uplnk
Now on the host, the bridges will show up as a network adapter that you can think of as plugged into a virtual switchport. Here, dhclient uplnk will get an IP address from the DHCP server on your physical LAN. You will probably get a different IP address than you had previously, as the bridge will have a virtual MAC address that differs from your Ethernet adapters.
From a design standpoint, I like to isolate the lab from the rest of network. To do this, I use a container and set it up as a Linux Router/gateway. I then give it interfaces on the lab segment and any additional testing segments I want to create, and either pass a physical NIC into it for access to the outside world or give it an interface in “uplnk.” This will be our first container.
Creating Your First Container
The lxc distributions come with a number of tools for creating and managing containers. The first one is lxc-create. The lxc-create tool will create minimal install of various linux platforms using templates. You can discover what templates you have by looking at the /usr/share/lxc/templates directory. On my Slackware 14.2 host, my templates directory looks like below.
[caption id="attachment_14561" align="alignnone" width="891"]
Figure 1 lxc-checkconfig on a correctly configured system[/caption]
It should look like the output above. If you are missing any features, enable the kernel options specified and re-compile your kernel! This should not be necessary as these features have been enabled in most common configurations for quite some time now.
Network Setup
Next, let us take care of the network. After playing with a number of routes, the best option is really using the virtual Ethernet interface, or “veth,” in LXC speak. I have come to this conclusion for a number of reasons. First, it’s as agnostic as possible regarding higher level protocols, so anything you need to play with should work even if it’s not IP. The second reason is that you can seamlessly add other Ethernet devices to a bridge with it; which includes physical adapters and kvm virtual interface, and even things like OpenVPN that use the tun/tap interface. Finally, because it presents inside the container as a normal Ethernet interface, guests works reliably without changes.
On the host machine, create Linux bridges. If you are unfamiliar with the concept of a bridge, think of it as virtual network layer-two switch. Depending on your platform, there may be rc scripts that allow you to define and configure bridge interfaces. I’ll give the basic commands you can use ad-hoc while setting up your topology. You can either migrate your settings to your platform’s boot scripts, or write yourself some shell scripts using these commands to create configure interfaces.
For each LAN segment you need we will create one bridge interface on the host.
brctl addbr lab
The command should create a bridge interface called “lab.” I suggest using names like “lab” rather than just “br0,” because it makes it clear what things are in the future, when you run a command like ifconfig -a. Otherwise, as the number of virtual networks and interfaces becomes large in your lab, things will get confusing fast.
If you only have the one interface (assumed to be eth0), you can create a second bridge to act as the uplink to the outside world, then add your physical adapter to that. You will want to make sure that the adapter is configured as “UP” without an address assigned. If you have daemons like Networkmanager, you will need to make sure these don’t try to change the properties of this interface.
brctl addbr uplnkbrctl addif uplnk eth0dhclient uplnk
Now on the host, the bridges will show up as a network adapter that you can think of as plugged into a virtual switchport. Here, dhclient uplnk will get an IP address from the DHCP server on your physical LAN. You will probably get a different IP address than you had previously, as the bridge will have a virtual MAC address that differs from your Ethernet adapters.
From a design standpoint, I like to isolate the lab from the rest of network. To do this, I use a container and set it up as a Linux Router/gateway. I then give it interfaces on the lab segment and any additional testing segments I want to create, and either pass a physical NIC into it for access to the outside world or give it an interface in “uplnk.” This will be our first container.
Creating Your First Container
The lxc distributions come with a number of tools for creating and managing containers. The first one is lxc-create. The lxc-create tool will create minimal install of various linux platforms using templates. You can discover what templates you have by looking at the /usr/share/lxc/templates directory. On my Slackware 14.2 host, my templates directory looks like below.
[caption id="attachment_14561" align="alignnone" width="891"]lxc-create -n router -t slackware -B BtrfsAfter running this command and waiting for a bit while the required files are fetched from the web, I should end up with a new container uncreatively named “router.” Just like with the network names, I like to keep things really plain so it is obvious what their role is later. When lxc-create completes a directory, /var/lib/lxc/router will have been created, which contains all the files associated with our new container. Notably, it will contain two things: a config file that defines the container, and rootfs director (actually a Btrfs subvolume, more on that later) that holds the containers file system. The contents of config are below. I have highlighted some things I changed in red and will discuss each.
| # Template used to create this container: /usr/share/lxc/templates/lxc-slackware # Parameters passed to the template: # Template script checksum (SHA-1): 1d5a84ae1fd3725be88e7d347128402c61000d19 # For additional config options, please look at lxc.container.conf(5) # Uncomment the following line to support nesting containers: #lxc.include = /usr/share/lxc/config/nesting.conf # (Be aware this has security implications) lxc.start.auto = 1 #Probably change network.0 to dhcp inside the container at some point lxc.network.0.type = phys lxc.network.0.link = eth1 lxc.network.0.name = wan lxc.network.0.flags = up lxc.network.0.ipv4 = 192.168.1.20/24 lxc.network.0.ipv4.gateway = 192.168.1.1 lxc.network.0.hwaddr=DE:AD:BE:EF:FF:FF lxc.network.1.type = veth lxc.network.1.link = lab lxc.network.1.name = lab0 lxc.network.1.flags = up lxc.network.1.ipv4 = 192.168.16.254/24 lxc.network.1.hwaddr=DE:AD:BE:EF:00:FF lxc.rootfs = /var/lib/lxc/router/rootfs lxc.rootfs.backend = Btrfs lxc.utsname = router lxc.mount = /var/lib/lxc/router/fstab #lxc.console = none lxc.tty = 4 lxc.pts = 1024 lxc.rootfs = /var/lib/lxc/router/rootfs lxc.cgroup.devices.deny = a # /dev/null and zero lxc.cgroup.devices.allow = c 1:3 rwm lxc.cgroup.devices.allow = c 1:5 rwm # consoles lxc.cgroup.devices.allow = c 5:1 rwm lxc.cgroup.devices.allow = c 5:0 rwm lxc.cgroup.devices.allow = c 4:0 rwm lxc.cgroup.devices.allow = c 4:1 rwm # /dev/{,u}random lxc.cgroup.devices.allow = c 1:9 rwm lxc.cgroup.devices.allow = c 1:8 rwm lxc.cgroup.devices.allow = c 136:* rwm lxc.cgroup.devices.allow = c 5:2 rwm # rtc lxc.cgroup.devices.allow = c 254:0 rwm # we don't trust even the root user in the container, better safe than sorry. # comment out only if you know what you're doing. lxc.cap.drop = sys_module mknod mac_override mac_admin sys_time setfcap setpcap # you can try also this alternative to the line above, whatever suits you better. # lxc.cap.drop=sys_admin |
| lxcpts /var/lib/lxc/router/rootfs/dev/pts devpts defaults,newinstance 0 0 none /var/lib/lxc/router/rootfs/proc proc defaults 0 0 none /var/lib/lxc/router/rootfs/sys sysfs defaults 0 0 none /dev/shm tmpfs defaults 0 0 none /run tmpfs defaults,mode=0755 0 0 /home /var/lib/lxc/router/home none bind,ro 0 0 /etc/hosts /var/lib/lxc/router/rootfs/etc/hosts none bind,ro 0 0 /etc/networks /var/lib/lxc/router/rootfs/etc/networks none bind,ro 0 0 /etc/passwd /var/lib/lxc/router/rootfs/etc/passwd none bind,ro 0 0 /etc/group /var/lib/lxc/router/rootfs/etc/group none bind,ro 0 0 /etc/shadow /var/lib/lxc/router/rootfs/etc/shadow none bind,ro 0 0 /etc/passwd /var/lib/lxc/router/rootfs/etc/passwd none bind,ro 0 0 /etc/shadow- /var/lib/lxc/router/rootfs/etc/shadow- none bind,ro 0 0 /etc/sudoers /var/lib/lxc/router/rootfs/etc/sudoers none bind,ro 0 0 /etc/sudoers.d /var/lib/lxc/router/rootfs/etc/sudoers.d none bind,ro 0 0 /etc/profile /var/lib/lxc/router/rootfs/etc/profile none bind,ro 0 0 /etc/profile.d /var/lib/lxc/router/rootfs/etc/profile.d none bind,ro 0 0 /etc/slackpkg/mirrors /var/lib/lxc/router/rootfs/etc/slackpkg/mirrors none bind,ro 0 0 /etc/resolv.conf /var/lib/lxc/router/rootfs/etc/resolv.conf none bind,ro 0 0 |
lxc-start -n routerOkay, but did it work? The command lxc-info -n router will tell us. If it’s running, you will get something like this: [caption id="attachment_14562" align="alignnone" width="227"]
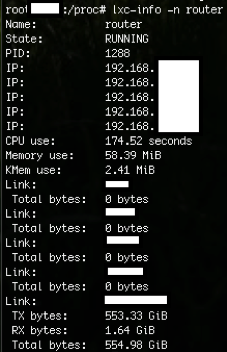 Figure 5 Sample output of lxc-info[/caption]
If it failed to start, you can try to start it again with the command:
Figure 5 Sample output of lxc-info[/caption]
If it failed to start, you can try to start it again with the command:
lxc-start -n router -FThis will cause the container to start in the foreground, so you can see any errors. You can also use the command lxc-top to see information and statistics for running containers. The next steps are to configure the router machine to do whatever routing and firewalling you need. To access it initially, you can connect to a virtual console using lxc-console -n router. It is a bit like GNU Screen to exit when you are done use <[ctrl]+[a] q>. Once on the console, use installpkg, apt, yum, etc., to add any packages you need. After that, you can probably use ssh or xnest to manage it. All Very Neat, but Why Btrfs? We will now see where Btrfs comes into play. Let’s assume I want 10 Ubuntu workstations to join my test domain. I’ll deploy an Ubuntu container to use as a template itself.
lxc-create -t ubuntu -n TubuntuWS -B BtrfsI can go ahead and configure it similarly to how I did the router. I’ll build it with a single veth interface lxc.network.0 on with lab as the link. In this case I won’t bother with my special fstab. I will also refrain from setting lxc.start.auto. I will go ahead and start the container lxc-start -n TubuntuWS and build out the machine after connecting with lxc-console. As soon as everything is to my liking, I can shut it down. This can be done inside the container ot from the host with lxc-stop -n TubuntuWS. Now I can use BTRFS to make a whole lot of cheap copies. First, I’ll create directories for the additional containers under /var/lib/lxc/ Now I can clone the my template container, TubuntuWS.
cat /var/lib/lxc/TubuntuWS/config | sed ‘s/TubuntuWS/ubuntuWS01/g’ > /var/lib/lxc/ubuntuWS01/config

Btrfs subvolume snapshot /var/lib/lxc/TubuntuWS/rootfs /var/lib/lxc/ubuntuWS01/rootfs
Just like that, I have a clone! I might need to change some network settings but that is it. I can start it up just like it was made with lxc-create. Btrfs has created a copy-on-write snapshot of the templates rootfs, so at least until I do a lot of updating, there is virtually no disk cost. Btrfs can do all kinds of other helpful things too. You can make as many copies of a volume as you like. You can make snapshots of snapshots and you can delete the original source volume. Remember the router? It’s all set up just the way we like now, so go make a snapshot of its rootfs as rootfs.bak. You can even use it to make incremental streaming backups of volumes. All the information is at at: https://Btrfs.wiki.kernel.org/index.php/Main_Page I know it was whirlwind tour, but I hope that it shows the power and flexibility available by using LXC and Btrfs together. It’s a really neat way to build a lot of test systems quickly and without a lot of overhead.