Expanding the Hound: Introducing Plaintext Field to Compromised Accounts
Introduction
When doing an Internal Penetration Test, it is not uncommon to run BloodHound at one point or another. In case you are not familiar with BloodHound, it's a tool that automatically fires off a bunch of LDAP queries and Windows API calls to collect various data in an Active Directory environment. Data can range from domain users to domain groups and even users who have dangerously configured rights on other objects. For example, User-Force-Change-Password allows you to reset an account's password without knowing the previous password.
All this data gets collected and stored in JSON files, which are then fed to a Neo4j database that can display a visual representation of the objects in a sort of graph view.
This makes it easy for penetration testers and system administrators to identify potential misconfigurations in Active Directory.
BloodHound also has a ton of so-called built-in queries, which allow you to query the database efficiently. An example of such a query is 'List all kerberoastable accounts.' While a lot of penetration testers are familiar with these built-in queries, not all of them are familiar with the underlying Cypher query language. The BloodHound GUI is a visual wrapper around Cypher queries that are being made to the Neo4j database. The database can also be viewed manually without BloodHound and is very useful to retrieve things like CSV exports.
Neo4j Login and BloodHound Queries
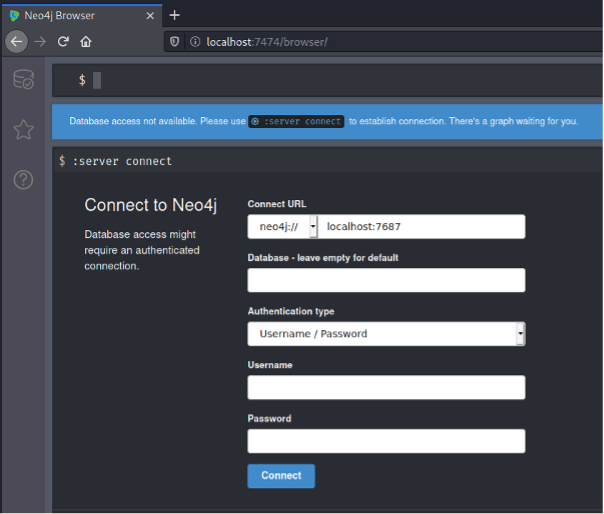
When starting Neo4j, the console window will show you that both the web and bolt interfaces have been started and point you to their location.
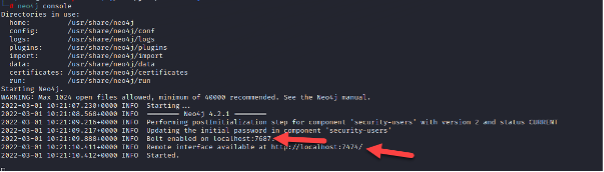
If we now go to the web interface, we are presented with a login prompt that has the following default admin and password credentials: neo4j. However, this will need to be changed upon first login.
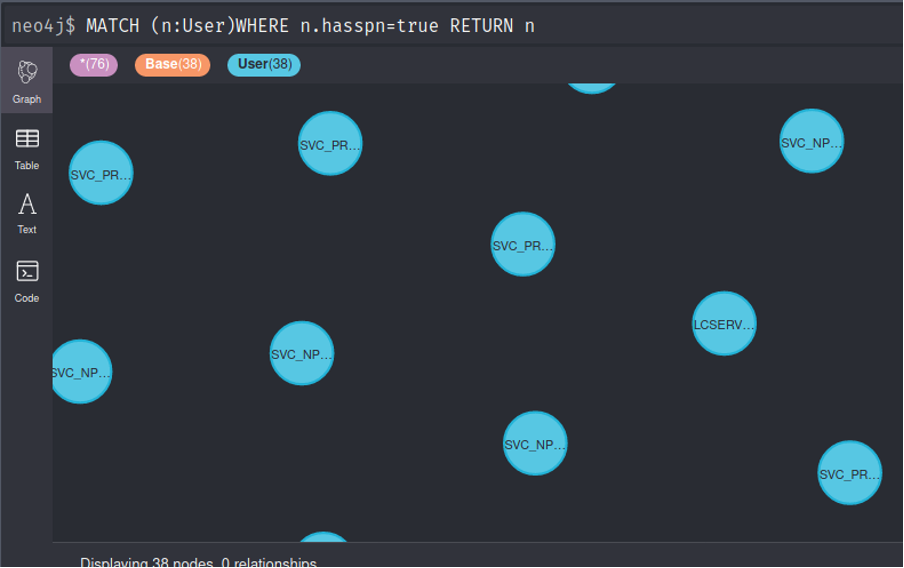
Once connected, the user will be able to insert Cypher queries into the web application. For example, the 'List kerberoastable accounts' built-in query in the BloodHound GUI executes the following Cypher query:
MATCH (n:User) WHERE n.hasspn=true RETURN n
The 'n' in this example is the identifier, which can be replaced by any other letter such as 'u' or 'c'.
With this knowledge in hand, there are extensive publications in the form of GitHub repositories and blogposts that are dedicated to 'custom' queries. My favorite one is https://hausec.com/2019/09/09/bloodhound-cypher-cheatsheet/.
This Neo4j web UI is very handy for pulling lists of outdated operating systems, for example:
MATCH (H:Computer) WHERE H.operatingsystem =~ '(?i).*(2000|2003|xp|vista|me).*' AND H.enabled = true RETURN H.operatingsystem,H.name
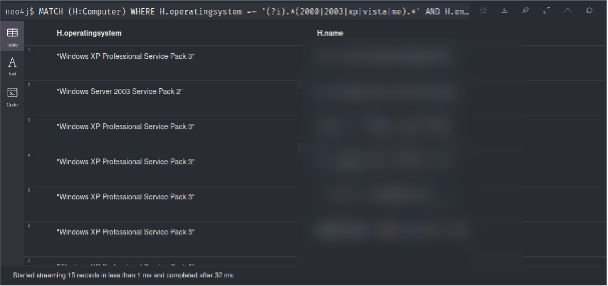
You can then click the download icon on the top right and select CSV. This is very handy for reporting purposes!
BloodHound in Action
Now that we know how BloodHound works in the background, let’s dive into some fun.
We can extend BloodHound with new functionality by manipulating the Neo4j database or by creating new JSON files to feed into BloodHound (such as demonstrated by Oliver Lyak in his Certipy tool: https://twitter.com/ly4k_/status/1495024542904946691)
In a recent engagement, we had compromised a very large domain with over 20,000 users. I wanted a way to mark all of my compromised users as 'owned' in BloodHound. Furthermore, TrustedSec has a very nice cracking rig that allows us to try and brute-force password hashes to retrieve the plaintext password. I wanted this in BloodHound as well or, at the very least, in the Neo4j database.
In order to understand what I had to do to make this work, I wanted to figure out how I can manipulate properties in Neo4j manually and, more importantly, which fields are already being collected by BloodHound.
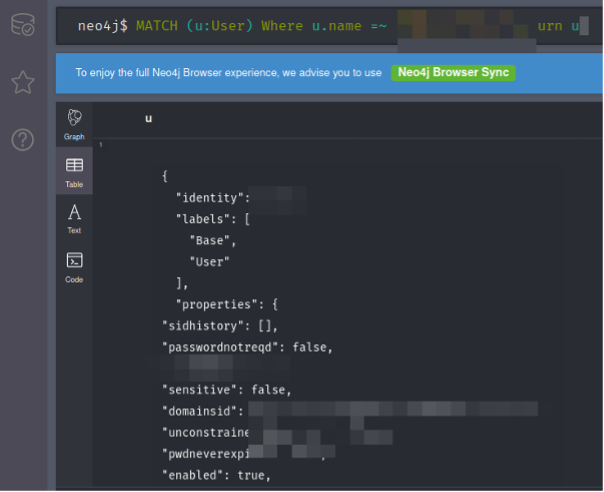
I went into this by taking a single username and returning all the properties back to me in Neo4j.
MATCH (u:User) Where u.name =~ "SOMEUSERNAME.*" return u
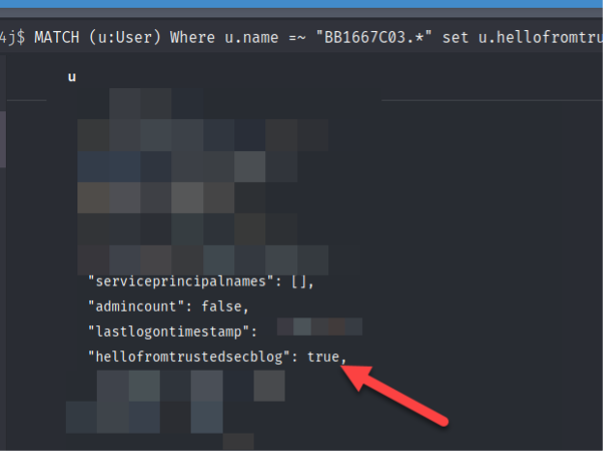
Here's what I found after Googling for a little bit: To add a property, you first need to query the object you wish to modify and then simply use the SET parameter to set a property. If the property does not exist yet, it gets created automatically:
MATCH (u:User) Where u.name =~ "SOMEUSERNAME.*" set u.hellofromtrustedsecblog=True return u
Now that we know how to add a property manually, let’s figure out how to do it automatically next.
As it turns out, Neo4j has an officially supported, very handy Python library:
https://neo4j.com/docs/api/python-driver.
We will first have to set up a database connection, which, thanks to the library, is just a single line of code:
db_conn = neo4j.GraphDatabase.driver(url, auth=(username, password), encrypted=False)
At first, I had an annoying error. Turns out setting encrypted to 'false' fixed it. Go figure! #Security 😊
The second thing I had to do was figure out how to make transactions. I was encountering issues, but as it turns out, Neo4j connections need to queue up transactions and can only process one (1) transaction at the time (taken from the official documentation, as referenced in the URL above).
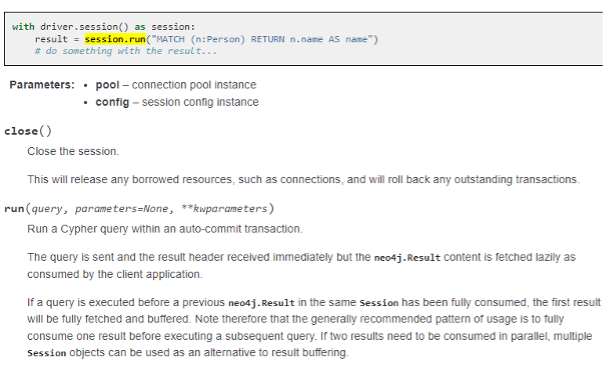
I didn’t want to wait that long, so I opted to create multiple concurrent sessions and close the connection after the transaction was complete.
At TrustedSec, our internal tooling spits out compromised users in a familiar Impacket-like structure:
DOMAIN\USER:NTLM:PlainTextPassword
BloodHound does not have a field where the username gets collected in such a way, so I had to create some manual conversion to get it into USER@FQDN format.
Meet CrackHound
The tool that was released along with this post is CrackHound.py. It accepts the following parameters:
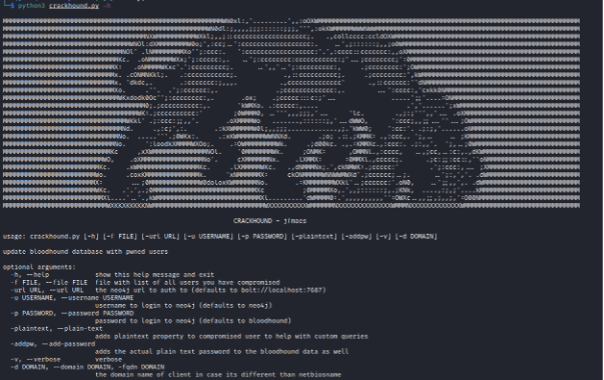
- The -f switch is mandatory and expects a file with compromised users.
- The URL, username, and password parameters are not required and default to your localhost Neo4j connection with username 'neo4j' and password 'bloodhound'. If you want to use this script on another machine or have other credentials, you can fill them in.
- The plaintext switch is optional and will introduce the plaintext property into the compromised users’ data. If the switch is not passed, a user will be marked as owned and no plaintext field or plain text password will be added.
- The -addpw switch is also optional and will add the plaintext credentials in the Neo4j database.
Be sure to check if this is in line with your data protection/retention policy.
The script is smart enough to parse compromised users files in
DOMAIN\USER:NTLM:PlainTextPassword format or
DOMAIN\USER format.
If your client's NetBIOS name is not the same as the FQDN as matched in BloodHound, you can use the -d flag to specify the domain manually.
For example, if your output is test\user1 and the principal name of the account is [email protected], you can use the -d test.com parameter to transform your input into BloodHound readable data.
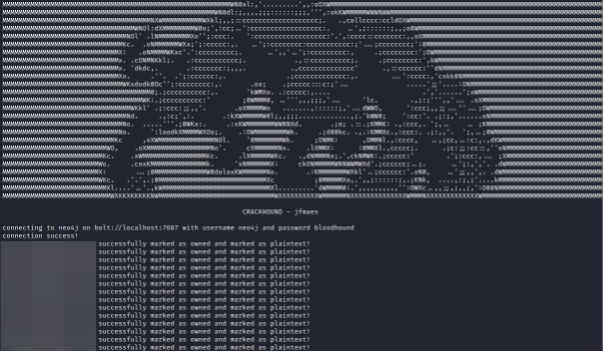
If we let CrackHound do its thing, it’s going to look a lot like the following:
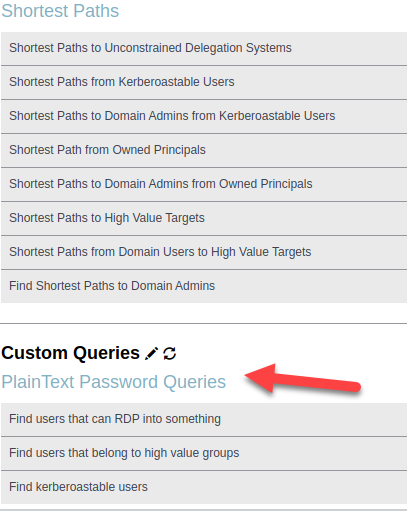
Now that we have the new plaintext field, let’s create some custom queries.
You can import custom queries by saving the customquery.json file in ~/.config/bloodhound
There will be a custom queries JSON file in the same repository as CrackHound.
Find users that can RDP into something:
match (u1:User) WHERE u1.plaintext=True MATCH p1=(u1)-[:CanRDP*1..]->(c:Computer) RETURN u1
Find users that belong to high value groups:
match (u1:User) WHERE u1.plaintext=True MATCH p=(u1:User)-[r:MemberOf*1..]->(m:Group {highvalue:true}) RETURN u1Find kerberoastable users:
match (u1:User) WHERE u1.plaintext=True AND u1.hasspn=True RETURN u1
If you import the plaintext passwords into the database, you can have some interesting custom queries for that field as well. As an example, return users with seasons in their password.
match (u1:User) WHERE u1.plaintextpassword =~ "([Ww]inter.*|[sS]pring.*|[sS]ummer.*|[fF]all.*)" return u1.name,u1.plaintextpassword
After you imported the JSON file by placing it in the right directory the queries will show up in BloodHound:
Conclusion
By using CrackHound, a penetration tester can save time because all the information will be available in the BloodHound interface. This means that a penetration tester does not have to sift through the password cracking results to find the users' credentials.

Additionally, this opens up new Cypher query vectors, e.g., listing users with plaintext credentials that have RDP rights to at least one computer.
Adding the plaintext password field in the Neo4j database can also help to identify all users that have the same password. Neo4j also supports “fuzzy” matching with regular expressions an example query would be:
Match (u1:User) WHERE u1.plaintextpassword =~”(CompanyName.*)” return u1.name,u1.plaintextpassword
This will return all the usernames and their plaintext password (provided the password is cracked and in the Neo4j database).
I hope this quick walkthrough to expand BloodHound will prove useful to you in your next Internal Penetration Tests and will inspire other consultants to extend BloodHound further, and potentially share with the world!