Generating SSH Config Files with Ansible

If you like to stand up infrastructure in the cloud using Ansible (like we do), one of the pain points can be getting the new instance IP addresses configured in an SSH config file for easy connecting. This used to be a manual process, but generating these files as part of your playbook is straightforward using Jinja templates. When combined with a little-known feature of SSH, you will never need to make an SSH config file manually again.
Our goal is to create an Ansible playbook that performs the following steps:
- Creates a new EC2 instance
- Adds the new EC2 host to an in-memory inventory group launched
- Waits until SSH port 22 opens on the EC2 host
- Adds the host’s SSH key into ~/.ssh/known_hosts
- Creates a new SSH config file for the host and puts it into the SSH include directory
To start, we will take a look at the Ansible EC2 module. The examples at the bottom of the page basically provide all the code you need to get started building EC2 instances using Ansible and waiting for SSH to be available on that instance. In the examples section, notice the following block that uses the add_host module to add the public IP address of the new EC2 instance to the hostname variable and the string “launched” to the groupname variable.
      - name: Add new instance to host group
       add_host:
         hostname: "{{ item.public_ip }}"
         groupname: launched
       loop: "{{ ec2.instances }}"
If you use the EC2 module to create two (2) new instances, the block above would add the public IP addresses of both of those hosts to the launched list. In code, this might look similar to an array:
launched = {’54.232.48.21’, ’35.11.8.52’}
Ansible takes the public IP addresses and adds them to its in-memory host inventory. This will be important later. For now, just remember that the host inventory group name is launched. This list is gone once the playbook is completed, so we have to make use of it while the playbook is running.
SSH Include Statements
Before going any further, we need to add a small hook into SSH. Beginning in version 7.3p1, SSH config files can have an Include statement, which allows SSH to recognize any config file that is added to a designated folder.
In the ~/.ssh folder, create an include folder, then add the following line to the top of the main ~/.ssh/config file (create it if it does not exist):

Save and exit. SSH will now automatically recognize any SSH config file put into ~/.ssh/include. This makes it easy to create and delete new SSH config files based on project.
Generating SSH Files With Jinja Templates
Jinja is the magic behind generating customized files using Ansible. Jinja is a web-templating engine that receives input and uses the output to render a final document. It is very similar in principal to PHP or legacy ASP code, where code was templated in along with the final HTML output.
A simple example would be something along the lines of:
   {% for user in users %}
     <li><a href="{{ user.url }}">{{ user.username }}</a></li>
   {% endfor %}
The example above is just a loop that iterates across users and spits out an HTML list based on user attribute data.
We can apply the same principal for our SSH config file using the following Jinja template:
  #jinja2:lstrip_blocks: True

 {% for host in groups['launched'] %}
 Host aws{{ loop.index }}
   User ubuntu
   IdentityFile {{ ec2_key_path }}
   Hostname {{ hostvars[host]['inventory_hostname'] }}
   ServerAliveInterval 120

 {% endfor %}
Line by line this reads:
- Setting lstrip_blocks to True trims off leading whitespace. You do not have to set this, but I do because it keeps out unnecessary whitespace and gives the file a cleaner look (especially with multiple entries). More information can be found here.
- For each host (IP address) in the launched group:
- Write Host aws along with the loop index number (e.g., aws1). “loop.index” is 1 based, “loop.index0” is 0 based.
- Write User ubuntu
- Write IdentityFile+ the ec2_key_path string variable, which is passed in from the playbook vars section.
- Write Hostname + the hostname attribute from the inventory file. This is the IP address.
- Write ServerAliveInterval 120
Ansible Template YAML
Now that we have our Jinja template, we can use it in our Ansible playbook template module. The template module allows you to pass a file (including a Jinja file) and write out the rendered output to a destination you specify.
The YAML looks like:
       - name: Creating local SSH config files
       template:
         src: templates/ssh_template.j2
         dest: /Users/jason/.ssh/include/demo.conf
         ec2_key_path: /Users/jason/.ssh/jlang_demo_keys.pem
         mode: 0644
This code essentially saves a new SSH config file, demo.conf, to our SSH include directory. We have passed in the ec2_key_path variable so the template can render properly with that value. The important part is that we put this YAML after the section that generates the EC2 instance (so it populates the launched group with IP addresses).
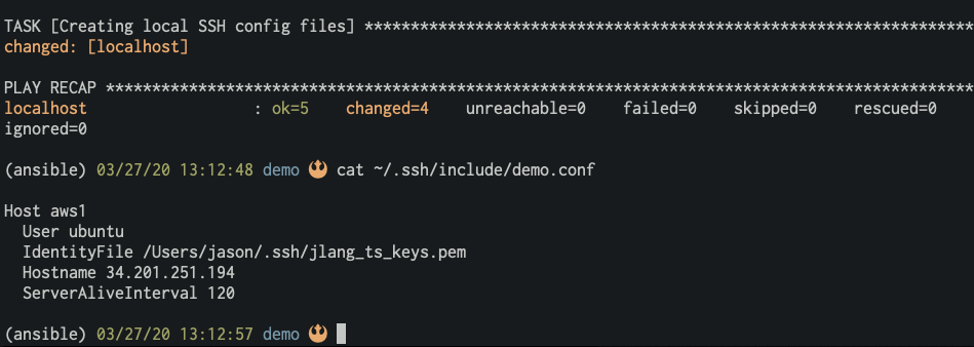
When the playbook has finished, you should have a shiny new SSH config file ready to use:
Get the entire project here: https://github.com/curi0usJack/Ansible-SSH-Conf
Enjoy!