Introducing CoWitness: Enhancing Web Application Testing With External Service Interaction

As a web application tester, I encounter a recurring challenge in my work: receiving incomplete responses from Burp Collaborator during DNS and HTTP response testing.

For example, Collaborator will provide the IP address that performed the DNS look up or HTTP Request. Sometimes, these responses turn out to be false positives caused by intrusion protection systems or other mechanisms in front of the actual application. In many cases, I find that the request is coming from a device in front of the web application related to Akamai or CloudFlare rather than the target server itself.
What’s also missing from the information in Collaborator is the URI and User-Agent. Both of these can be important for determining where the request originated and what actions the requests were taking.
I developed CoWitness as a solution. CoWitness is an application that mimics an HTTP server and a DNS server. This saves time by not having to install and configure a traditional webserver and DNS server to capture external service interactions during web application testing. In this blog post, I will discuss CoWitness' setup and usage, providing you with a tool to improve your web application testing.
Prepping the Environment
To begin, choose a domain name that you control for use within your testing environment. Next, set up a remote server and obtain a public IP address for it (Linux is the preferred operating system). A virtual private server works best for this, and it does not require a lot of resources such as disk space and RAM.
The next step is to register name servers for the domain. I’ll use examples from a domain registrar called Hover on setting this part up. Other domain registrars have a similar process.
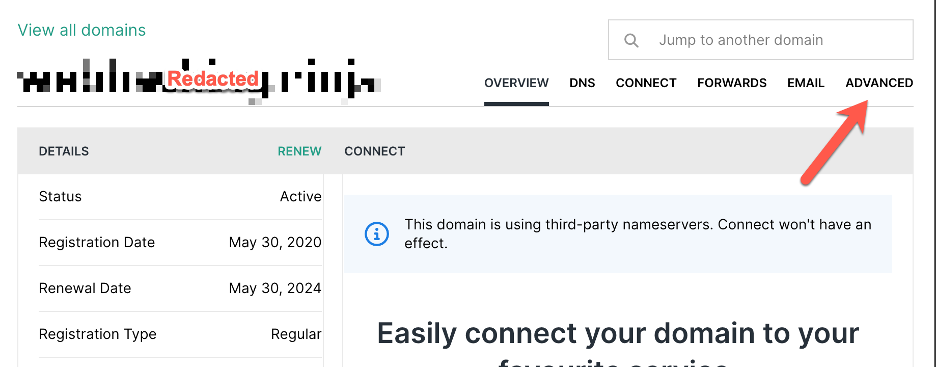
Log into the control at Hover and click on “Advanced”.
Next, scroll down to and click on “Add a Glue Record”.

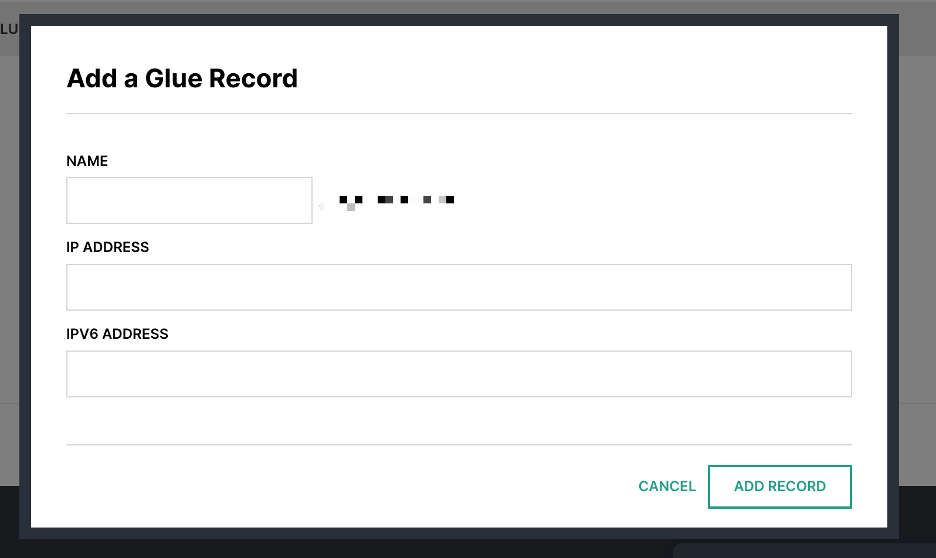
You will need to create two (2) Glue Records. For the names, use ns1 for the first record, and ns2 for the second. For the IP address, use the public IP address of your server or virtual private server. Once you save the changes, it will take 24-48 hours for the DNS propagation to take place. However, I rarely have to wait over an hour for this to take place with newly registered domain names. Existing domain names already pointed to an IP address tend to take longer to propagate.
What this DNS configuration does is cause all DNS and HTTP requests for the domain and all subdomains of the domain you control to be directed to your server or virtual private server.
Setting up CoWitness
You can use Git to download CoWitness and then compile it with Go using the following commands:
git clone https://github.com/stolenusername/cowitness

cd cowitness
At this point, you will need to edit the variables in the code as noted for IP address and domain name in the file cowitness.go:
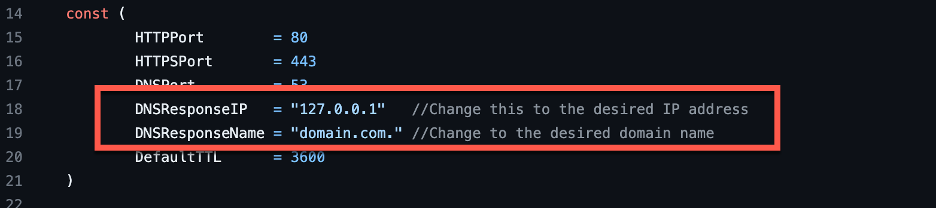
DNSResponseIP should be changed to the public IP address of your server or virtual server.
DNSResponseName should be changed to the top-level domain name you control.

ns1.domain.com and ns2.domain.com should be changed to reflect the top-level domain name you control.
The application can now be compiled with the following command:
go build cowitness.go
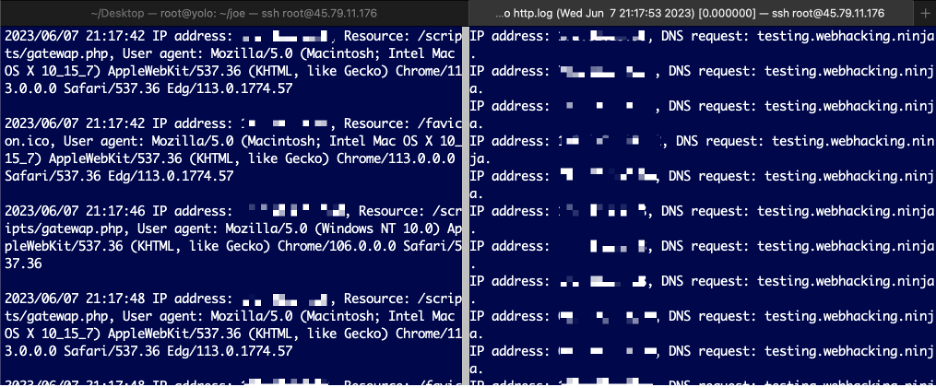
These commands will result in the CoWitness executable shown in Figure 7.

Using CoWitness
To start CoWitness, issue the command ./cowitness. from the same directory as the CoWitness executable.
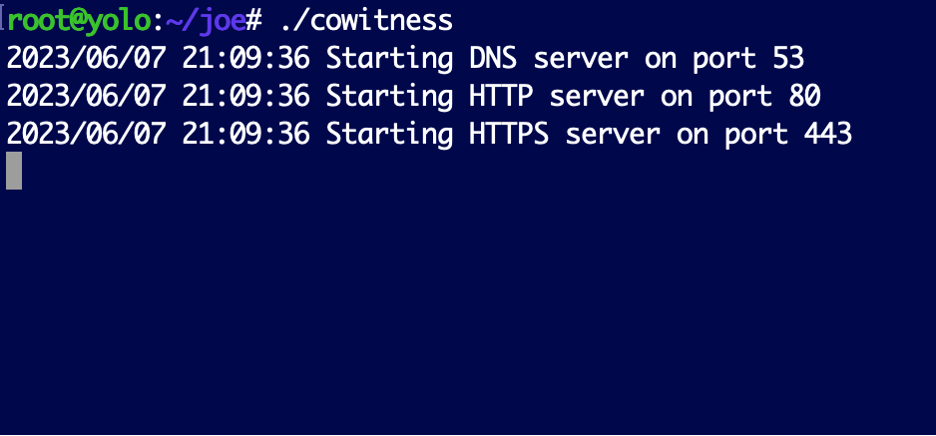
CoWitness starts listening on ports 80, 443, and 53 of your remote server (Make sure other services are not listening on those ports or it will fail to start). CoWitness logs of the all incoming requests to http.log and dns.log, which allows you to monitor and analyze the data.
To conveniently view both logs simultaneously in a terminal, you can utilize the MultiTail application. MultiTail is a powerful tool that enables you to monitor multiple log files in real-time, making it an ideal companion for CoWitness.
You can do this with the following command for Multitail within the same directory as the CoWitness executable: multitail -s 2 http.log -s 2 dns.log
The Benefits of CoWitness
CoWitness provides several benefits to web application testers. By capturing the requested resource and user agent information, it assists in identifying false positives. Through analyzing the logs, you can determine whether the requests are genuinely originating from the web application or if they are triggered by external factors.
In my experience, DNS requests are most often the result of an IPS, load balancer, or DDoS protection services in front of the application. However, HTTP requests are more interesting in that I often see requests for specific resources that are hardcoded in the application, or requests for resources I triggered with my command or payload.
For example, in the Figure 7 left-side pane, you can see that the application sent out an HTTP request for a resource called /scripts/gateway.php. Since I did not include that URL path in my payload, that tells me that application is coded in some way to request that.
Since CoWitness can serve files over port 80, I can create the directory /scripts and the file within that directory gateway.php containing PHP code on my remote server to see if I can trigger a response in the application.
This insight is valuable in distinguishing actual vulnerabilities from potential false alarms, saving time and effort in the testing process.
Moreover, CoWitness often reveals crucial details about the web application's behavior. Examining the resource paths and file names requested by the application can uncover hidden vulnerabilities. In some cases, CoWitness exposes specific directories or file paths where potential malicious code could be injected, leading to more comprehensive and thorough security testing.
I am releasing CoWitness to the public, hoping that it will assist web application testers in their quest for comprehensive testing and security assurance. Stay tuned for updates and enhancements as we continue to evolve CoWitness based on user feedback and emerging technologies.
You can also download CoWitness here: https://github.com/stolenusername/cowitness.