Malware Analysis is for the (Cuckoo) Birds - Cuckoo Installation Notes for Debian

 Cuckoo is written in the programming language Python and utilizes multiple Python libraries. First step is to verify that these libraries are in place and up to date. Cuckoo's Documentation does a good job of listing the commands, but can be confusing. The following will outline the commands needed to install Cuckoo and provide a brief description about each part.
Setup Requirements:
Cuckoo requires multiple different libraries. These libraries each in turn require others. Debian and Ubuntu aid in program and library installation, through the aptitude (apt-get) commands. It will not hurt to attempt to install a library or program if it is already installed on the system. The package manager will detect that it is installed and skip. The structure of the following commands will be: the command to issue in bold, followed by an explanation of what is being installed. Open a terminal window, as a non root user, and copy/paste the following commands.sudo apt-get update
Iterates through the /etc/apt/sources.list file updating the local record with the newest version of the libraries and their dependencies.
sudo apt-get install python python-pip python-dev libffi-dev libssl-dev
python -> Installs the python 2.7 Interpreter. Used to run python scripts
python-pip -> Tool to install Python packages
python-dev -> Contains the header files to build python extensions
libffi-dev -> Library for portable Foreign Function Interface. Used to bridge between interpreted and compiled code
libssl-dev -> Contains development libraries, header files and manpages for lib ssl and libcrypto
sudo apt-get install python-virtualenv python-setuptools
python-virtualenv -> Tool to create isolated Python environments
python-setuptools -> Tool to aid in download, build, install, upgrade and uninstall Python packages
sudo apt-get install libjpeg-dev zlib1g-dev swig
libjpeg-dev -> Development files for the JPEG runtime library
zlib1g-dev -> Development Files for the compression library zlib
swig -> Connects programs written in C and C++ with scripting languages
sudo apt-get install mongodb
mongodb -> A no-sql Database and is used in Cuckoo as a backend to the Django web interface.
Alternative to mongodb is to use postgresql. IF you plan on having a very large set of cuckoo sandboxes (such as a multi node environment) or you plan on submitting many malware samples, PostgreSQL is a good choice.
sudo apt-get install postgresql libpq-dev
postgresql -> Database alternative. Object Relational Database management system
libpq-dev -> Development files (Header files, static libraries) for the PostgreSQL library libpq
sudo apt-get install tcpdump apparmor-utils
tcpdump -> Network capture utility. Considered more secure than Wireshark
apparmor-utils -> Linux Security Module. Confines individual programs to a set of listed files and posix 1003.1e draft capabilities.
sudo aa-disable /usr/sbin/tcpdump
NOTE: I had an issue with “Profile for /usr/sbin/tcpdump not found, skipping” error message. To resolve use the following
sudo apt-get install apparmor-profiles-extra
This added the needed profile to get around the above error.
sudo setcap cap_net_raw,cap_net_admin=eip /usr/sbin/tcpdump
Gives permission to run tcpdump as root without Cuckoo being run as root.
To verify the setcap command issue the following
getcap /usr/sbin/tcpdump
Output should be similar to
/usr/sbin/tcpdump = cap_net_admin,cap_net_raw+eip
OPTIONAL
Install Volatility to enable the analysis to scan memory dumps from the VM. This can be time consuming. Instructions on how to install Volatility can are located on their site. For a basic installation of Cuckoo, this program is not added. Inetsim Internet services simulation suite. Used to simulate the HTTP and DNS protocols. Any request from the client will be redirected to the Host. Specific responses are customizable.echo “deb http://www.inetsim.org/debian/ binary/” > /etc/apt/sources.list.d/inetsim.list
Add the repository for the inetsim to the aptitude.
wget -O – http://www.inetsim.org/inetsim-archive-signing-key.asc | apt-key add -
Pull down the inetsim key and add it to the apt list.
apt-get update
Update the list of available packages from the inetsim
apt-get install inetsim
Install the inetsim and its dependencies
Edit the inetsim configuration file /etc/inetsim/inetsim.conf. Modify the following values to point to the Host virtual network IP address.
service_bind_address            192.168.56.1

dns_default_ip                       192.168.56.1
Edit /etc/default/inetsim to enable the tool
ENABLED 1Restart the inetsim service
sudo service inetsim restart
pip install m2crypto
pip is Python's installation tool, previously installed as python-pip.
M2crypto is a Python wrapper of OpenSSL features RSA, DA, DH, EC, HMACs, and more.
NOTE: Cuckoo installation instructions say to use “pip install m2crypto==0.24.0” but this failed for me. Remove the "==" and it worked.
Cuckoo Installation:
Next step will be to install Cuckoo. First, we will add a new user to run the Cuckoo sandbox. You never want to run the sandbox as “root”. Then, as the newly created user, create a virtual Python environment. Enter the virtual Python environment and install the setuptools and Cuckoo. Remember to always start the sandbox from this user and inside this virtual environment, as Cuckoo will not exist outside of this environment.sudo adduser cuckoo
adduser -> Creates a new user with the name cuckoo.
Proxmox Log in as the cuckoo user. Proxmox does not have sudo by default.
apt-get install sudo.

virtualenv venv
Creates an isolated Python environment. Think of a python jail.
This creates a copy of the python libraries and source code that is independent from the rest of the system. It will be located in the current working directory.
. venv/bin/activate
Enters the isolated virtual environment.
NOTE: The command is “.” <space> “venv/bin/activate” do not forget the space.
pip install -U pip setuptools
From within the isolated environment use the pip command to install and upgrade pip and setuptools to aid in installing, upgrading, and uninstalling python packages.
pip install -U cuckoo
From within the isolated environment use the pip command to install cuckoo sandbox. Cuckoo will now only be able to be run from within this virtual environment. To start Cuckoo, you must first enter the environment using
. venv/bin/activate
You will know you are in the virtual environment when you see the (venv) prompt, as demonstrated in Figure 19.
[caption id="attachment_14250" align="aligncenter" width="381"]Configure Cuckoo
Cuckoo is installed, now what? Now is the sometimes intimidating process of configuring Cuckoo. Cuckoo provides a lot of description in their configuration files, but sometimes it too much. So, I will outline the items to change in order to get a basic analysis server up and running with one VM. The newer version of Cuckoo provides a nice feature. When starting Cuckoo for the first time, it creates a directory, ~/.cuckoo, in the current user home directory, containing all the Cuckoo related files, and all results are also stored here. Run the following command, in the venv environment, to create this directory.cuckoo -d
Setups all the configuration files and creates the working directory
Note the working directory will be written in red. See Figure 20.
[caption id="attachment_14251" align="aligncenter" width="974"]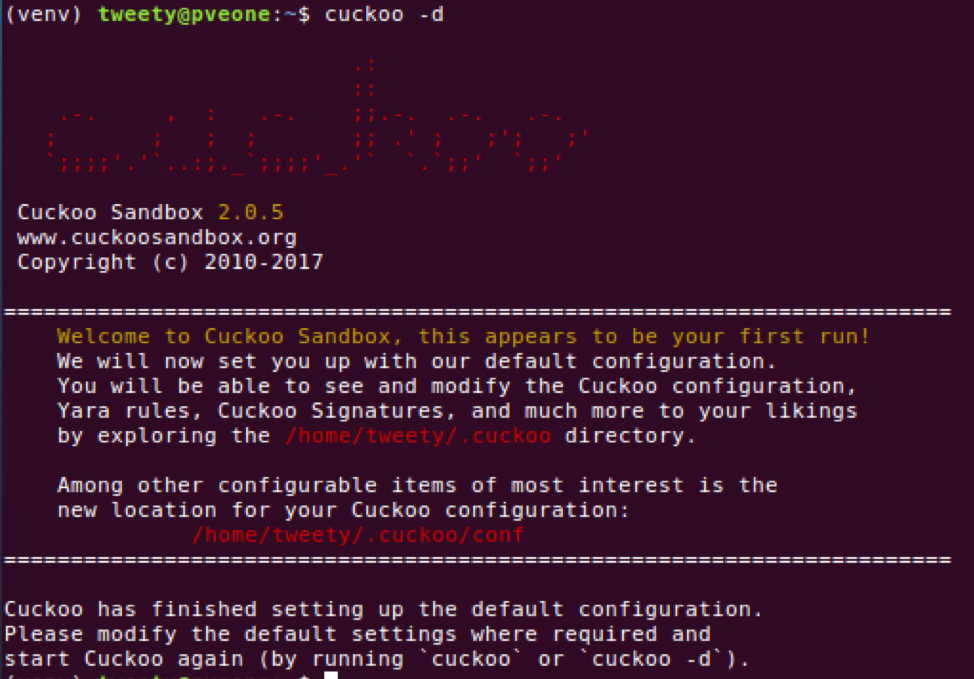 Fig. 2 - Create Cuckoo Working Directories and Files[/caption]
Located in the newly created .cuckoo directory is the conf directory. This contains the configuration files to setup Cuckoo. We will now walk through these files noting what needs to be modified for the basic functionality.
Fig. 2 - Create Cuckoo Working Directories and Files[/caption]
Located in the newly created .cuckoo directory is the conf directory. This contains the configuration files to setup Cuckoo. We will now walk through these files noting what needs to be modified for the basic functionality.
~/.cuckoo/conf/cuckoo.conf
Change the machinery value to the virtualization software. i.e. VirtualBox, VMware, KVM, QEMU, or Proxmox
[caption id="attachment_14252" align="aligncenter" width="954"] Fig. 3 - Example cuckoo.conf Machinery Section[/caption]
IP address is the address of the Result Server.
[caption id="attachment_14253" align="aligncenter" width="974"]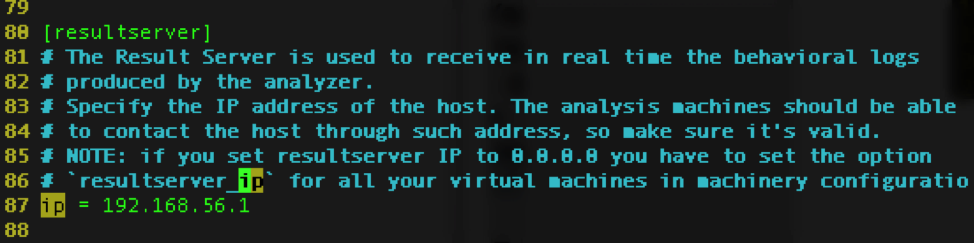 Fig. 4 - example cuckoo.conf resultserver Section[/caption]
This is where the Agent in the client sends the data after the malware is run and is most commonly the IP address of the Host.
In VirtualBox, there is a virtual network with its own IP address range. The Host is assigned the 192.168.56.1 address by default. This can be determined by Opening VirtualBox Preferences.
[caption id="attachment_14254" align="aligncenter" width="779"]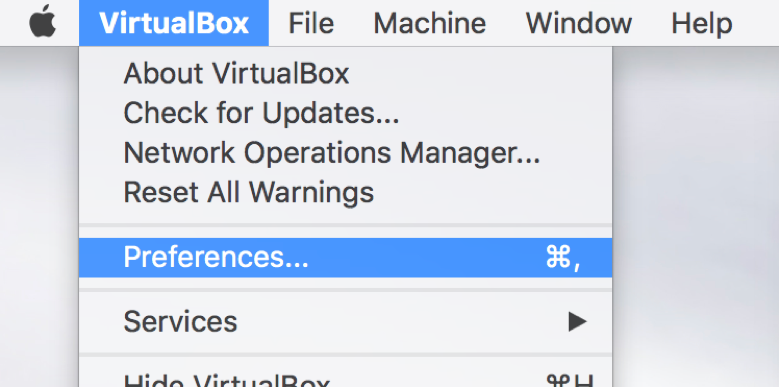 Fig. 5 - VirtualBox Preferences[/caption]
Selecting the Network Tab and the Host-only Networks. There should be a vboxnet0. Select the vboxnet0 and click the screwdriver icon on the right. Remember this interface name, it will be needed in the next section.
[caption id="attachment_14255" align="aligncenter" width="974"]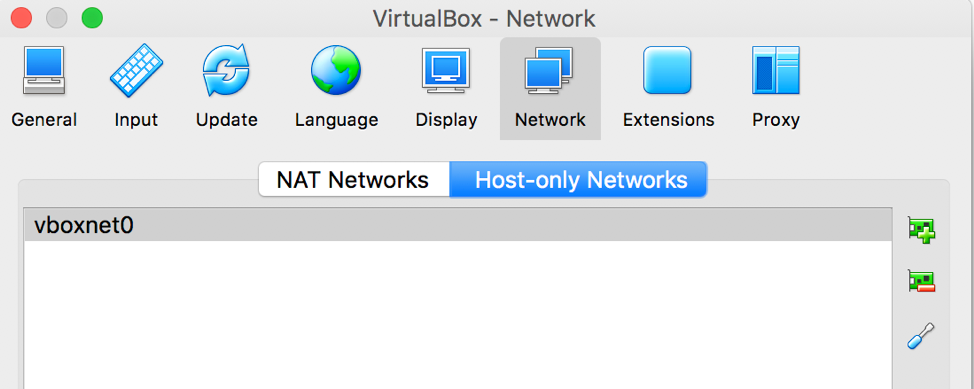 Fig. 6 - VirtualBox Network Preferences[/caption]
This new pane will display the current settings for this vboxnet0 network. In this case, the Host IP address is 192.168.56.1.
[caption id="attachment_14256" align="aligncenter" width="974"]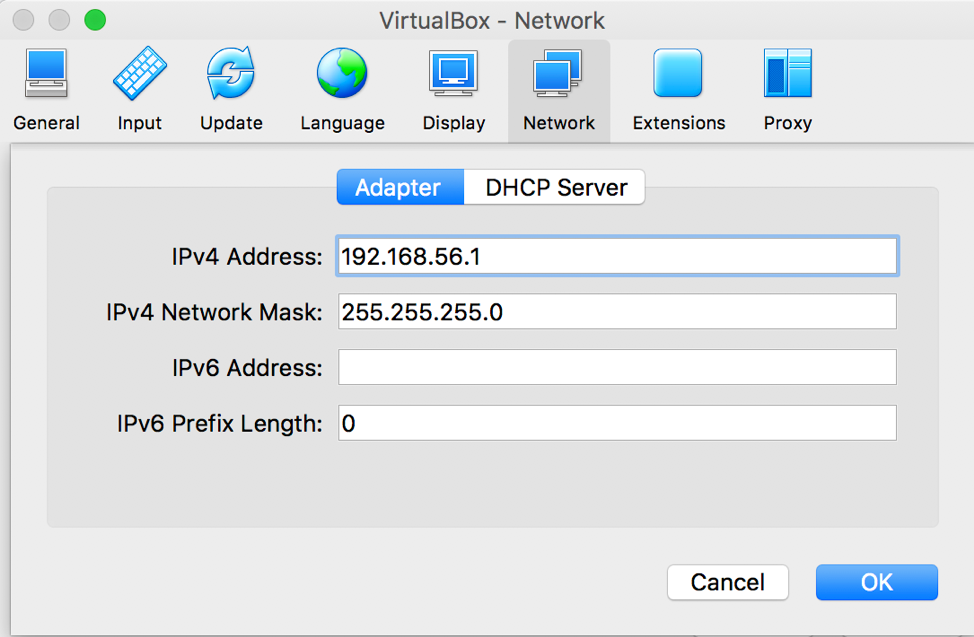 Fig. 7 - VirtualBox Network Host-Only Preferences[/caption]
With the Guest VMs pulling from the DHCP Server with an IP address range from 101-254. Note: I statically assign IP addresses to my Guest VMs. This makes populating the <machine>.conf easier.
[caption id="attachment_14257" align="aligncenter" width="974"]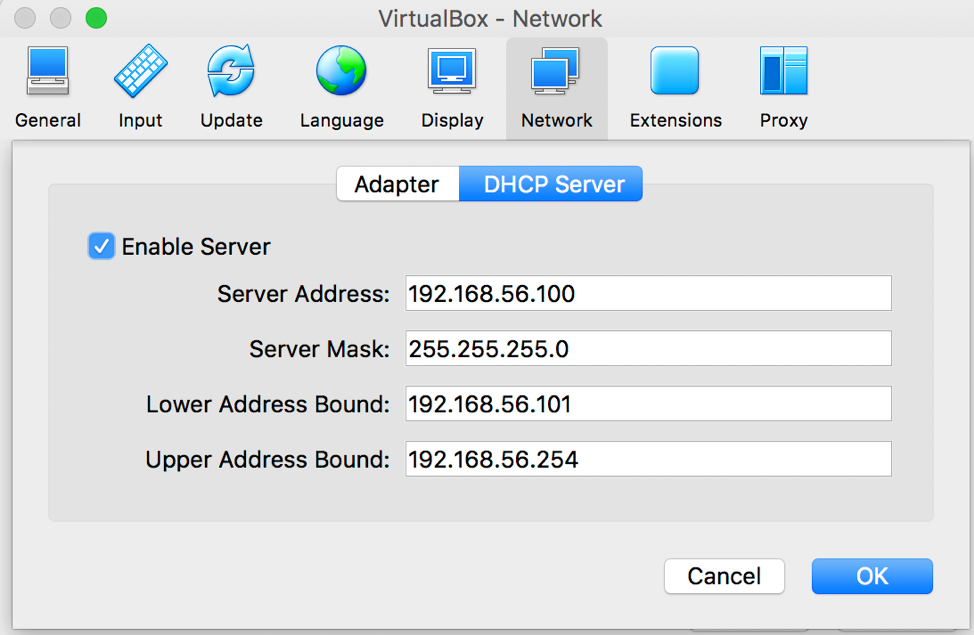 Fig. 8 - VirtualBox Network Host-Only DHCP Preferences[/caption]
Port for the Result Server.
[caption id="attachment_14258" align="aligncenter" width="849"] Fig. 9 - cuckoo.conf Example Result Server Port Number[/caption]
The IP address and port need to match the values configured in the config file that corresponds to the virtualization software being used. Ie VirtualBox has the config of virtualbox.conf
~/.cuckoo/conf/auxiliary.conf
For basic install, just leave this as default. For more advanced installs, this allows to enable Man-in-the-middle attacks on SSL connections. Starting specific services like Honeyd is a good way to interact with the malware and record the interaction and results.
~/.cuckoo/conf/virtualbox.conf
If you are using a different virtualization software, such as VMware, you will need to edit the corresponding file, vmware.conf. In this case, we are setting up VirtualBox so we will edit the virtualbox.conf. Each config file varies slightly as each virtualization software execute differently.
path
Virtual box requires the path to executable vboxmanage. Path can be found by running from the command line “which vboxmanage”
[caption id="attachment_14259" align="aligncenter" width="974"] Fig. 10 - virtualbox.conf example VirtualBox path[/caption]
interface
The interface name of the network adapter. This was gathered in the previous section. This can be overwritten in each of the virtual machine sections.
[caption id="attachment_14260" align="aligncenter" width="466"]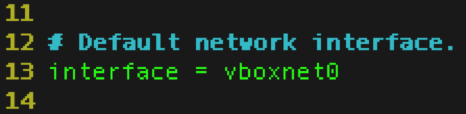 Fig. 11 - virtualbox.conf Example Setting Network Interface[/caption]
machines
A comma separated list of VM names. These will match the names in the “[<name>]” later in this file. Figure 30 shows two (2) machine names. cuckoo1 and cuckoo1_Office. These machines will have a [cuckoo1] and [cuckoo1_Office] section.
[caption id="attachment_14261" align="aligncenter" width="974"]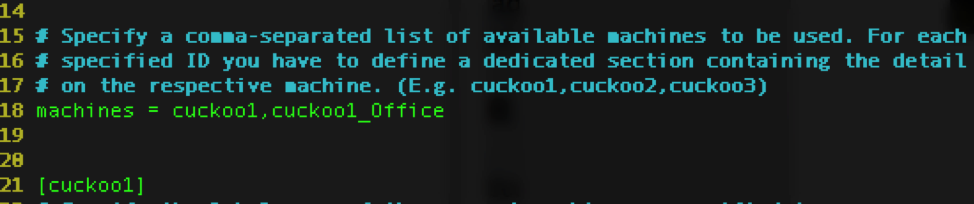 Fig. 12 - virtualbox.conf Example Virtual Machine Selection[/caption]
Individual Machine sections
Fig. 12 - virtualbox.conf Example Virtual Machine Selection[/caption]
Individual Machine sectionsThe machine sections all start with the “[<name>]” see Figure 31. The name needs to be unique but does not have to match the name of the Virtual Machine.
[caption id="attachment_14262" align="aligncenter" width="974"]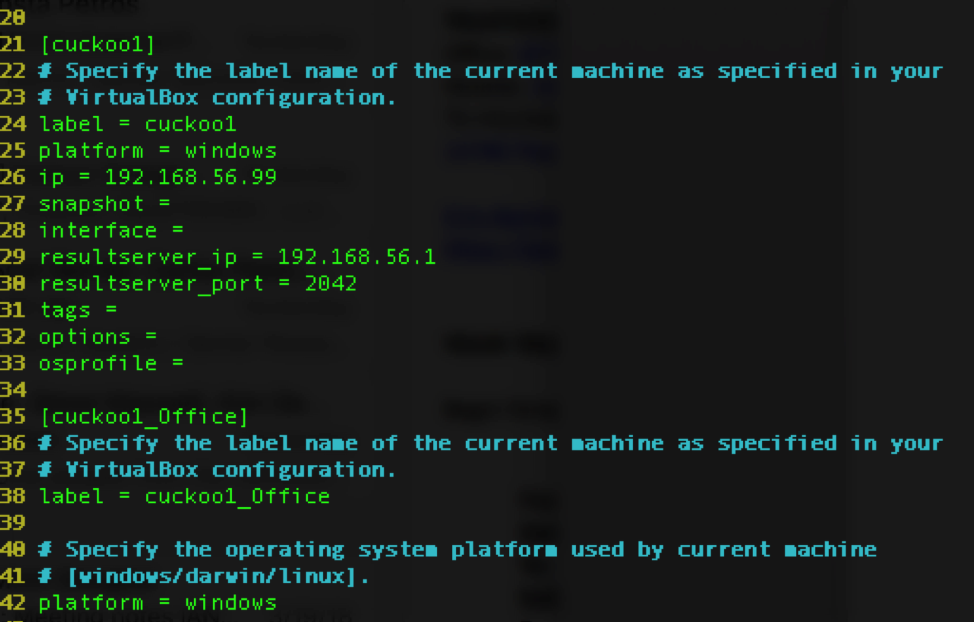 Fig. 13 - virtualbox.conf Example Virtual Machine Section[/caption]
label
Label on the other hand, must match the name of the VM
ip
IP address is the address given to the client machine. I statically assign the IP address to the clients. Given the network configuration discussed in the last section I have a dynamic range of 100-254, so my static addresses are below 100. In this case its 192.168.56.99.
snapshot
Snapshot is the name of the snapshot to revert back to before the execution of the malware. If left blank, Cuckoo will revert back to the previous snapshot.
Note: The VM must have at a least one (1) snapshot.
resultserver_ip
The resultserver_ip needs to match the IP address assigned in the cuckoo.conf.
resultserver_port
The resultserver_port needs to match the port assigned in the cuckoo.conf
~/.cuckoo/conf/memory.conf
This allows the configuration of Volatility, which will scan the memory dumps. If the virtualization software does not support this or Volatility is not installed, than skip this section. cuckoo.conf will have memory_dump = no
~/.cuckoo/conf/processing.conf
Used to control the analysis performed on the results. Configure depending on your needs, but for the most part can leave as default.
~/.cuckoo/conf/reporting.conf
Stores configuration about the reports, which covers what is stored to where it is stored. If you want to use the Web front-end, under mongodb change enable = no to enable = yes
[caption id="attachment_14263" align="aligncenter" width="639"]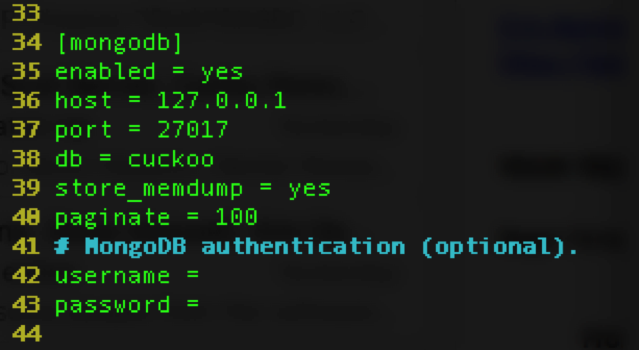 Fig. 14 - MongoDB Example Config[/caption]
Other DB is supported for larger organizations such, as elastic search. Reports are also stored locally in JSON by default. The JSON reports are located ~/.cuckoo/storage/analyses/<Task Number>/reports/report.json
~/.cuckoo/conf/routing
Setup routing options for the Cuckoo Rooter. This allows sample by sample or global configuration on networking. You can configure to allow no network traffic from the Guest through the Host bridged network, some specific traffic, or all traffic. It is very customizable.
Update Cuckoo Signatures
By default, cuckoo does not download the latest signatures. To update the signatures from the terminal, run the following commandcuckoo communityI schedule a task to run this command once a week. [caption id="attachment_14264" align="aligncenter" width="972"]
 Fig. 15 - Updating Cuckoo Signatures[/caption]
Cuckoo Agent Installation on Kali:
Cuckoo communicates with the Guest VMs through a Python program named agent.py. This agent opens a port for the Host to connect. The Host will push the malicious file through this connection, along with the information on how to explode and analyze the results. The agent.py also creates a connection to the resultserver configured in the cuckoo.conf and the virtualbox.conf, sending the results of the analysis through this connection. The Guest VM needs to match the settings in the virtualbox.conf. Static IP address same as in the <machinery>.conf file [caption id="attachment_14265" align="aligncenter" width="974"]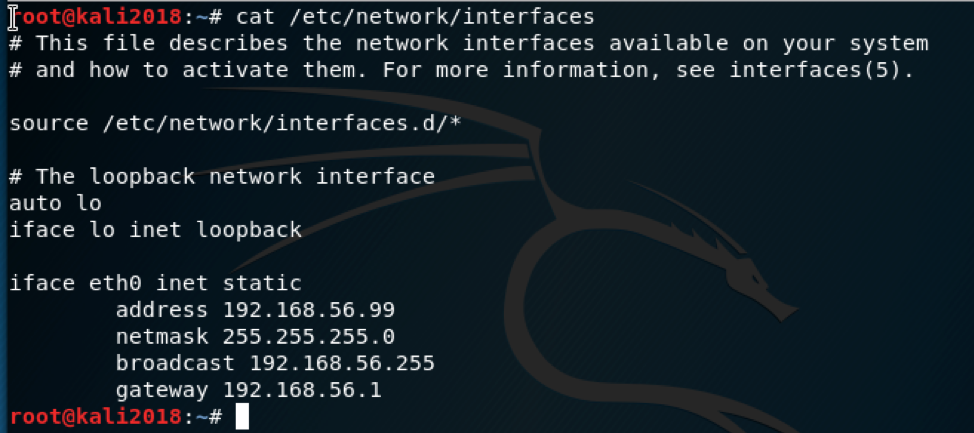 Fig. 16 - Guest VM Static Network Configuration[/caption]
Copy agent.py and agent.sh to the Guest VM
There are multiple ways to transfer files from Host to Guest. The agent files are located in ~/.cuckoo/agent/. I prefer to transfer files to the Guest with python -m SimpleHTTPServer 8080 run from the directory with the files I wish to transfer. This creates an HTTP server with the root directory being the current directory. In a browser on the Guest, I go to the Host IP address, 192.168.56.1, and download the files I need.
Move agent.sh into the /etc/profile.d/ folder.
Modify agent.sh to point to the agent.py script.
[caption id="attachment_14266" align="aligncenter" width="974"]
Fig. 16 - Guest VM Static Network Configuration[/caption]
Copy agent.py and agent.sh to the Guest VM
There are multiple ways to transfer files from Host to Guest. The agent files are located in ~/.cuckoo/agent/. I prefer to transfer files to the Guest with python -m SimpleHTTPServer 8080 run from the directory with the files I wish to transfer. This creates an HTTP server with the root directory being the current directory. In a browser on the Guest, I go to the Host IP address, 192.168.56.1, and download the files I need.
Move agent.sh into the /etc/profile.d/ folder.
Modify agent.sh to point to the agent.py script.
[caption id="attachment_14266" align="aligncenter" width="974"]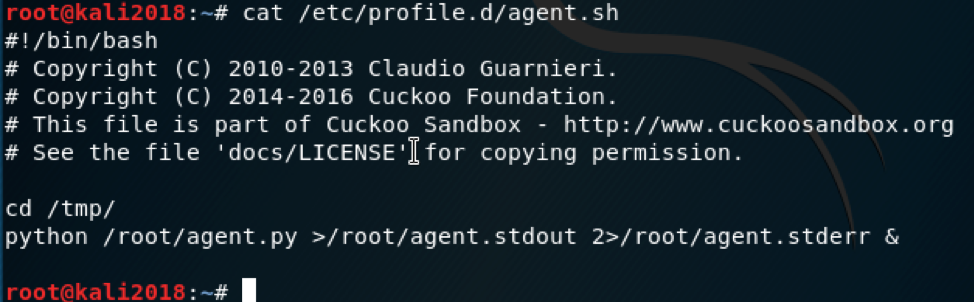 Fig. 17 - Guest VM Agent Persistance[/caption]
An alternative to adding the agent.sh to the profile.d directory, is to take a live snapshot of the Guest VM after the agent has been started. Every time the Guest is reverted to the previous snapshot, the agent will be running. This is valid for VirtualBox.
Fig. 17 - Guest VM Agent Persistance[/caption]
An alternative to adding the agent.sh to the profile.d directory, is to take a live snapshot of the Guest VM after the agent has been started. Every time the Guest is reverted to the previous snapshot, the agent will be running. This is valid for VirtualBox.
Start Cuckoo
To start Cuckoo as a daemon, issue cuckoo from the VirtualEnv terminal. [caption id="attachment_14267" align="aligncenter" width="974"]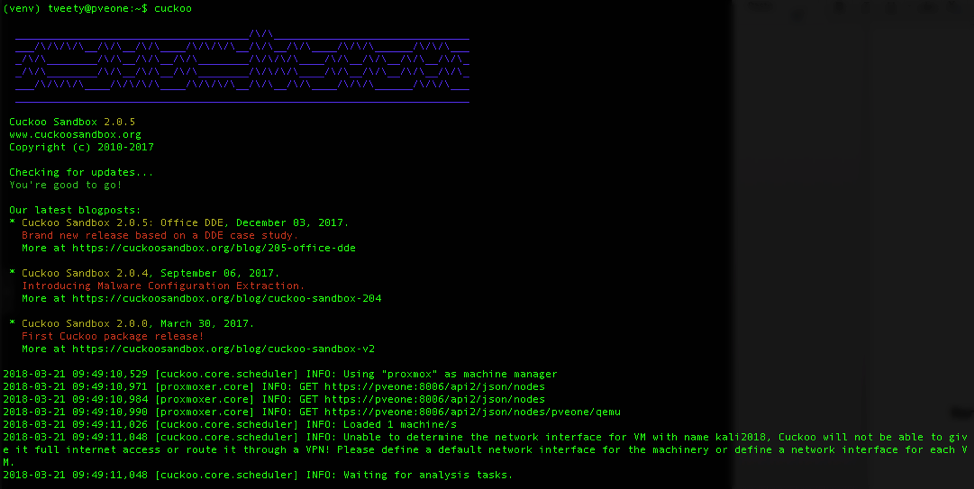 Fig. 18 - Cuckoo Server Launch[/caption]
Start Cuckoo web open for everyone
To start Cuckoo’s web interface, issue cuckoo web from the terminal. This will start a web server that listens on the localhost. To enable others to use the Cuckoo web interface issue cuckoo web -H 0.0.0.0 -p 8000. [caption id="attachment_14268" align="aligncenter" width="929"]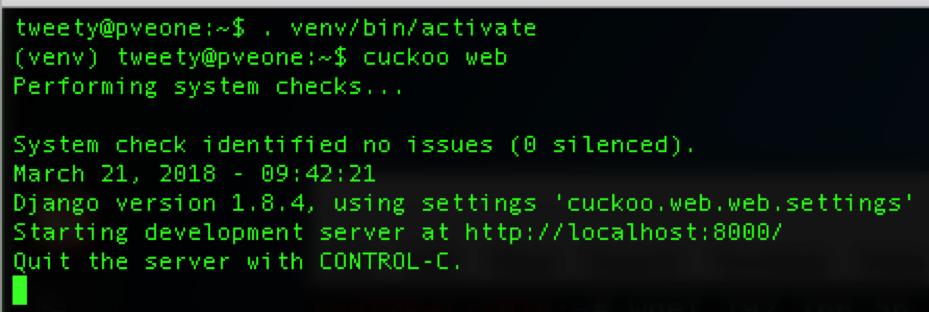 Fig. 19 - Starting Cuckoo Web Interface[/caption]