Next Gen Phishing - Leveraging Azure Information Protection

In this blog post, I will go over how to use Azure Information Protection (AIP) to improve phishing campaigns from the perspective of an attacker. The idea came during an engagement where I was having trouble getting phishing emails into users' inboxes without being caught by a sandbox on the way. During this engagement, it struck me like a bolt of lightning that I could use AIP (also known as Rights Management Service) to protect the attachments and even the email so that only the designated recipient could open it. That way, it would not matter if the sandbox got the file since it will not be possible for it to read the contents.
AIP works in two ways. First, it adds encryption to the files you protect and second before the designated user can open the document, it has to contact Azure to verify the identity to obtain the decryption key. This key is only valid for a certain time (more on that later in this post).
Walkthrough
In order to get started, you need to have your phishing domain in Office 365. This can be done by adding your custom domain to your tenant from the administrator portal[.
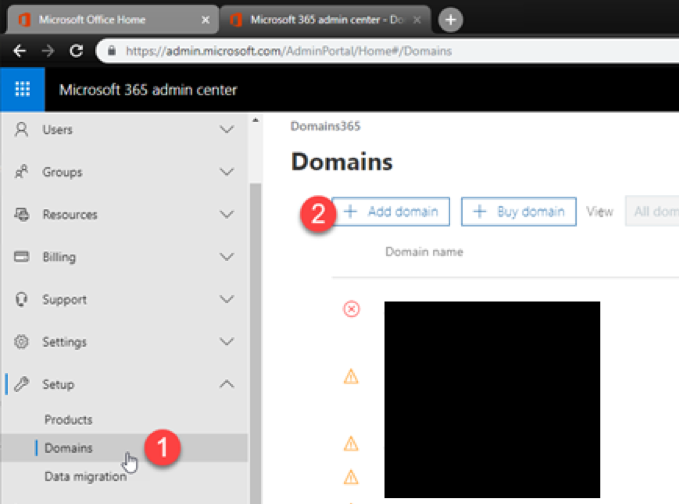
This is as easy as following the wizard to get your domain added—it includes adding DNS records to verify your ownership of the domain.
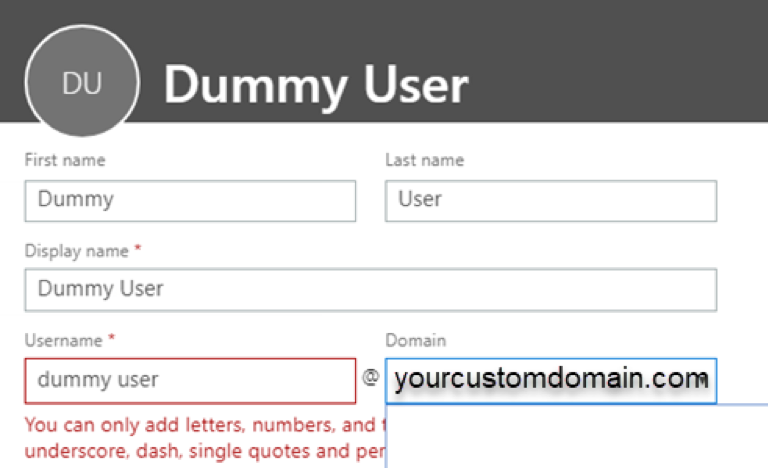
Once that is taken care of, create an account for your custom domain and assign it the correct license required for using AIP.
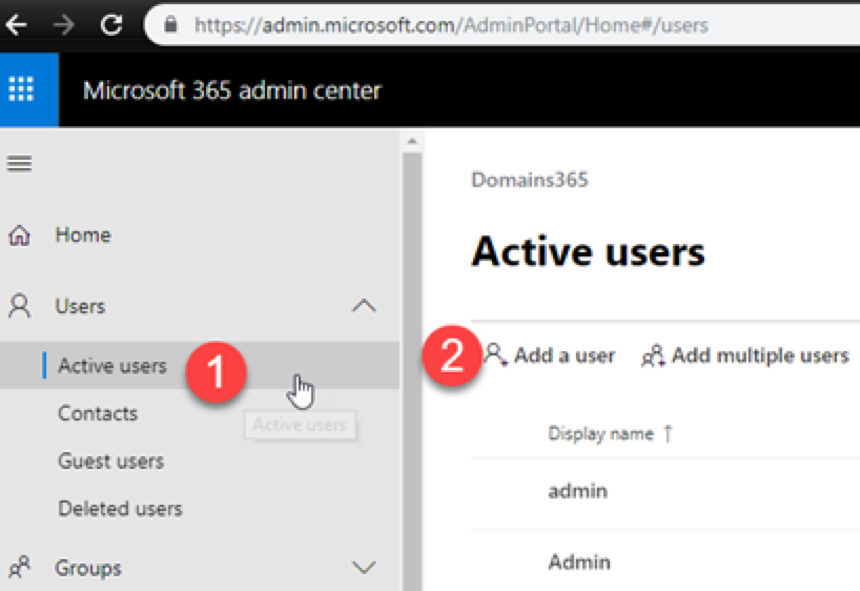
In the 'Add a user' dialog, fill in the fields and choose your custom domain from the list.
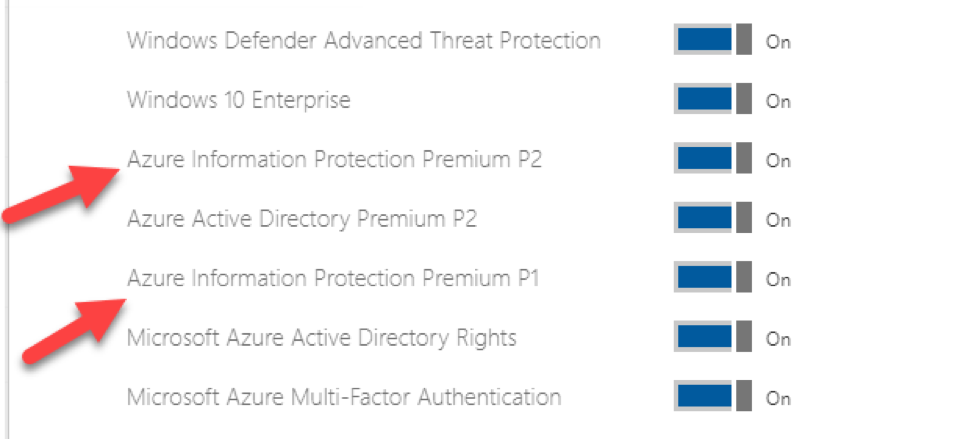
Now comes the most important part, which is licensing. In order to have the possibility of using AIP, you need the correct license. A minimum of Azure Information Protection Premium P1, which is included in Microsoft 365 E5, is required. I am not a licensing expert, but the details can be found here.
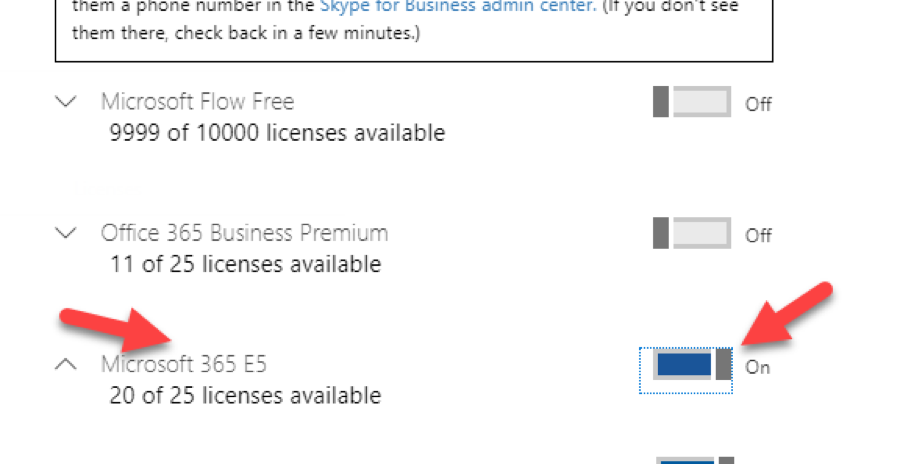
Additionally, make sure the sub-products are turned on:
After you have selected the correct license, you are good to go. Next up in our walkthrough is to install the AIP client on a Windows virtual machine (VM) with Office, and then log on to AIP as the new user.
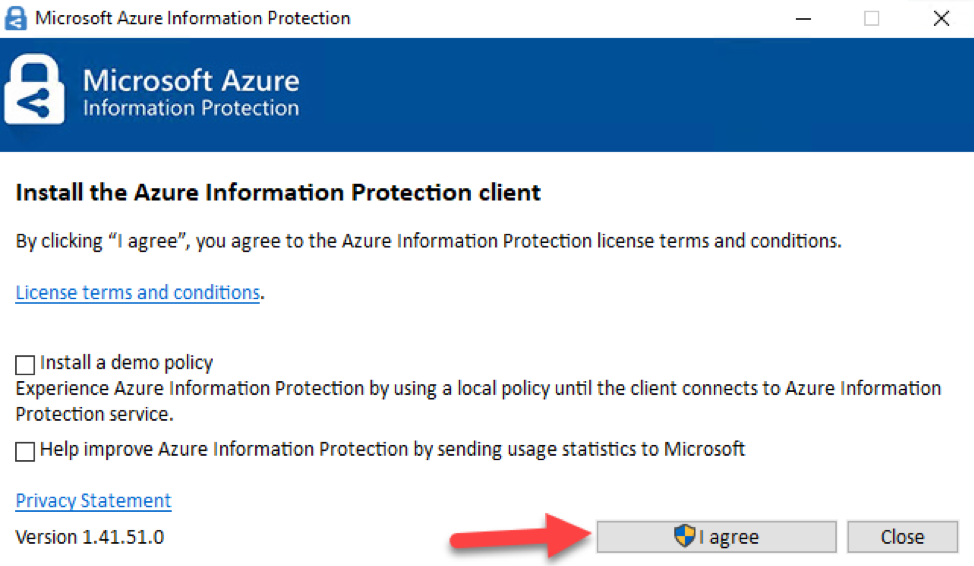
The AIP client can be downloaded from the following URL:
https://www.microsoft.com/en-us/download/details.aspx?id=53018
The file you want is AzInfoProtection.exe. Install this file on your Windows VM client. If you are not a fan of giving away telemetrics, I would recommend considering removing the 'Help to improve Azure Information Protection by sending usage statistics to Microsoft' checkbox before clicking 'I Agree.'
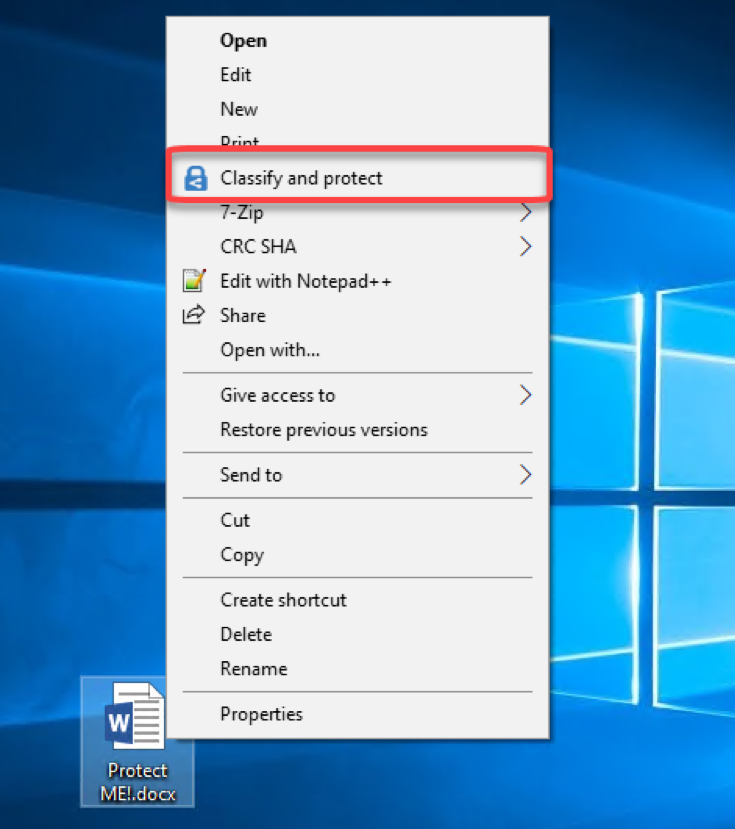
After the installation is done, right-click on a Word document to get started.
After you have clicked 'Classify and protect,' you will then be asked to sign in to your account. Here, you want to authenticate using the Office 365 user you created earlier.
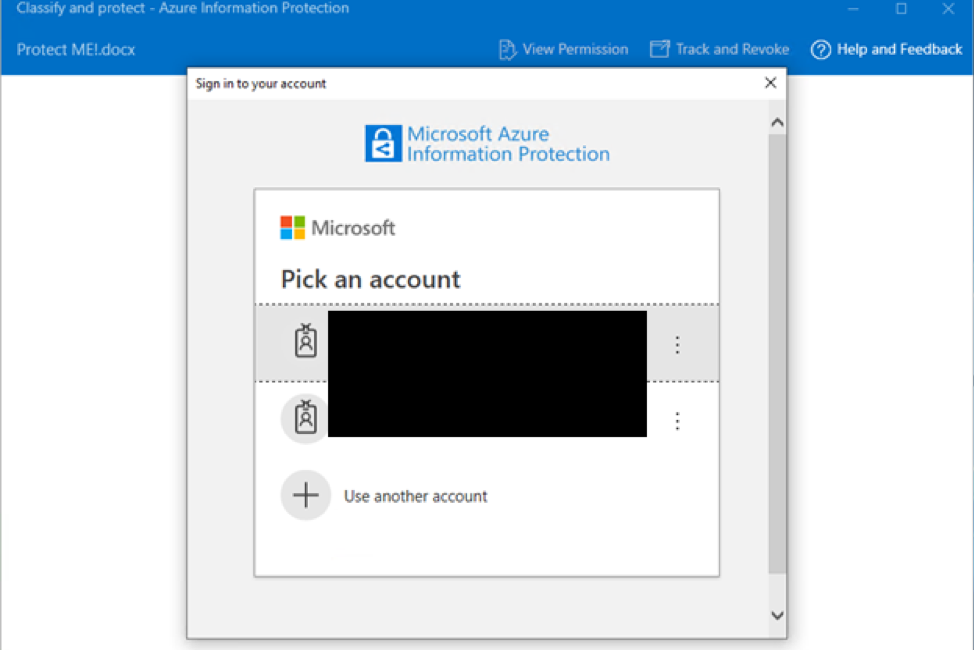
(If you have already 'connected' Office with another user, you must logoff from inside Word/Excel, or you can see additional troubleshooting steps here.)
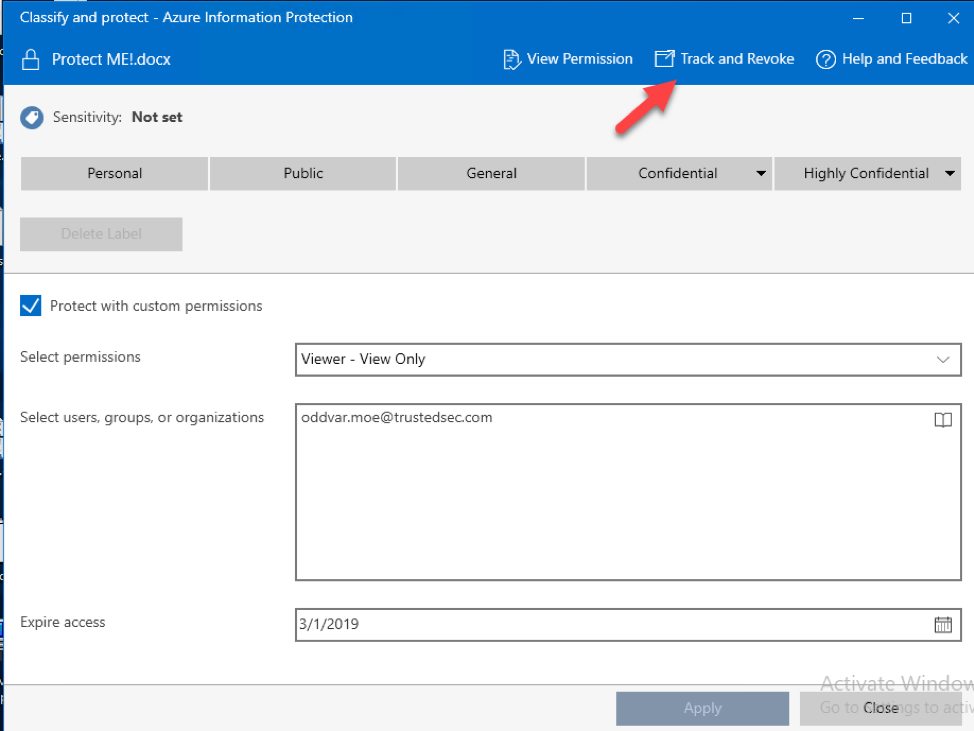
If everything went smoothly, you should now see this window:
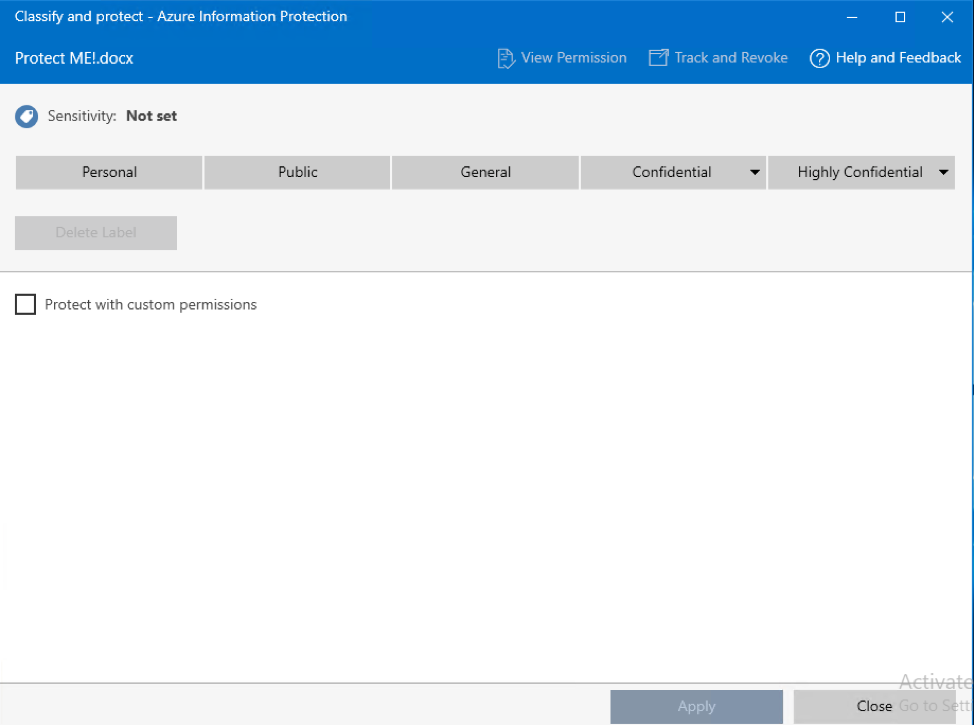
This is where you configure the protection for your document. Imagine that this is a document with a macro or even a link that you want to protect, and you want to only allow a specific user to open this document. We then need to use the 'Protect with custom permissions' checkmark.
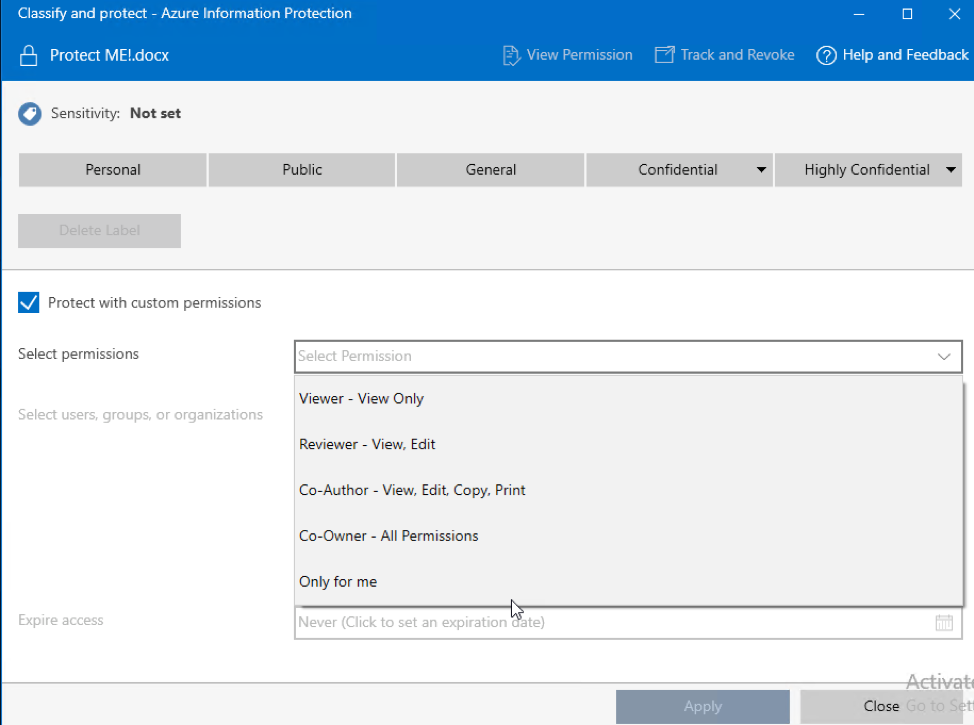
After you have check marked the 'Protect with custom permissions' you can specify the permissions:
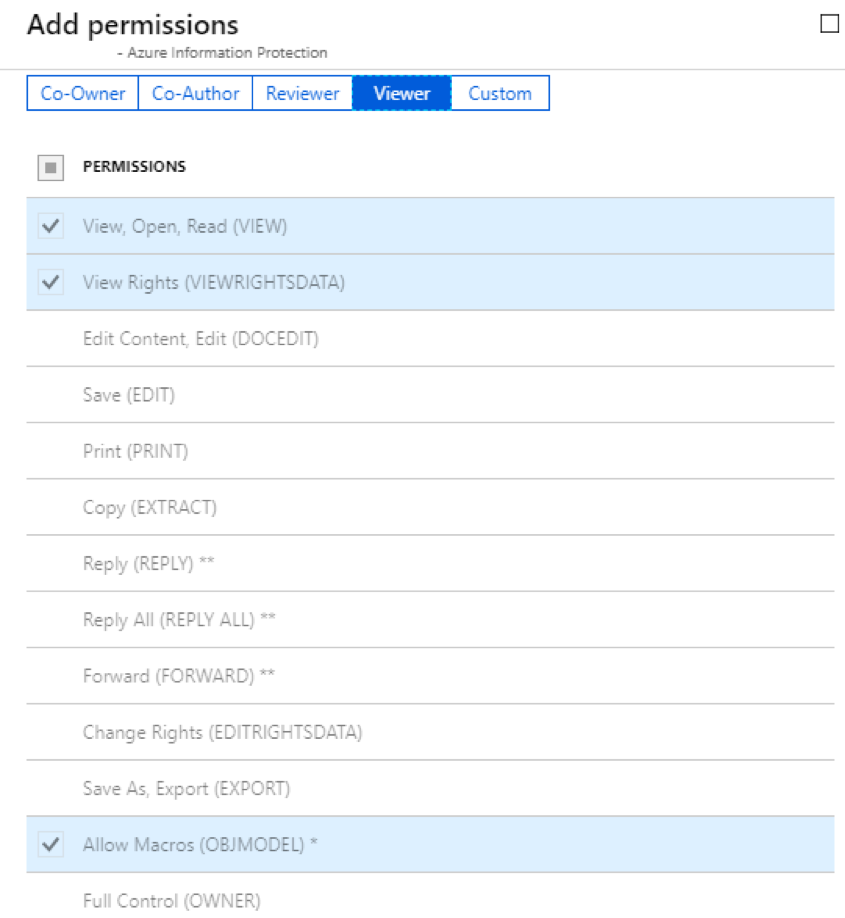
For a user to be able to execute a macro, 'Viewer' is enough. The screenshot below is a list of the permissions granted to the 'Viewer' protection:
Next, fill in the selected targets in the 'Select users, groups, or organizations' field. These are the users who can view this document afterward. You, as the owner, are always allowed.
The 'Expire access' is a setting we can use to specify when the content should expire. This works very similarly to how online video renting works—you give the user permission to view this file for a specified time. You can also revoke the document before the time has expired (more on that further down in this article).
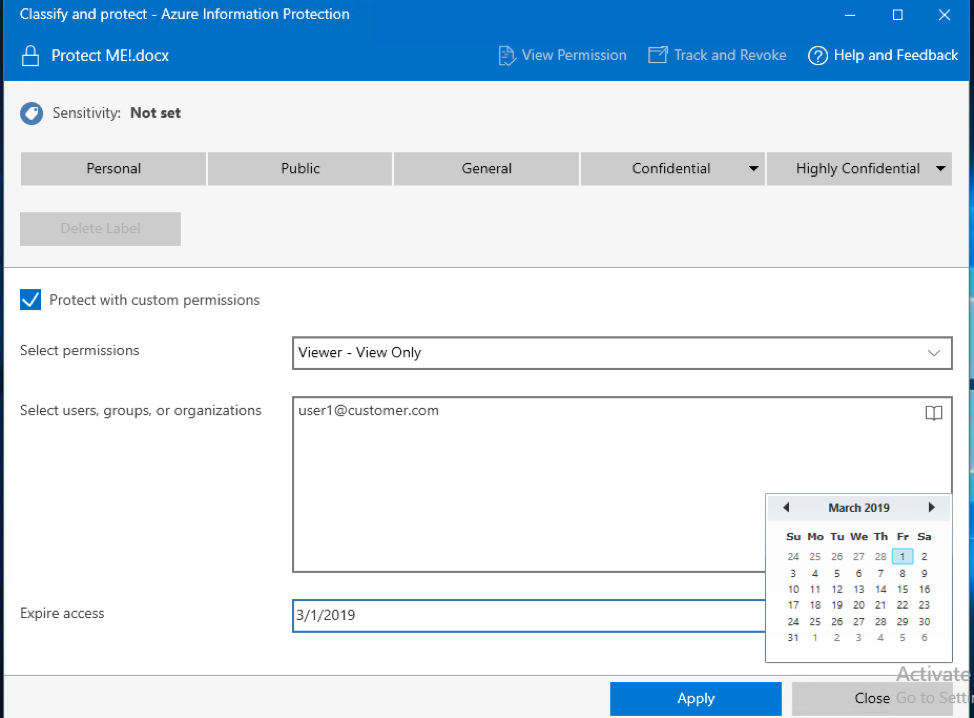
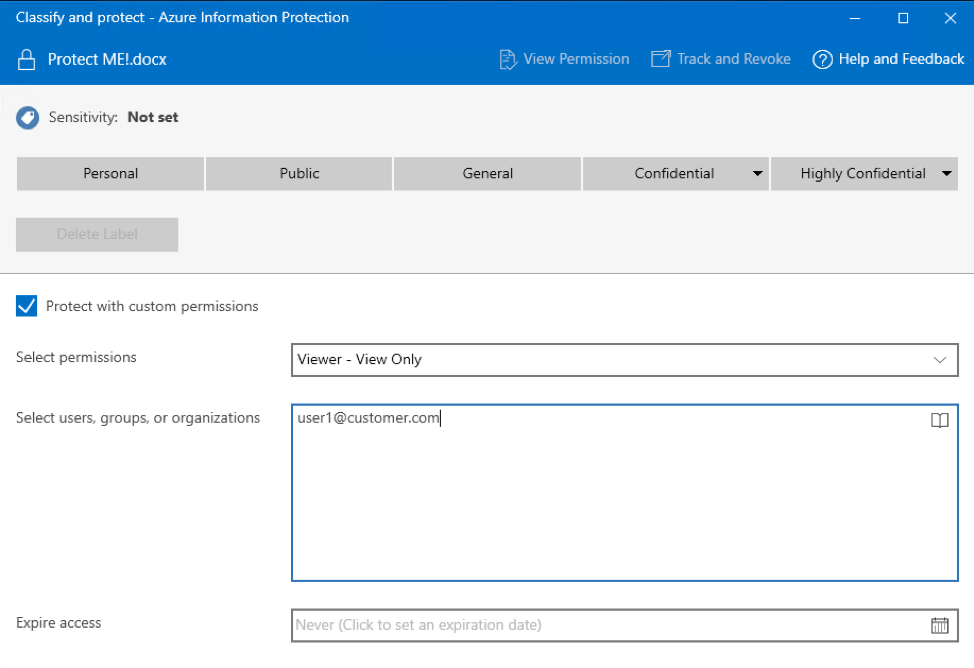
Here, I am specifying that [email protected] is allowed to view the document until March 01, 2019. After that, the user cannot open the document no matter how hard the user tries. ????
In this walkthrough, I created a similar protection against Oddvar.Moe [at] TrustedSec [dot] com, so I could send an email to myself in order to show how this looks on the client's side. First, you need to create an email like this:
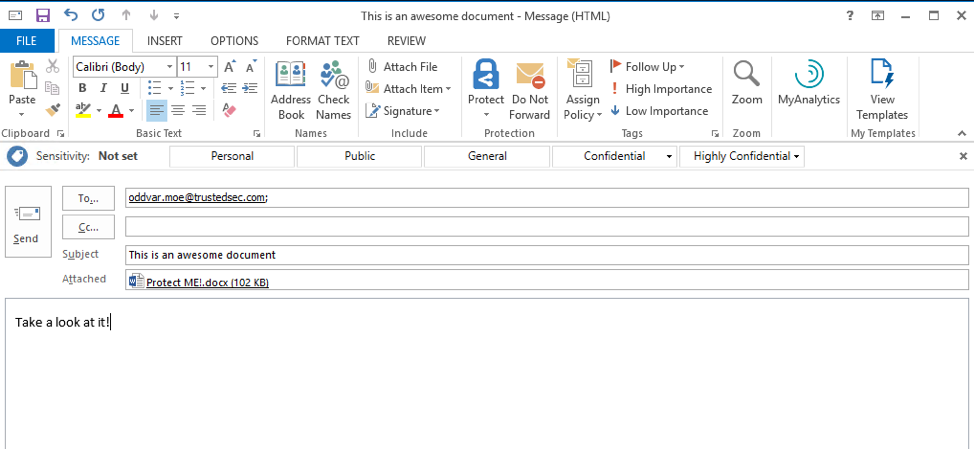
Notice that you also have a new 'Protect' button on the toolbar now. This is due to the AIP client. You can also enable the 'Do Not Forward' feature, so the user cannot forward the email to an analyst, and it also blocks the possibility of printing or copying the content. This will make it harder to report the phishing attempt. In this walkthrough, the 'Do Not Forward' was used. It will also make it impossible to inspect unless the solutions can impersonate the user. There could be products that already do this, but I am currently unaware of any.
After the protection setting is turned on and the email is sent, it will look like this on the receiver side:

Notice that there is a lock icon next to the attachment, which makes users feel safe. The preview of the email states: 'This message with restricted permission cannot be viewed in the reading pane until you verify your credentials. Open the item to read its contents and verify your credentials.'
The user cannot preview the message since it requires authentication to verify that the user is the designated recipient. When the user opens the email, this happens:
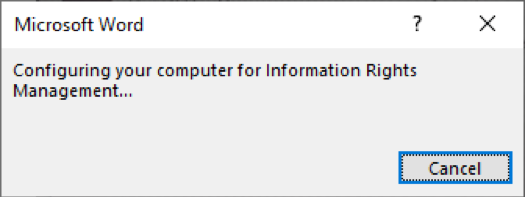
In the background, it tries to log the user into Office 365 to verify its identity, and when it is successful, the user can view the content of the email and open the attachment. Interesting things you will see when you are experimenting with this are that the forward button is gone, you are not allowed to right-click and copy or do ctrl+c, and doing screenshots does not work.
Since this is not possible to screenshot, I took a picture with my phone to show what the user experience looks like:
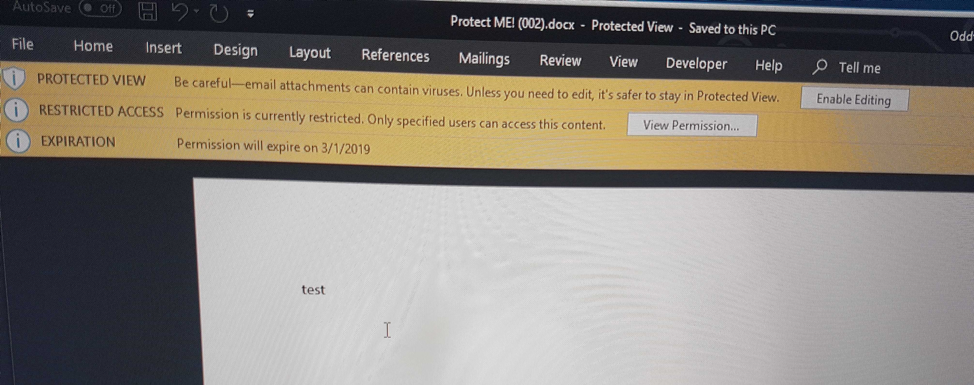
You can see that the expiration will show and that the document is restricted access. If the user saves this document, copies it to a USB, and some other person attempts to open it, they will be unable. Even if the user decides to upload this to VirusTotal, the content of the file cannot be analyzed. There are some exceptions to this rule, however, because the AIP has some limitations in the protection of older formats, such as .doc and .xls. In my testing, if you create a vanilla macro payload using .doc or .xls, the macro does not get encrypted with AIP, but the content itself will be.
In this walkthrough, I saved the document to disk and sent it in a new email to my Gmail account to show how that works:

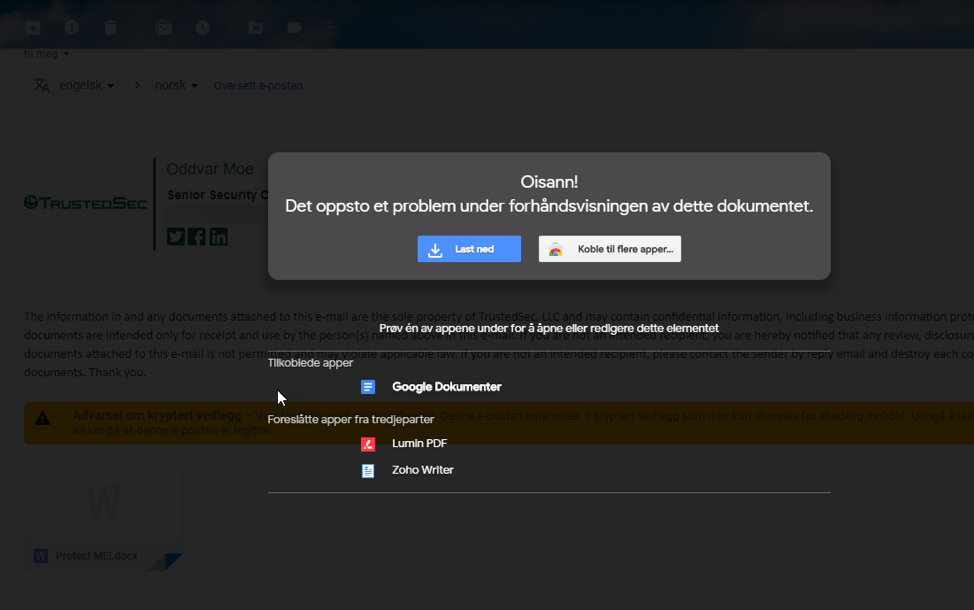
This is an error message telling me that I am not able to open this document inside Gmail (it is in Norwegian). It also states as a warning that the email contains encrypted content and could contain malicious content.
Now comes one of the cool parts of the walkthrough. You see, we are also able to track this document as it spreads out and people try to open it, which is perfect for phishing scenarios. To do this, log on to the portal.azurerms.com or on your VM where you protected your document, right-click the document again, and choose the 'Classify and protect' option. From here, you can click the 'Track and Revoke' button on the top bar:
This will open a web browser and take you to the Azure RMS portal automatically and it should look something like the screenshot below:
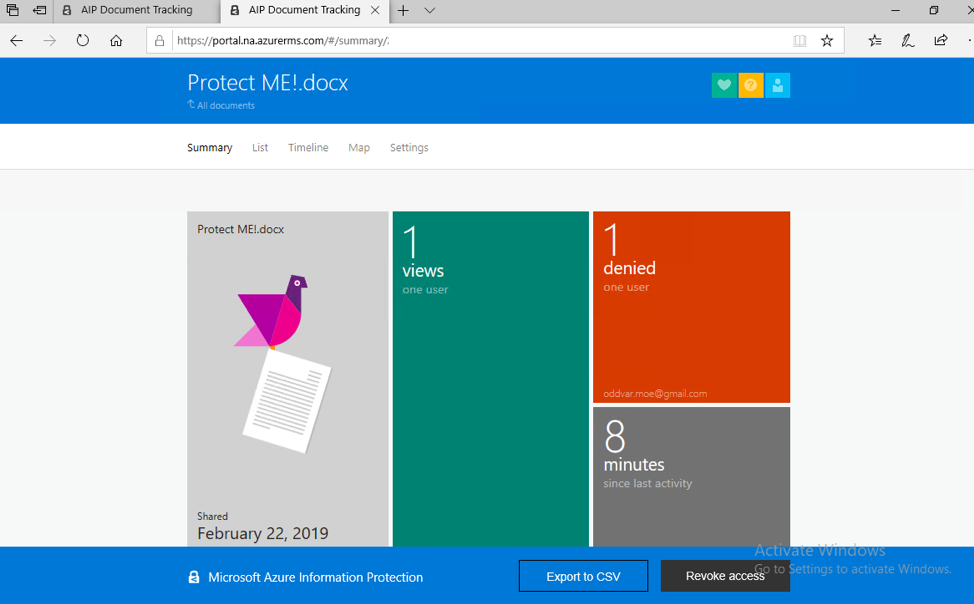
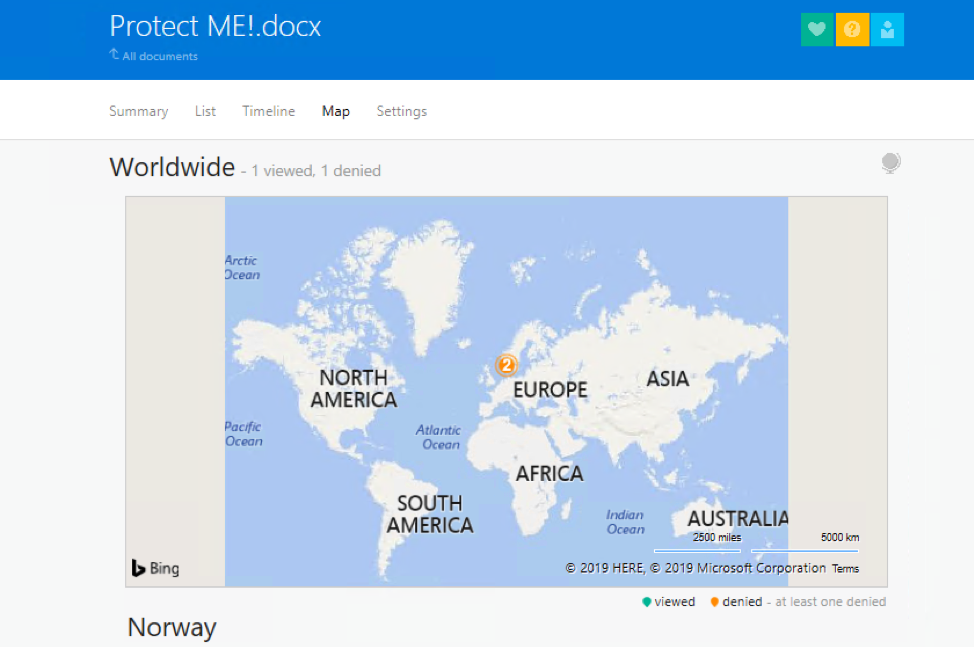
Here we get details on when the document was shared, who tried to view the document, and who was denied access. If you want to see who viewed it, you can click on the green 'views' column or the list link:
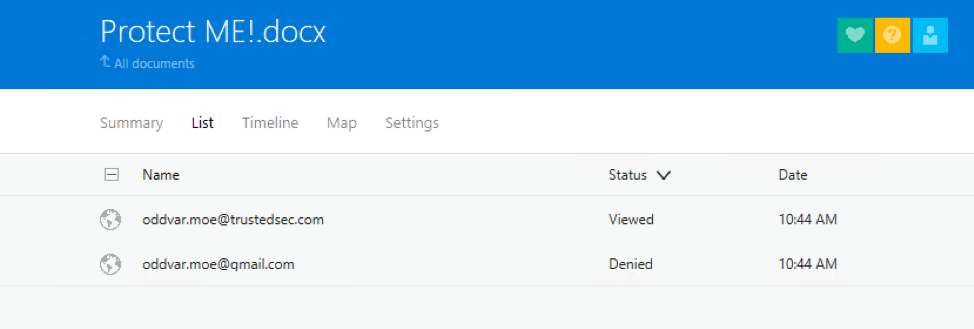
We can see that Oddvar.Moe [at] TrustedSec [dot] com (the intended recipient) has viewed the document and Oddvar.Moe [at] TrustedSec [dot] com was denied, meaning he got access to the document and tried to open it.
You can also click on the map and see from where they tried to open the document:
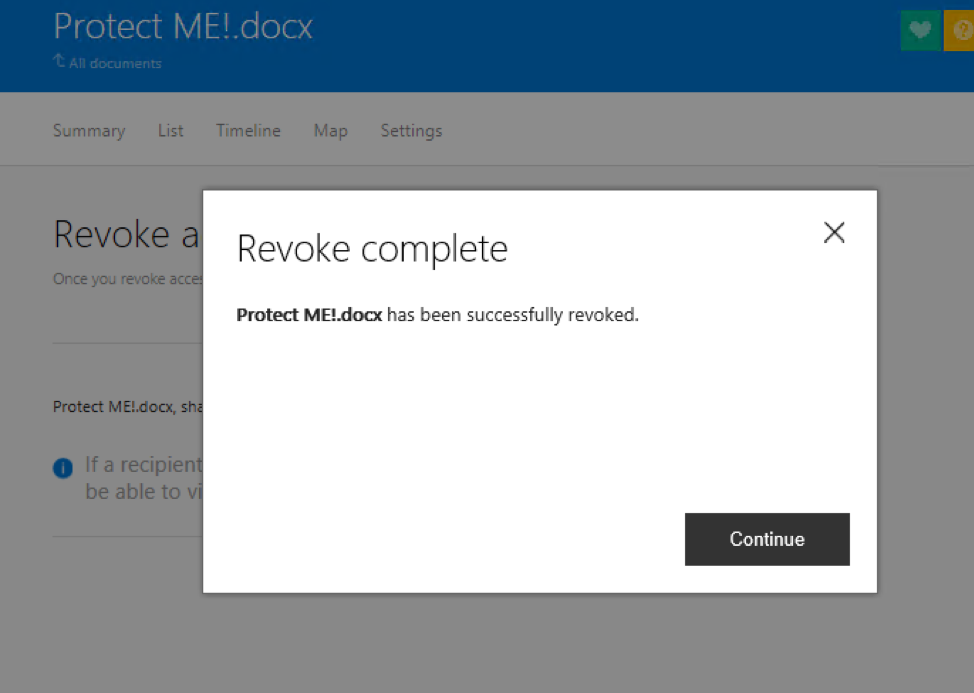
If we want the document to be revoked, we can click the revoke access, but this will in most cases not have any affect if the user has already opened the document. If a user has opened the document, they will have access 30 days after they opened it unless you specified 'Expire access.' It can be useful if you have sent a document to multiple users and want to block it for others who have not opened it yet. To revoke, simply click on the 'Revoke access' button:

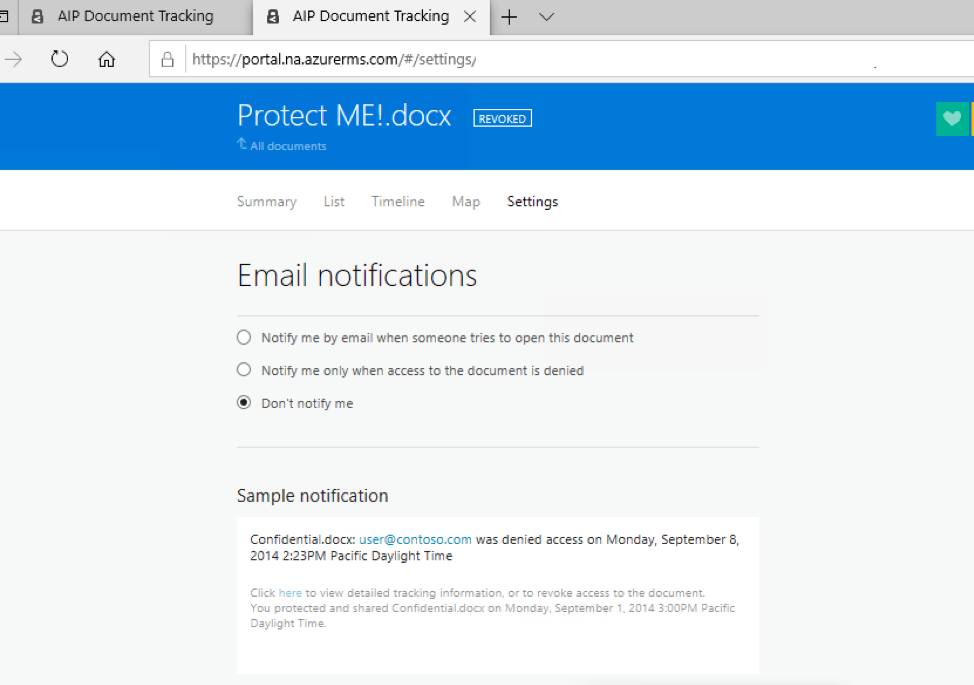
Another cool thing is that you can configure notifications if someone tries to open the document.
Defense
Protecting against phishing attacks that use AIP can be tricky. The easiest method (unless you have a product that supports inspection of AIP-protected documents) is to block/quarantine all incoming AIP-protected email at the gateway level. If your organization already leverages AIP on a day-to-day basis, however, then blocking is probably not an option. In these cases, I recommend that organizations do extensive user awareness, perform hardening as much as possible, and build up detections as much as possible when bad things do happen. Also, consider whitelisting partners that are allowed to send AIP-protected documents and perform quarantine of the rest so that attackers are halted. If you know there are phishing attempts and it is targeted toward specific users, you must either be able to impersonate the user or be allowed to borrow their access to open the attachment as them to exfiltrate the macro code.
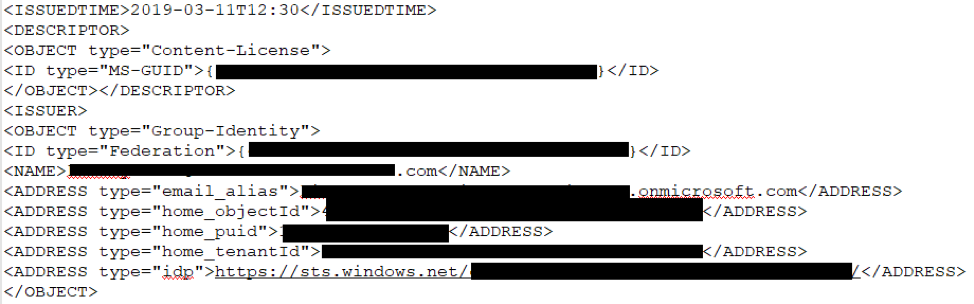
In terms of inspection, there are some interesting artifacts when AIP is in play. One of the key places to look for interesting data is in the file itself. The first thing you can do to investigate is to use 7-Zip to unpack it to the file system. As you can see on the structure, it is quite different from a normal .docx when AIP is in use.
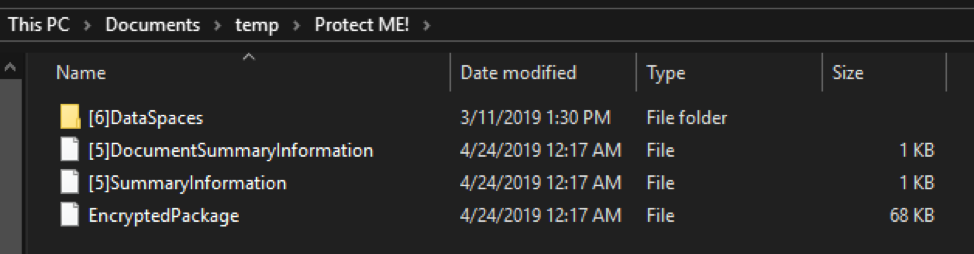
The files of interest that I have found are the ones buried under [6]DataSpaces -> TransformInfo -> DRMEncryptedTransform.

These files contain some interesting artifacts such as sender address, tenant ID, and alias. The alias is often an email address with the tenant name and not the custom domain.
I have searched for products that can inspect RMS content in transit but have not been able to find any specific product. This does not mean that these do not exist.
Some great research on RMS has been conducted in the past, and can be found here: https://web-in-security.blogspot.com/2016/07/how-to-break-microsoft-rights.html
Conclusion
AIP is meant to better protect privacy and data, and it is only natural that attackers have started to use this to their advantage. AIP has many advantages for an attacker, such as protection of the exploit code that the attacker uses, the difficulty of being detected by defenders, and its trustworthy appearance, with the lock visible in the inbox. At TrustedSec, we have used AIP in several engagements already and have had great success using this as part of our phishing attacks. There are, however, very limited options in terms of inspecting this in transit. In order to, for example, successfully reverse the macro code that is delivered in an AIP-protected document, the analyst must be able to either impersonate the user completely or 'borrow' their credentials to view the content of the attachment. My conclusion is that this can be an 'easy' attack to detect but difficult to analyze, and I am pretty sure we will see more of these attacks in the near future as DRM products are leveraged more and more.