SDR: Entering the Noise Floor
First, I would like to preface this article by saying that gr-limesuite and the LimeSDR drivers are updated fairly regularly. Some of the issues that I have encountered in the past have been remedied by recent updates. With that said, the information in this article should remain relevant, but the pictures may vary with subsequent updates to the gr-limesuite blocks.
In my last post I talked about some of the hardware considerations for software defined radio (SDR). In this article, I will cover some potential hurdles when dealing with the software-side of SDR. This article will primarily be focused on the LimeSDR Mini, since there aren’t as many projects that use this device as a reference point. This can be a source of frustration, especially when attempting to transmit with a LimeSDR Mini.
Let's assume that you have GNU Radio installed using the PyBOMBS method because you followed some instructions for the HackRF One or another SDR. If you haven't done this, I will have a brief list of commands to install the required files to get GNU Radio and LimeSDR up and running at the end of the article. In order to get the most out of your device, it's helpful to have 'limesuite', 'gr-limesdr', and 'soapyrtlsdr' installed via PyBOMBS. To do this, navigate to your SDR PyBOMBS directory (several guides have this as ~/sdr) in your terminal and type pybombs install limesuite gr-limesdr soapyrtlsdr. After waiting a while for that to install, you can double check that the device is recognized by typing LimeUtil --find into your terminal. This should bring up some information about your device, such as the hardware and serial numbers. If that worked, it's time to fire up GNU Radio!
Now that GNU Radio is able to run and your computer is able to find your LimeSDR Mini, it’s time to build a flowgraph in GNU Radio to test receiving and transmitting. For this, I will be using an inexpensive ham radio (optional) and two antennae that are tuned for various frequencies allotted to amateur radio.
A quick side note: if you plan on transmitting, you should have an amateur radio license. At the very least, your transmitting power should be as low as possible, filter the data that is transmitted, and keep transmission times to a few seconds.
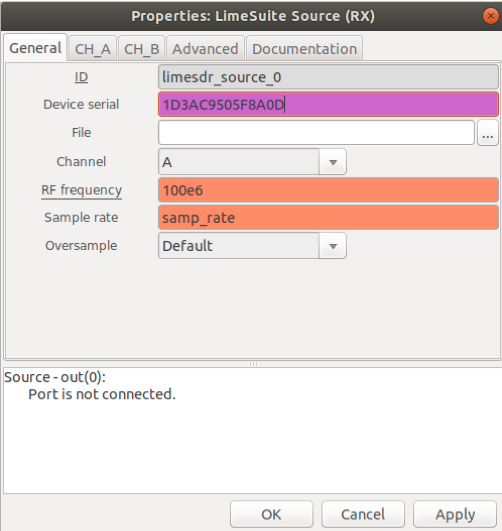
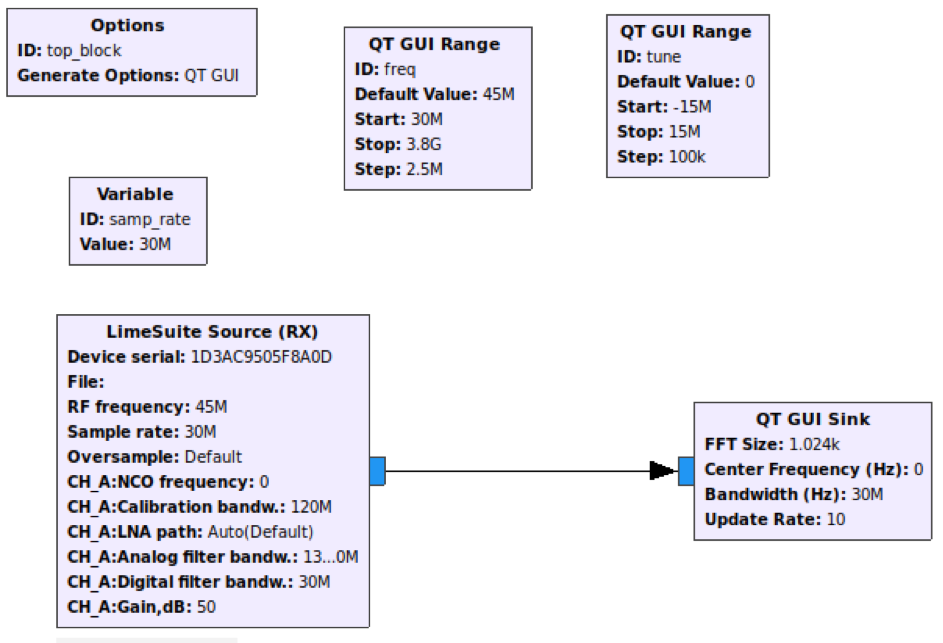
First, let's place our newly installed LimeSuite Source block into a flowgraph. Don't worry about the RF frequency quite yet, but the serial can be found by issuing 'LimeUtil --find' in your terminal.

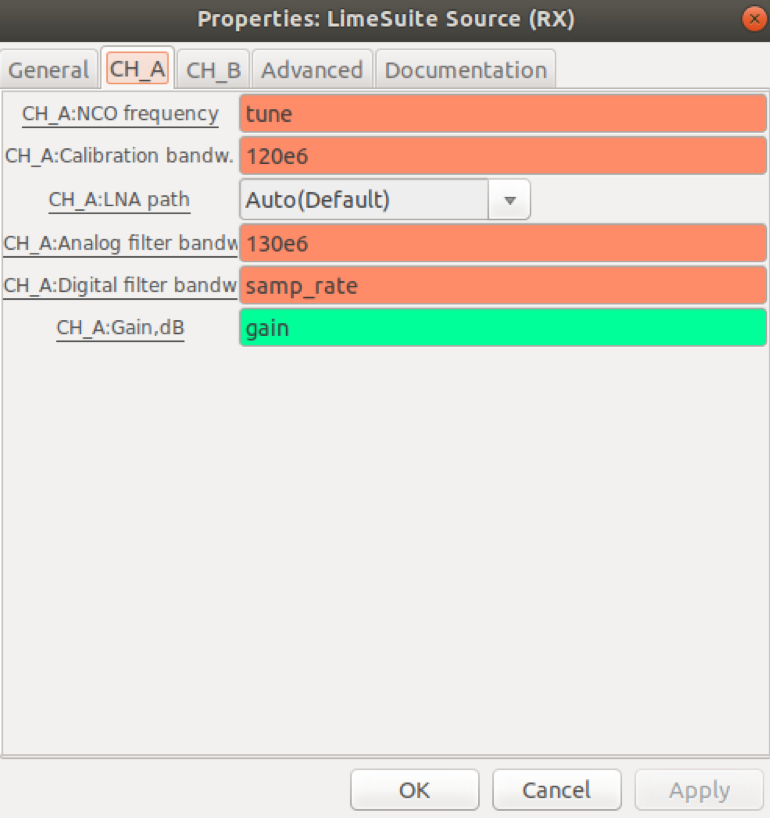
Most of the options for the LimeSuite blocks are covered pretty well in the Documentation tab, but there are a couple of caveats. Occasionally, GNU Radio will appear to lock or freeze when attempting to monitor between 10 MHz (megahertz) and 30 MHz. This has become less of an issue with recent updates, but it still happens. One way to potentially avoid this issue is to reduce your sampling rate to under 5 MHz. The better way to observe below 30 MHz is to use the numerically controlled oscillator (CH_A: NCO frequency) and use this to offset your signal capture, but this is only useful when you know where your signal supposedly lives and it will miss 5 MHz (10 - 15 MHz) as the NCO has a maximum value of +/-15. This same functionality can be achieved by connecting your LimeSource block and a signal source block with a multiply block, though this may increase the complexity of your flowgraph and have an effect on the performance. Another item that isn't explicitly defined in the Documentation tab is what low-noise amplifier (LNA) path should be selected for different frequencies. Granted, 'Auto (Default)' should give you the correct LNA path for the given frequency, but in the past, this feature didn't exist.
The various LNA paths and frequencies are as follows:
- LNAW - from 10 MHz to 2 GHz
- LNAH - from 2 GHz to 3.8 GHz
- LNAL - Loopback/NA
Now that the LimeSuite Source block is in place, let's add some blocks to explore the spectrum. Let's add three (3) QT GUI Range variable blocks and a QT GUI Sink. Then we'll modify the variable 'samp_rate' (a block that comes default with a new project) to 30e6 (30e6 is the scientific notation for 30 MHz). By setting the sample rate to 30 MHz, the SDR will be able to monitor 15 MHz above and 15 MHz below the center frequency. Monitoring this much space can be hardware intensive, but at this point, we are not doing any processing of the information, so this shouldn't be a concern. Let's change the ID of one of the range blocks to 'freq' and this will be set to cover most of the range the SDR can cover. In our case, that would be 30e6 (30 MHz) to 3.8e9 (3.8 GHz). One of the range blocks will be used to control the NCO and adjust what our QT GUI Sink displays. As stated before, the maximum value for the NCO is +/- 15e6 and I set the ID for this to 'tune'. The last range variable will be used for gain control - 0-70. By changing the NCO and RF frequency to range variables, we will be able to change our center frequency with a few clicks of a button while the graph is running and see the results in real time.
Once our variables are set, let's plug them into the LimeSuite Source block. The 'RF frequency' field will be 'freq', on the 'CH_A' tab to look like the following:
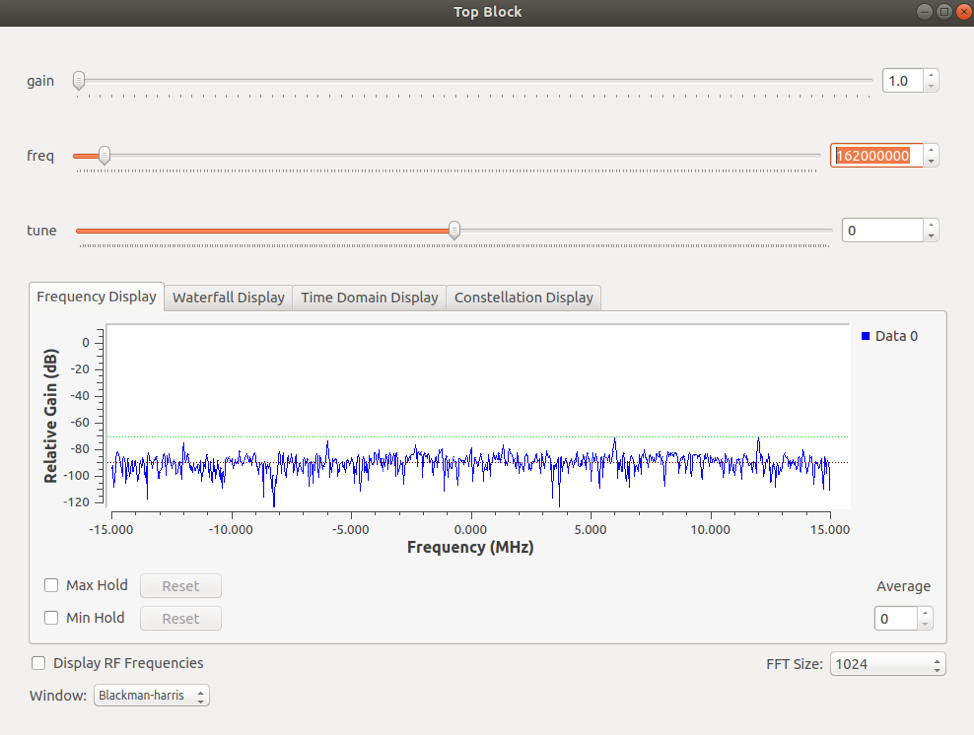
Hopefully, when it's all up and running, you'll see something like the following:
Before we continue to the next part on transmitting, I want to reiterate that you should have your amateur radio license if you plan on transmitting. Also, this part will require either two antennae (one to transmit and another to receive) or an inexpensive ham radio. I picked up a handheld amateur radio from amazon for under $30 and it's been a fun toy outside of the SDR realm too. First, let's record some audio in a program such as Audacity, save it as a WAV file, and make sure the sample rate is set to 48 kHz (kilohertz). This will help simplify the resampling process later on.
Now that we have a basic way to view the frequency spectrum and some sound we want to send, let's add a few blocks to transmit. There are several tutorials available on how to receive (demodulate) FM broadcasts. The process for transmitting (modulating) is basically the same process in reverse. First, let's reduce our sample rate (samp_rate variable) to 4 MHz. To start the modulation process, we will add a WAV source block with your recorded audio as the file location and a WBFM Transmit block. The audio rate and quadrature rate for the WBFM Transmit block are both going to be 48 kHz and the rest will be defaults. Just a reminder, quadrature rate is just a fancy way of saying sample rate.
Next, we'll add a Rational Resampler block to change our sample rate from the audio file to what our LimeSDR Mini is using. To accomplish this, set the interpolation to 4e6 and the decimation to 48e3. An easy way to remember what value is supposed to go where is to think of it as dividing (decimating) by the source signal rate and interpolating (multiplying) by the destination signal rate. In this case, it would be 48,000 divided by 48,000, which equals 1. This is then multiplied by 4,000,000 (our target sample rate) and that is the sample rate that gets passed to the rest of the flowgraph.
The last two (2) blocks are relatively self-explanatory - the Low Pass Filter and the LimeSuite Sink (TX). In this case, the Low Pass Filter may not be necessary, but it's a good idea to try and limit the transmitted signal using some filtering to help limit the RF pollution.
For the LimeSuite Sink, the main thing that needs to be changed is the RF frequency. In this instance, I chose a vacant frequency in the 70-centimeter band. One thing that caused me trouble in the past was knowing what amplifier (PA) path should be selected. Now that there is an 'Auto' feature, much like the LimeSuite Source block, this is less problematic. In the event that the 'Auto' feature is removed in the future, it's helpful to know that Band2 is for 10 MHz to 2 GHz (gigahertz), our use case, and Band1 is for 2 GHz to 3.8 GHz.
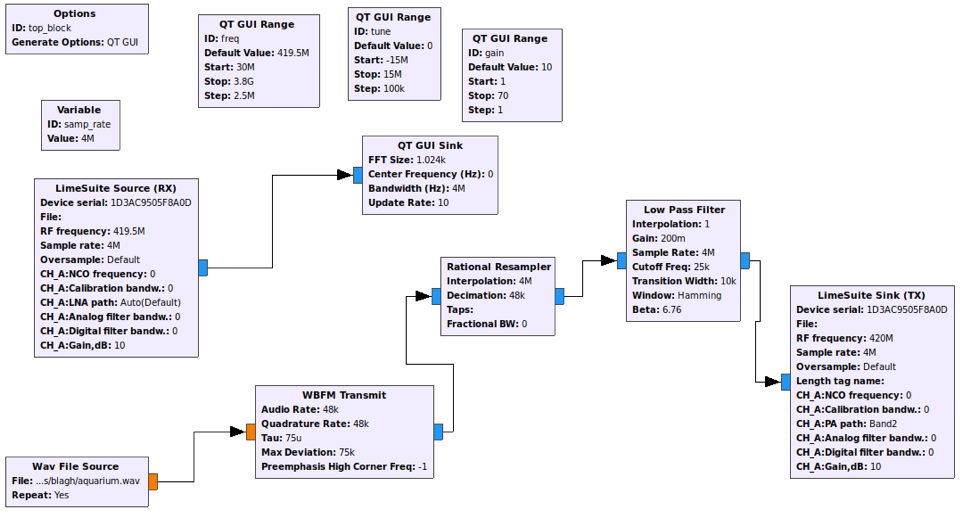
If you didn't notice in the flowgraph above, I changed the LimeSuite Source's RF frequency to be 500 kHz below the transmitted signal. This is to help draw emphasis to our transmitted signal when looking at the waterfall plot since the DC offset, the solid red line at 0 Hz (hertz), can obscure the signal. You might need to fiddle with the gain of both the RX and TX blocks, but you should see your transmitted signal.
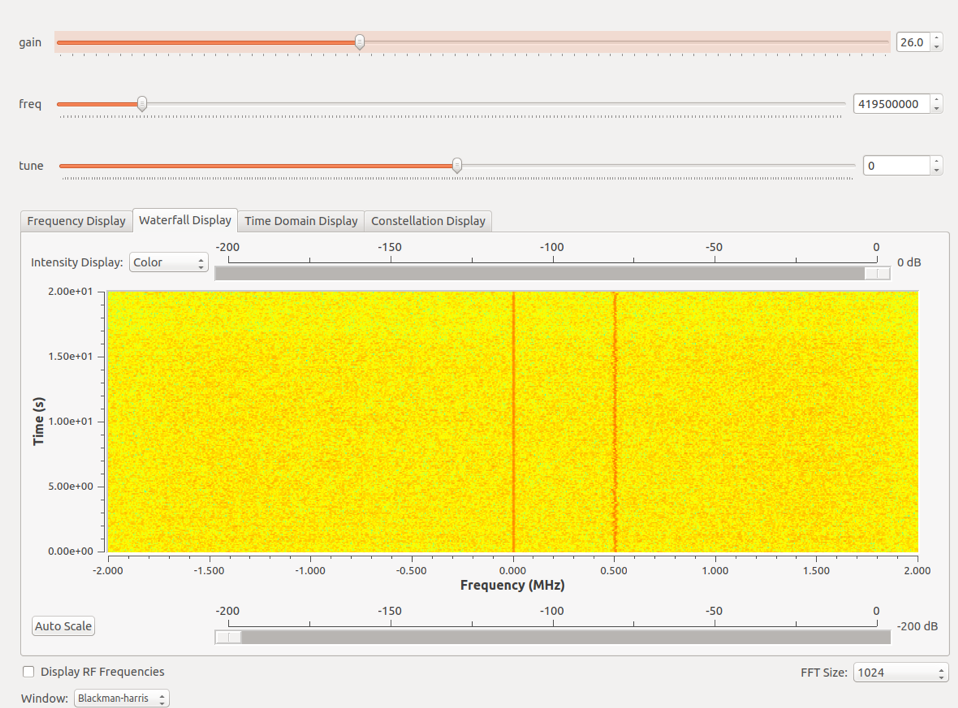
If you have a ham radio, you can even tune to the frequency you're transmitting on and listen to it there. The audio may be a little distorted, but it's not too bad for being a quick and dirty project.
Below are some references that can help clear up the muddy waters of SDR:
https://wiki.myriadrf.org/Gr-limesdr_Plugin_for_GNURadio
https://wiki.myriadrf.org/LimeSDR-Mini_v1.1_hardware_description#RF_Frequency_Range
http://fieldxp.com/Chapter-2-Installing-the-Software.pdfhttps://greatscottgadgets.com/sdr/
Installation Commands
Below is a very condensed version Paul Clark's guide to installing GNU Radio, as well as the HackRF One from his Field Expedient SDR book series (I can't recommend it enough), though it has been modified for the LimeSDR devices.
In your terminal issue the following:
sudo add-apt-repository -y ppa:myriadrf/drivers
sudo apt-get update
sudo apt-get install git libyaml-dev libssl-dev python-dev python-pip
mkdir ~/sdr
cd ~/sdr
sudo pip install PyBOMBS
pybombs recipes add gr-recipes git+https://github.com/gnuradio/gr-recipes.git
pybombs recipes add gr-etcetera git+https://github.com/gnuradio/gr-etcetera.git
pybombs prefix init ~/sdr -a myprefix
pybombs install gnuradio gr-osmosdr limesuite gr-limesdr soapyrtlsdr
source ~/sdr/setup_env.sh
Edit ~/.bashrc file to have source ~/sdr/setup_env.sh at the end of the file.
From your sdr directory (~/sdr) locate the limesuite.rules file:
find . -name *.rules | grep -i limesuite
The previous command should yield the path to a file named something like 64-limesuite.rules and copy this file to /etc/udev/rules.d/
After you copy the limesute.rules file to /etc/udev/rules.d/ unplug the device if it was plugged in and plug back in. If everything went well, you should be able to find your device by typing the following in your terminal:
LimeUtil --find
Now you should be able to see some device information.
There are just a couple more packages to install for graphical support in GNU Radio.
sudo pip install PyOpenGL PyOpenGL_accelerate
If everything went well, you should be able to type: gnuradio-companion in your terminal and start tinkering with your SDR device.